Managing vantage6 server via the user interface
Last updated on 2024-09-24 | Edit this page
Overview
Questions
- What is the permission system in vantage6?
- What are the default roles in vantage6?
- How to create a new organization using vantage6 user interface (UI)?
- How to create a new user using vantage6 UI?
- How to create a new collaboration using vantage6 UI?
Objectives
- Understand the permission system of vantage6
- Understand the default roles in vantage6
- Be able to create a new organization using the vantage6 UI
- Be able to create a new user using the vantage6 UI
- Be able to create a new collaboration using the vantage6 UI
Vantage6 permission system
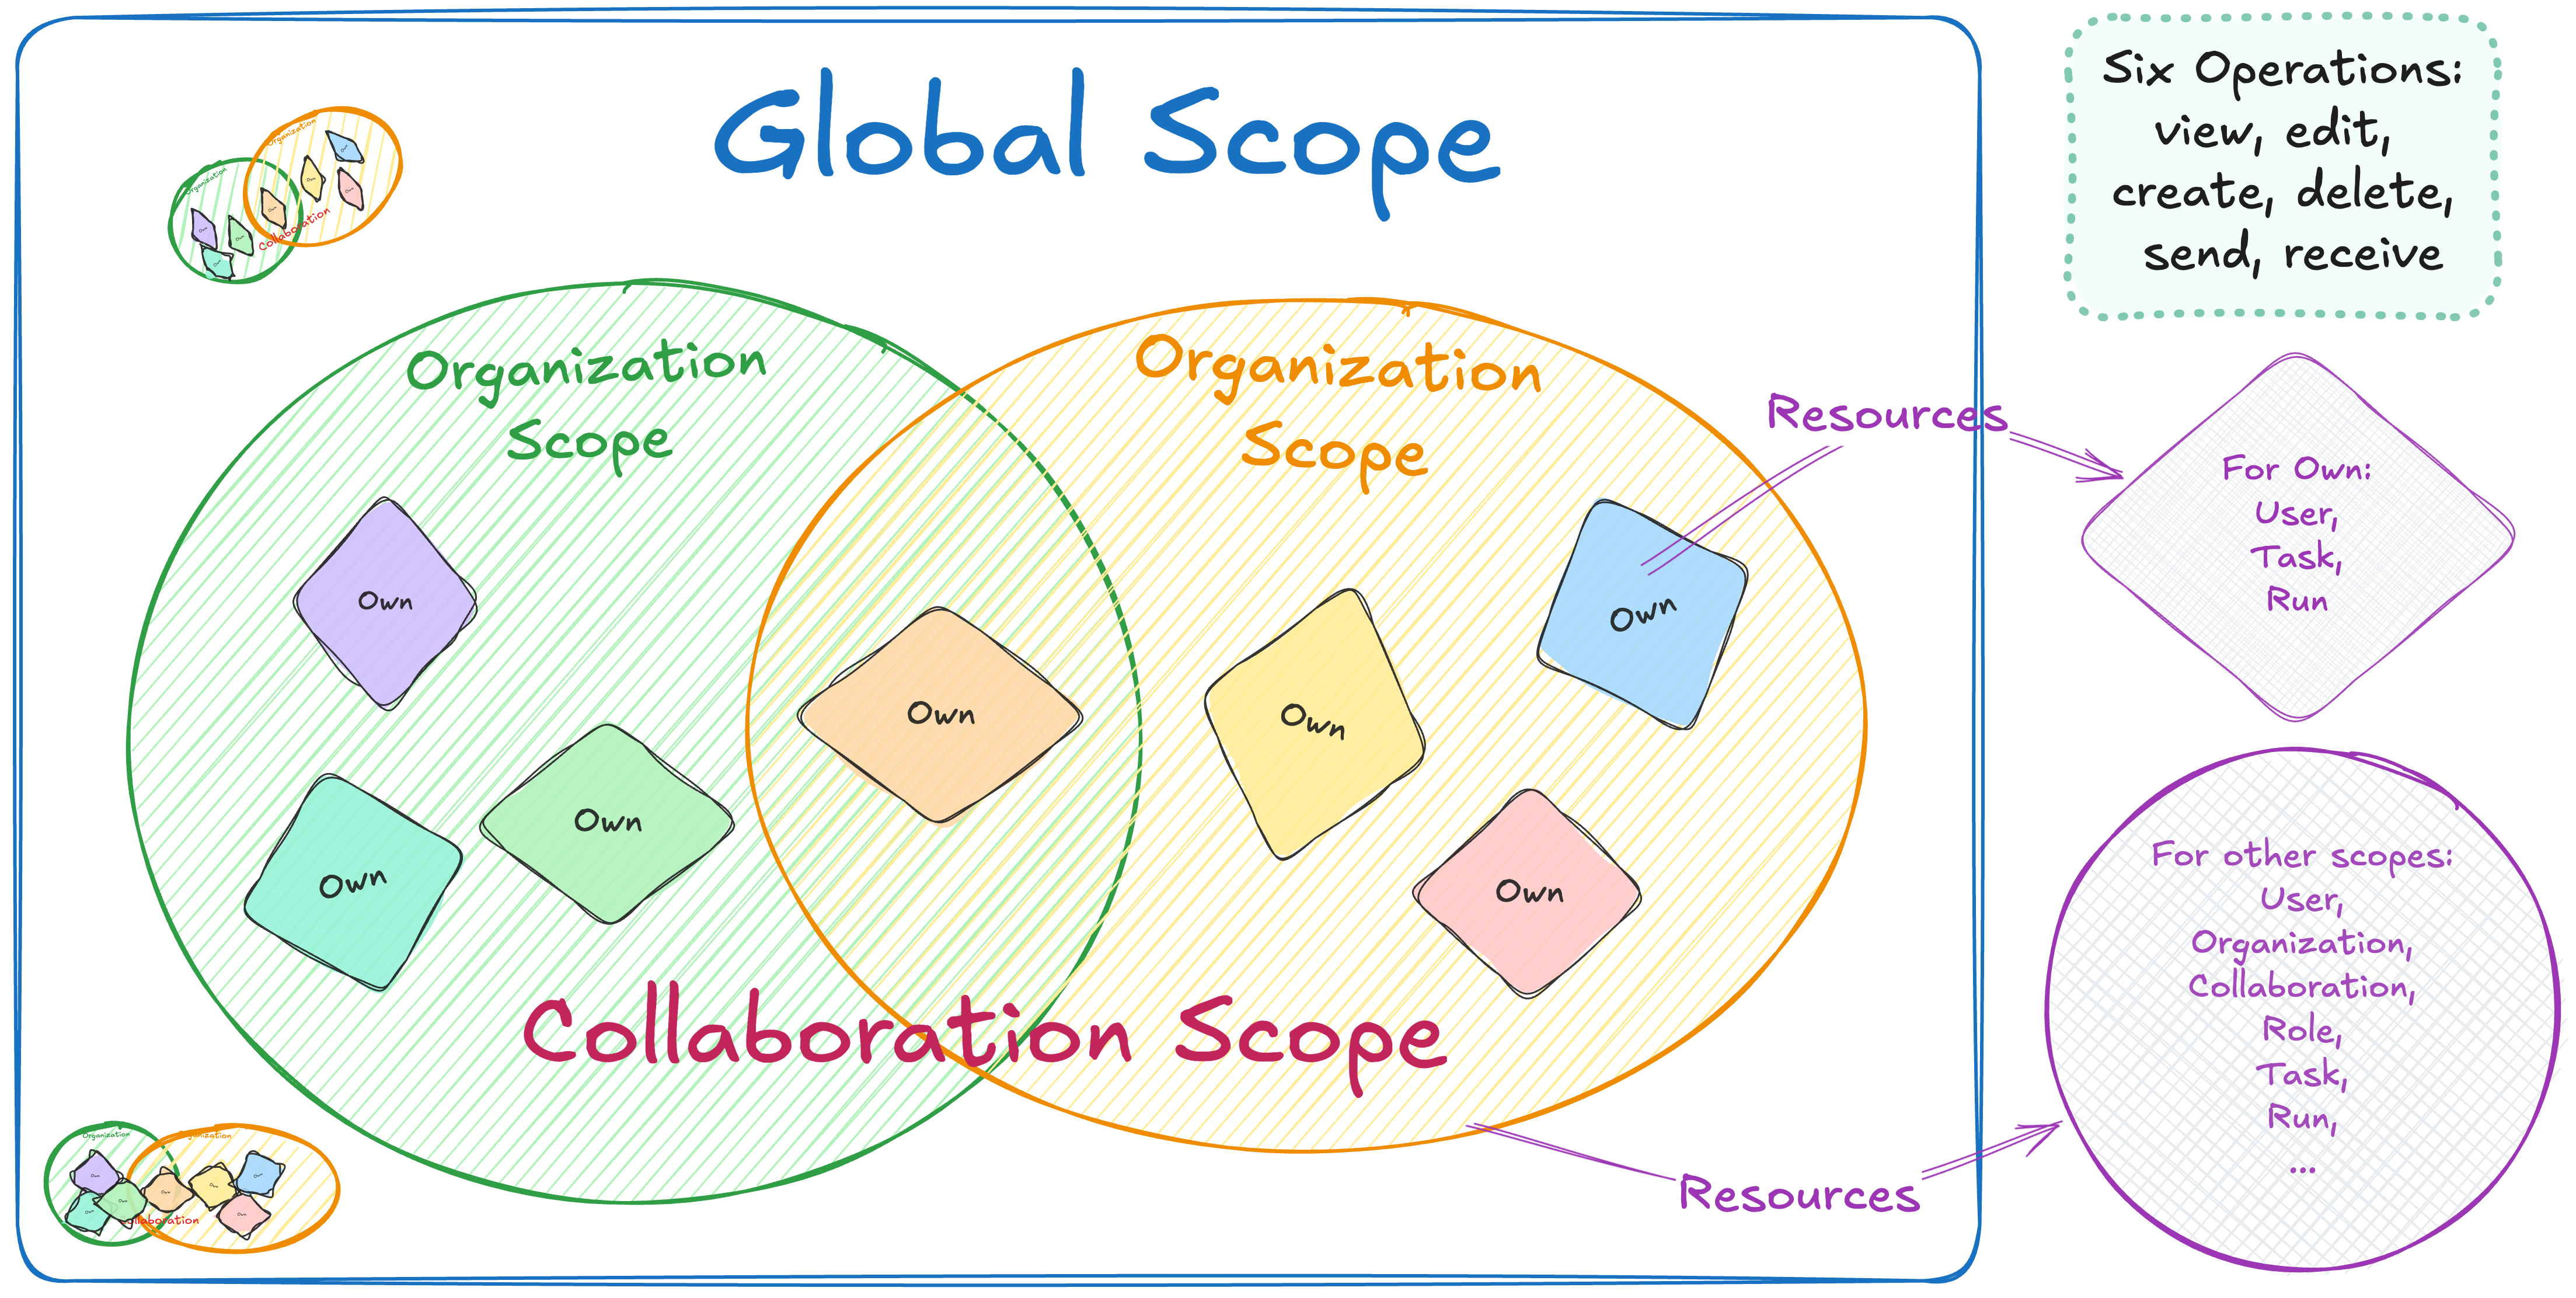
Vantage6 uses a permission system to control who can do what in the system. The permission system is based on roles, which are collections of rules that define the permissions of a user. A user can have multiple roles, and the permissions of the user are defined by the assigned rules.
The permission rules define what each entity is allowed to do, based
on the operation (view, create, edit, delete, send, receive), the scope
(own, organization, collaboration, global), and the resource
(e.g. users, organizations). Users can be assigned anywhere between zero
and all of these permission rules. For example, having the rules with
create in the scope organization for the
resource user means that the user can create users for the
organization they belong to.
There are six operations: view, edit, create, delete, send and receive. The first four correspond to GET, PATCH, CREATE and DELETE requests, respectively. The last two allow users to send and receive data via socket events. For example, sending events would allow them to kill tasks that are running on a node. For more details about Send and Receive operations, see the vantage6 documentation.
The scopes are:
- Global: all resources of all organizations
- Organization: resources of the user’s own organization
- Collaboration: resources of all organizations that the user’s organization is in a collaboration with
- Own: these are specific to the user endpoint. Permits a user to see/edit their own user, but not others within the organization.
Note that not every resource has all scopes and/or operations. For
example, the collaboration resource does not have
create operation for the organization scope,
as it does not make sense to create a collaboration that only your own
organization can participate in.
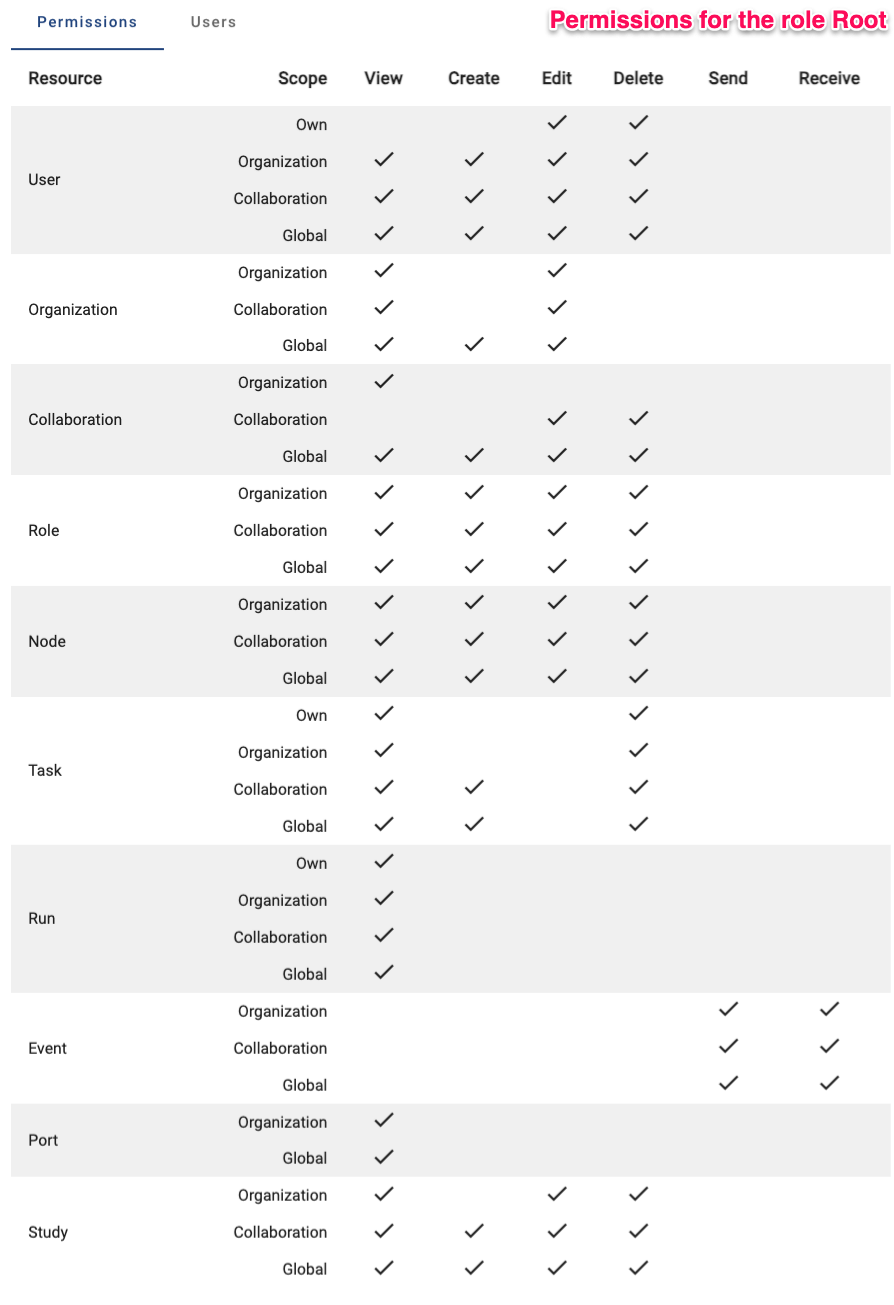
To make it easier to assign permissions, there are also predefined roles:
- Root: has all permissions (👉 see image below)
- Collaboration Admin: can do almost everything for all organizations in collaborations they are a member of
- Organization Admin: can do everything for their own organization
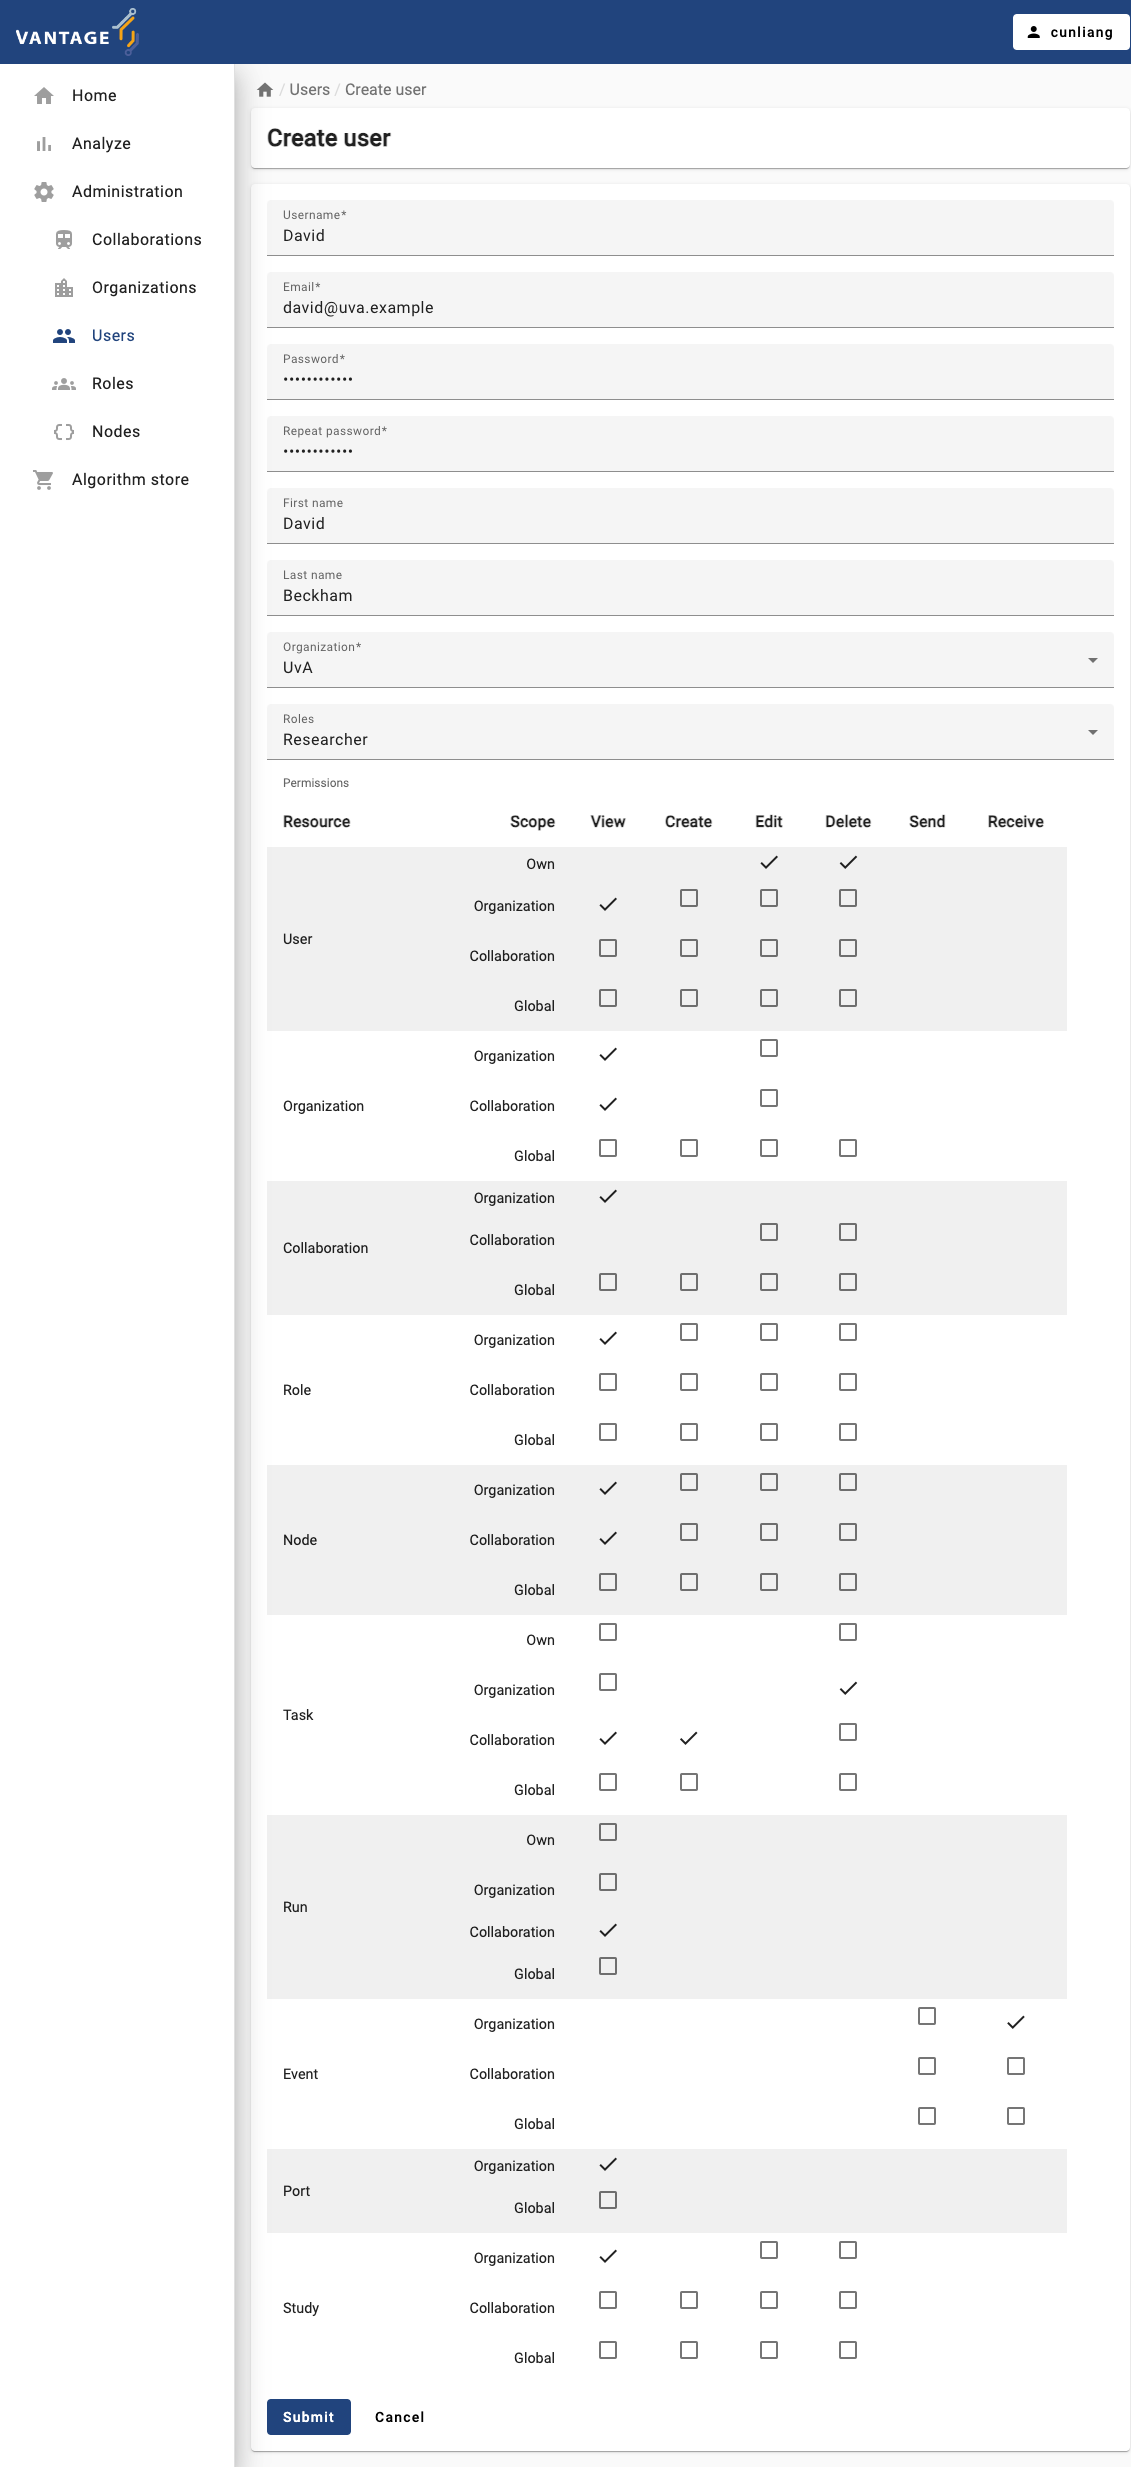
- Researcher: can view the organization’s resources and create tasks (👉 see image below)
- Viewer: can only view the organization’s resources
The permissions are set up in the Roles tab in the
administration page. You can click on a role to see the permissions of
that role. You can also create a new role by clicking the
Create role button.
The permission structure allows for a lot of flexibility, but it can be complex for beginners to set up. The default roles provide a quick way to set up permissions, but it is recommended to review them before using them in a project.

Challenge 1: What can you do in vantage6?
Go the administration page in the vantage6 UI, check the permissions that you have, and answer the following questions:
- What is your role in vantage6?
- Do you have the permissions to create a new organization, a new user or a new collaboration?
- Do you have the permission to remove an existing organization, a user, or a collaboration?
- Check it with your instructor.
- Yes, you should be able to create a new organization, a new user, and a new collaboration. If not, ask your instructor to give you the necessary permissions.
- Check it with your instructor.
Manage vantage6 project using the UI
In this section, we will go through the steps to create a new organization, a new user and a new collaboration using the vantage6 UI.
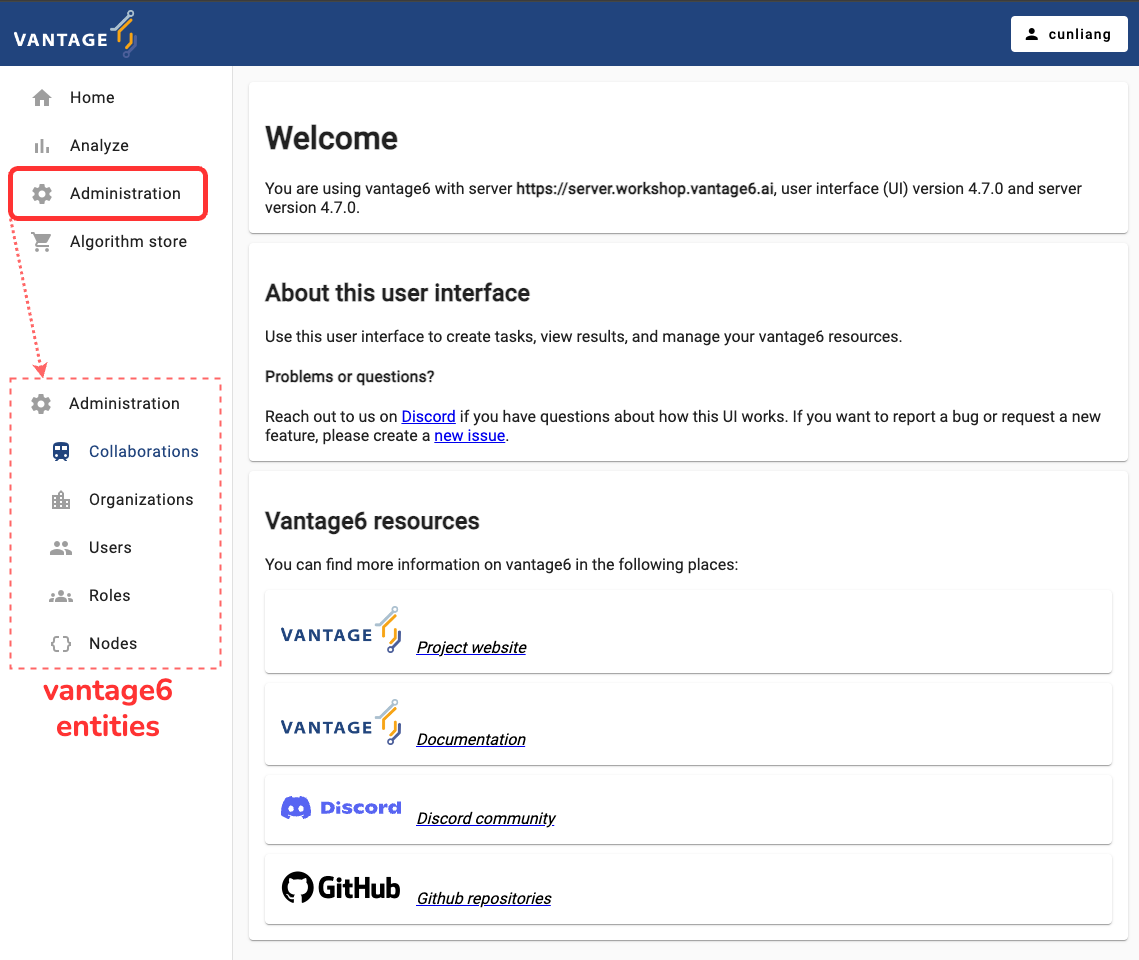
First you need to log in to the vantage6 UI, and then go to the
Administration page. You can find the
Administration tab in the left side of the start page.
Clicking on the Administration tab will show you all tabs
for vantage6 entities.
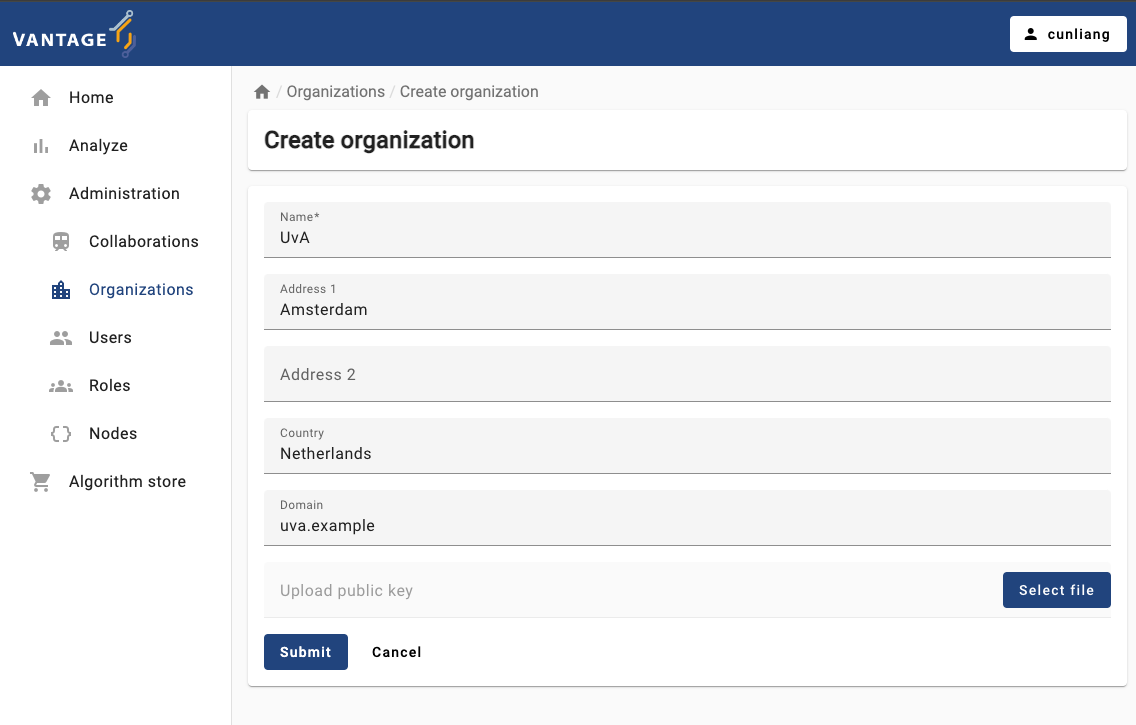
Create a new organization
It’s quite straightforward to create a new organization in vantage6. Here are the steps:
- Click on the
Organizationstab in the administration page. - Click on the
Create organizationbutton. - Fill in the details of the new organization.
- The
Upload public keyfield is optional. You can upload a public key for the organization if you want to use encryption in the collaboration. But note that we DO NOT use encryption in this course. For more details about encryption, see the vantage6 documentation.
- The
- Click on the
Submitbutton to create the new organization.
Create a new user
Now let’s create a new user for the organization we just created. Here are the steps:
- Click on the
Userstab in the administration page. - Click on the
Create userbutton. - Fill in the details of the new user.
- You can assign the user to an organization by selecting it from the
Organizationdropdown. Only one organization can be selected. - You can assign roles to the user by selecting them from the
Rolesdropdown. Here we assign theResearcherrole to the new user. You can give the user more permissions by assigning multiple roles or select the operation boxes in thePermissionssection.
- You can assign the user to an organization by selecting it from the
- Click on the
Submitbutton to create the new user.
Create a new collaboration
A collaboration is a collection of one or more organizations. Let’s create a new collaboration between two organizations. Here are the steps:
- Click on the
Collaborationstab in the administration page. - Click on the
Create collaborationbutton. - Fill in the details of the new collaboration.
- For
Encryptedbox, you can select whether the collaboration should be encrypted or not. - You can select the organizations that will participate in the
collaboration by selecting them from the
Organizationsdropdown. - By default, we select the
Register nodesbox. This will ensure the nodes of the organizations are registered in the collaboration. If you don’t select this box, you will have to register the nodes manually later.
- For
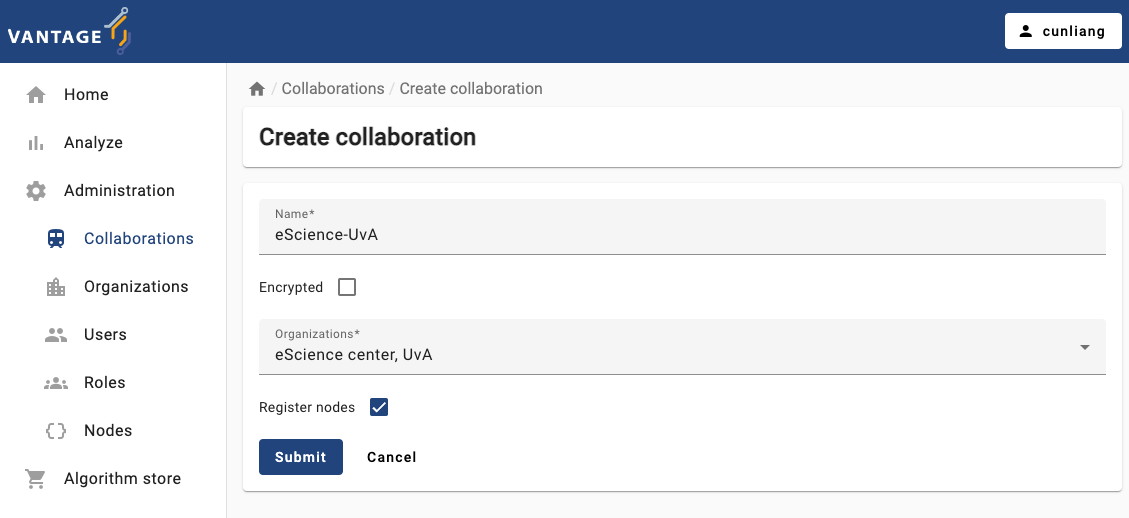
- Click on the
Submitbutton to create the new collaboration.- After submitting the form, you may see a dialog box to ask you to download the API key (on MacOS) or a dialog points out that the API key has been downloaded (on Windows). The API key is used to authenticate the nodes in the collaboration.
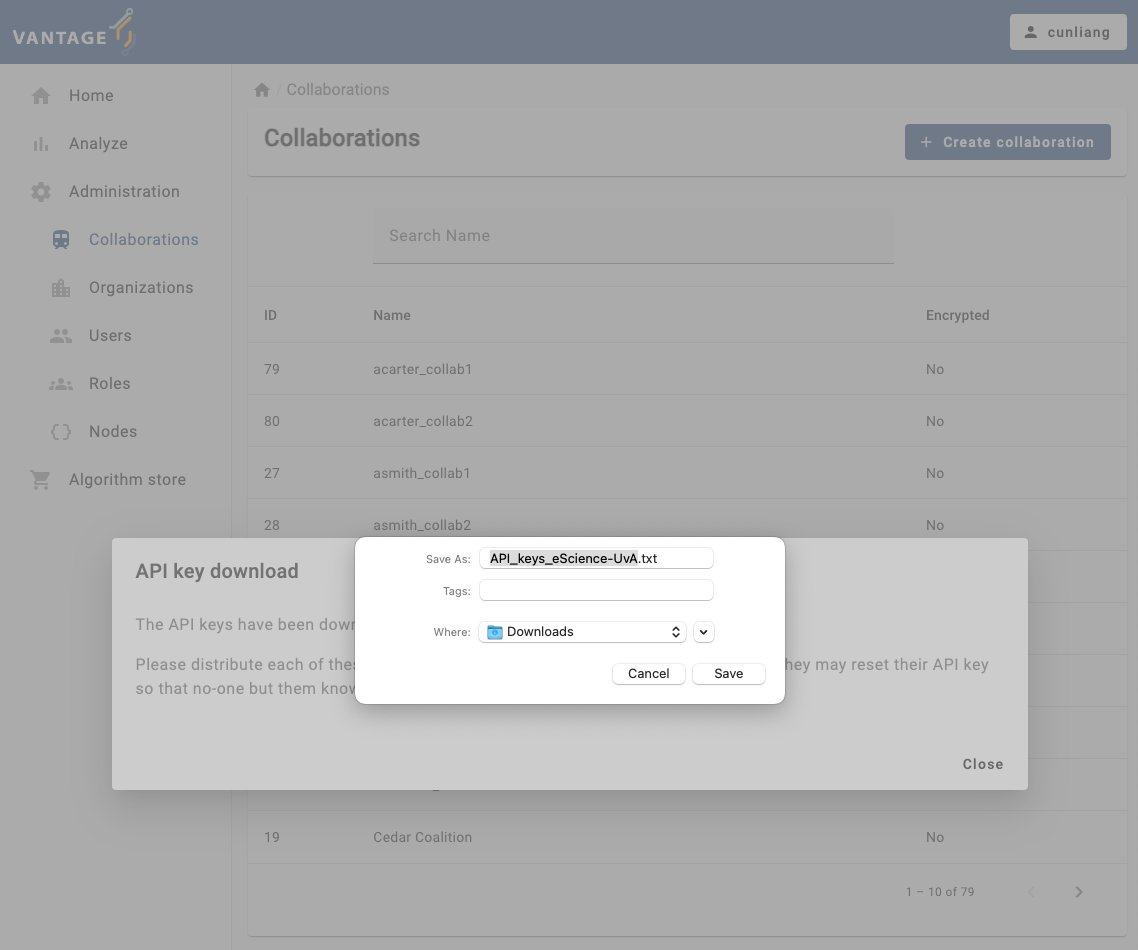
You will see a message:
API key download
The API keys have been downloaded.
Please distribute each of these keys privately to each of the organizations. Note that they may reset their API key so that no-one but them knows it.
You will need the API keys when you run the nodes to authenticate with the vantage6 server. Please save the API keys properly, we will need it in Chapter 6.
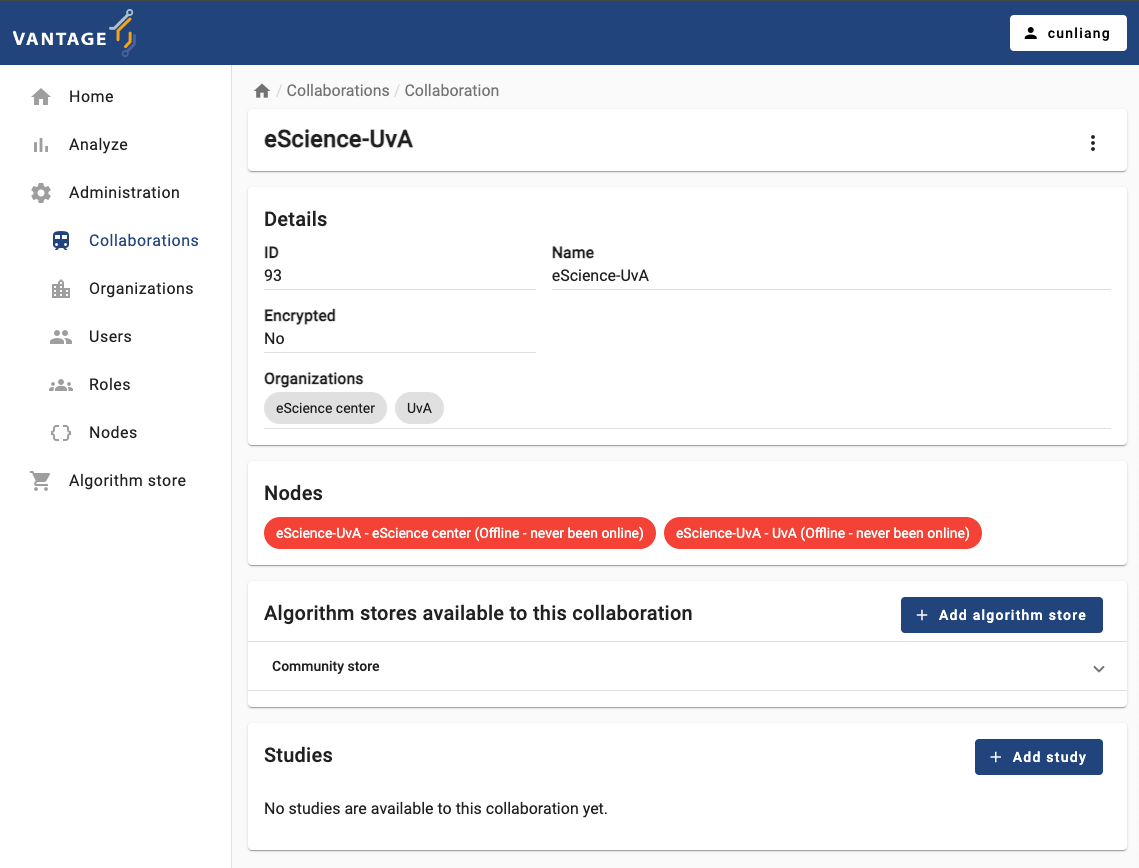
- After creating the collaboration, you can see the details of the
collaboration by clicking on the specific collaboration listed in the
Collaborationstab.- You will see what organizations are participating in the collaboration.
- You will see the nodes of the organizations that are registered in
the collaboration. In case one or more organizations did not register
their nodes when creating or updating the collaboration, you can
register them manually by clicking the
Register missing nodesbutton. Note that this button is not visible if all nodes are registered. - You can also see the algorithm store available for the
collaboration. You can add a algorithm store for the collaboration by
clicking the
Add algorithm storebutton. - You can also see the studies of the collaboration. You can add a
study by clicking the
Add studybutton.
Challenge 2: Manage vantage6 project using the UI
Go to the administration page in the vantage6 UI, and do the following:
- Create a new role
- Create a new user and grant them the new role you created
- Re-login to the vantage6 UI with the new user account and check if they have the permissions you granted them
- Vantage6 uses a permission system to control who can do what in the system.
- Vantage6 has default roles like
Root,Collaboration Admin,Organization Admin,Researcher, andViewer. - Vantage6 UI can be used to manage the entities of vantage6, like creating or deleting an organization, a user, or a collaboration.