All in One View
Content from Introduction to privacy enhancing technologies (PET)
Last updated on 2024-11-19 | Edit this page
Overview
Questions
- What techniques exist for analyzing data while protecting privacy?
- What are issues with only using data anonymization or pseudonymization?
- What are the building blocks to create a privacy enhancing analysis?
- What what are some non-technical challenges for performing privacy enhancing analysis?
Objectives
- Understand PET, FL, MPC, homomorphic encryption, differential privacy
- Understand how different PET techniques relate
- Understand scenarios where PET could be applied
- Understand horizontal vs vertical partitioning
- Decompose a simple analysis in a federated way
- Understand that there is paperwork to be done (DPIA etc.)
Introduction
In this course, we will explore how privacy-enhancing technologies (PETs) can support your research. On the first day, we will cover some of the core concepts of PET analysis, followed by a hands-on session where we’ll apply these techniques using the vantage6 user interface. We will also discuss how to manage PET analysis collaborations, one of the vantage6’s key distinguising features.
In the second part of the workshop, we will focus on the python client, which can do the same as the UI, but also much more. You will also learn how to create a federated algorithm using the platform’s algorithm tools.
This course provides a high-level overview of PETs, focusing on their practical applications in data analysis. While we won’t dive into the detailed mathematics behind these technologies, we encourage you to explore other resources for those specifics. Our goal here is to equip you with enough knowledge to apply PETs effectively in your work.
Problem statement
The amount of data being generated nowadays is absolutely mind-boggling. This data can be a valuable resource for researchers. However, personal data should be handled with great care and responsibility because of its sensitive nature. This is why there are privacy regulations in place like GDPR to prohibit easy access to this wealth of data.
However, often researchers are not interested in the personal records that make up the data, but rather in the insights derived from it. This raises an intriguing question: Can we unlock these valuable insights in a manner that upholds and respects privacy standards?
In classic data analysis, all data is copied over into a single place. This makes it very easy to use conventional data analysis software and tools to gain insights.
Unfortunately this way of working does not respect the privacy of the people contained within the dataset. All their personal details end up at another party.
1. Other problems with copying data
There are other issues with copying data to a central place that are not directly related to privacy. Some examples:
- The original data owner loses control of the data
- Results in multiple versions of the data
- What to do when the data needs to be updated?
- If there was consent in the first place, how can you retract consent?
1. Data sharing story time
Now it’s your turn. Have you personally experienced any issues doing research with data collected into a central place? Discuss with your peers.
In this lesson, we will discuss various privacy-enhancing technologies (PET) that can be used to analyze data in a privacy-preserving manner, and what the risks associated with different technologies are.
Data anonymization and pseudonymization
The first step in the process is often data anonymization. Personal identifiable information will in this case be removed so that individuals stay anonymous. Data pseudonimization is a similar process, but in this case, the records will be assigned an id that will make it possible to link individuals across datasets.
While data anonymization and pseudonymization are often a good first step, there is no guarantee that the data will never be reidentified. A famous example of reidentification is the story of the Netflix prize. The Netflix prize was an open competition to build the best recommender system to predict user ratings for films based on previous ratings. The data was anonymized, but in 2007 two researchers from The University of Texas at Austin were able to identify a large number of users by matching the dataset with film ratings on the Internet Movie Database (IMDB).
Federated data analysis
There are different ways in which privacy risks can be mitigated. For example, a well-known technique is to send the data to a trusted third party (TTP). The data can then be analyzed at that location in a traditional way. However, there are issues with this technique. When the data is copied to the TTP, the original owner loses control over it. Another issue with it is that this technique results in a single point of failure. If the security at the TTP is breached, all the data it handled could be exposed.
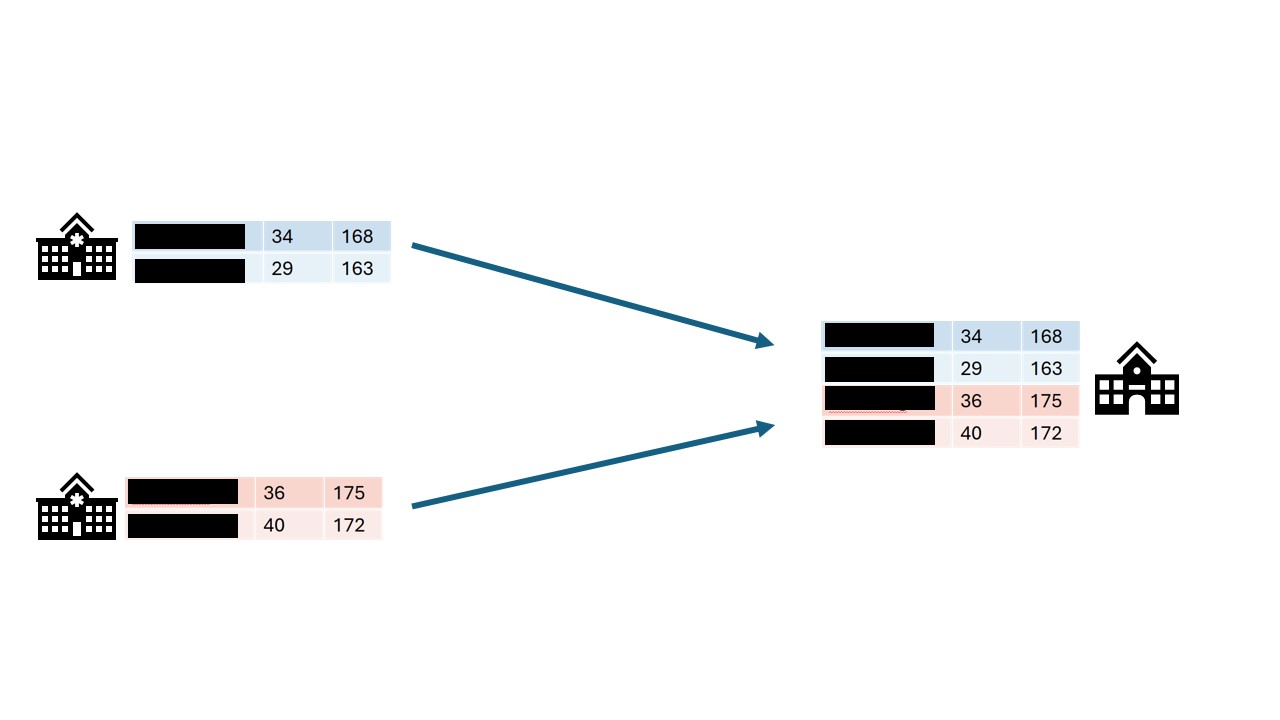
In this course we will focus on federated analysis. In a federated setting, the data with the data owner, who keeps full control over it. In this case, it is not the data that travels, but the analysis itself. The system sends a query or instruction to the data and only the results will get back to the user. The results are often akin to a form of aggregation of the data. This can be in the shape of traditional statistics like the mean, or it can be more intricate like a machine learning model. When data is aggregated, it doesn’t have a direct link with an individual anymore. Since the aggregated data cannot be be traced back to individuals individuals directly, the privacy is considered protected.
Aggregating the data does not ensure complete protection of person-level information, but it certainly makes it less likely that this will happen. It is usually the case that the larger the dataset, the lower the risk of data leakage. For instance, if you would like to take the mean of all records that fit a certain requirement, like age > 90, and there happens to be only one records that fits the requirement, the aggregation will be equal to the one matching individual record.
Federated learning
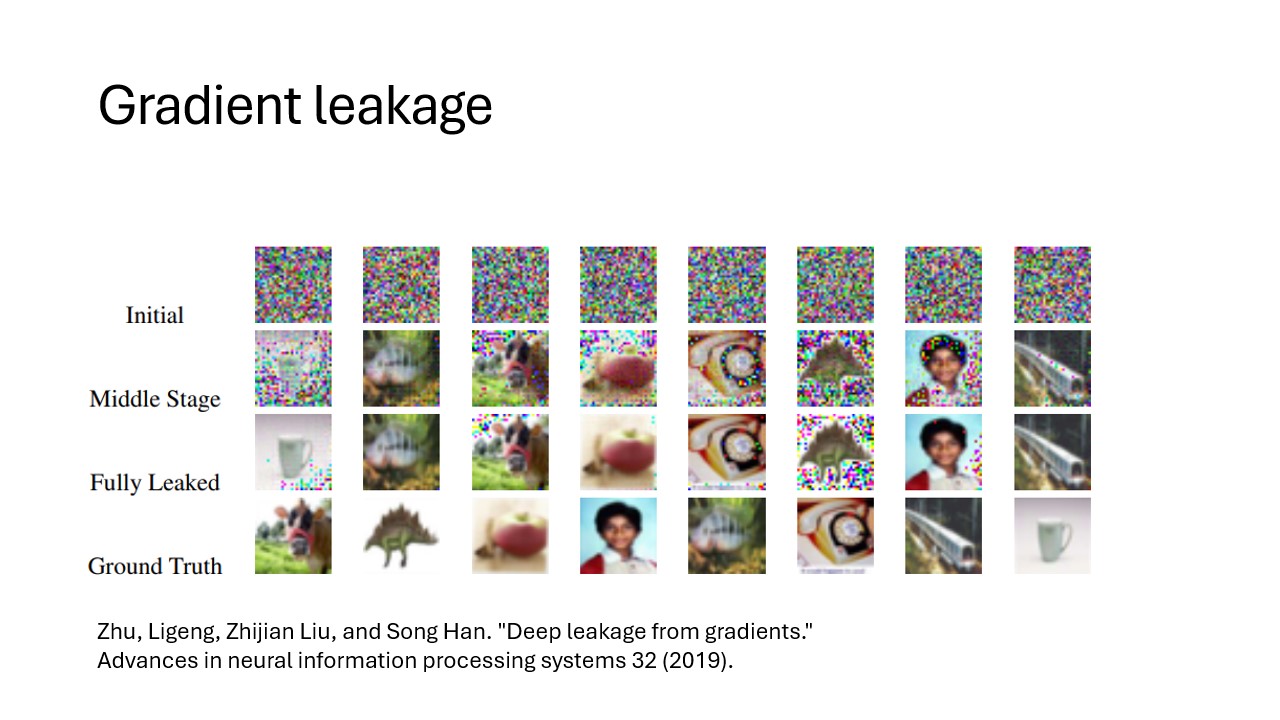
The term federated learning was introduced in 2016 by researchers at Google (McMahan et al.) and refers to a “loose federation of participating devices (which we refer to as clients) which are coordinated by a central server.” In traditional federated learning, the clients train machine learning models, and only the updates of the models are sent back to the central server. The central server combines the updates from all the individual clients into one final machine learning model.
There are caveats to using this type of data analysis though. Although the data transmitted from the clients to the server are an aggregation of the raw data, researchers have found a way to use this data to reconstruct the original data. This vulnerability is called gradient leakage.
Secure Multiparty Computation
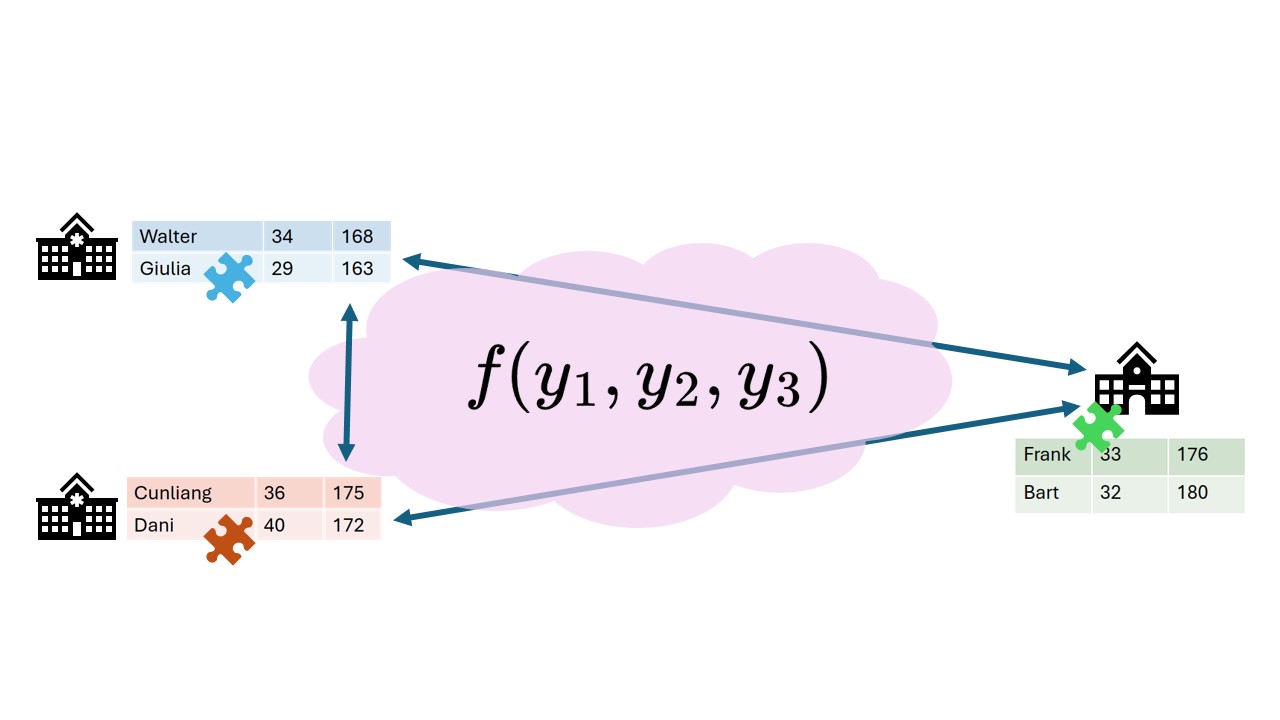
There are different solutions to prevent the reconstruction of raw data. One solution is to make sure that no party other than the data owner is actually able to see the intermediate data. One branch of techniques that can be used for this is Secure Multiparty Computation (MPC). With MPC, computations are performed collaboratively by multiple parties. Data is encrypted in such a way that other parties cannot see the original values, but values of multiple parties can still be combined ( e.g. added or multiplied). A classic technique from the field of MPC is secret sharing. With this technique data is encrypted, after which pieces of the encryption are sent to the other parties. No single party will be able to reconstruct the original value. Only when a certain minimum of parties work together (n-1 in many cases) the original value can be retrieved.
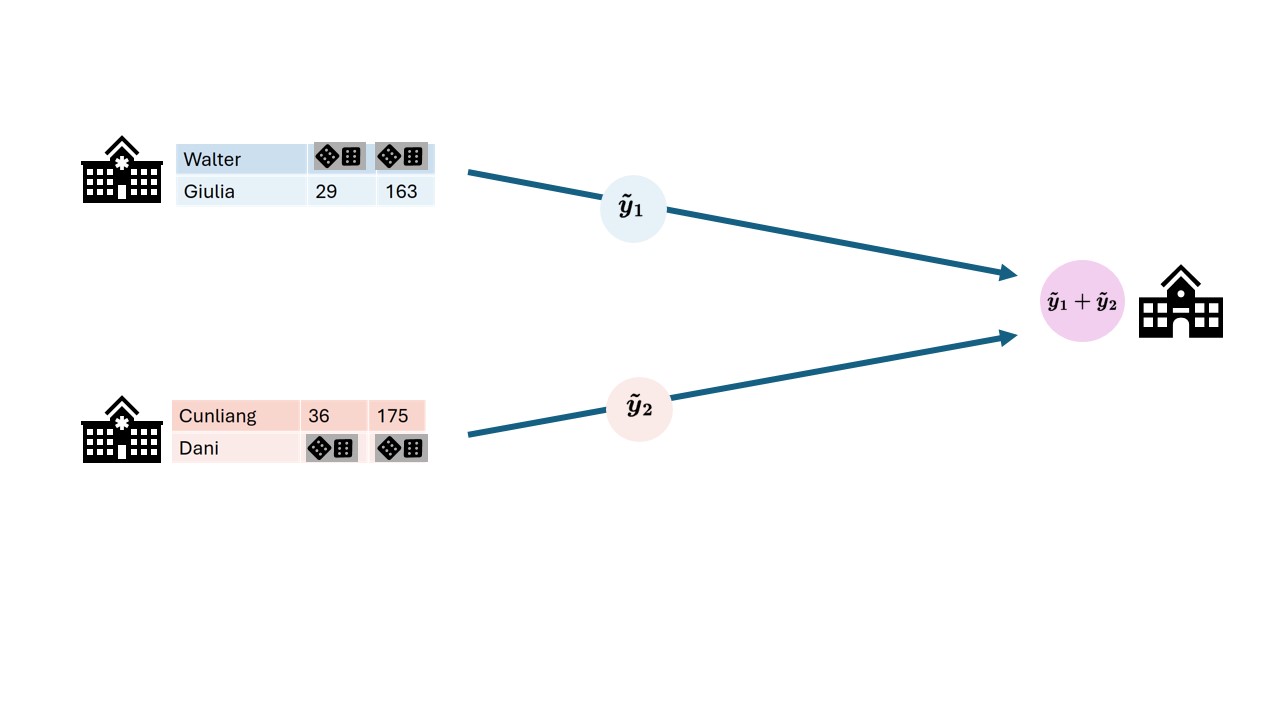
When combining multiple values using secret sharing, this will result in the parties owning new puzzle pieces that when put together will reveal the result of the computation.
Secret sharing, an example
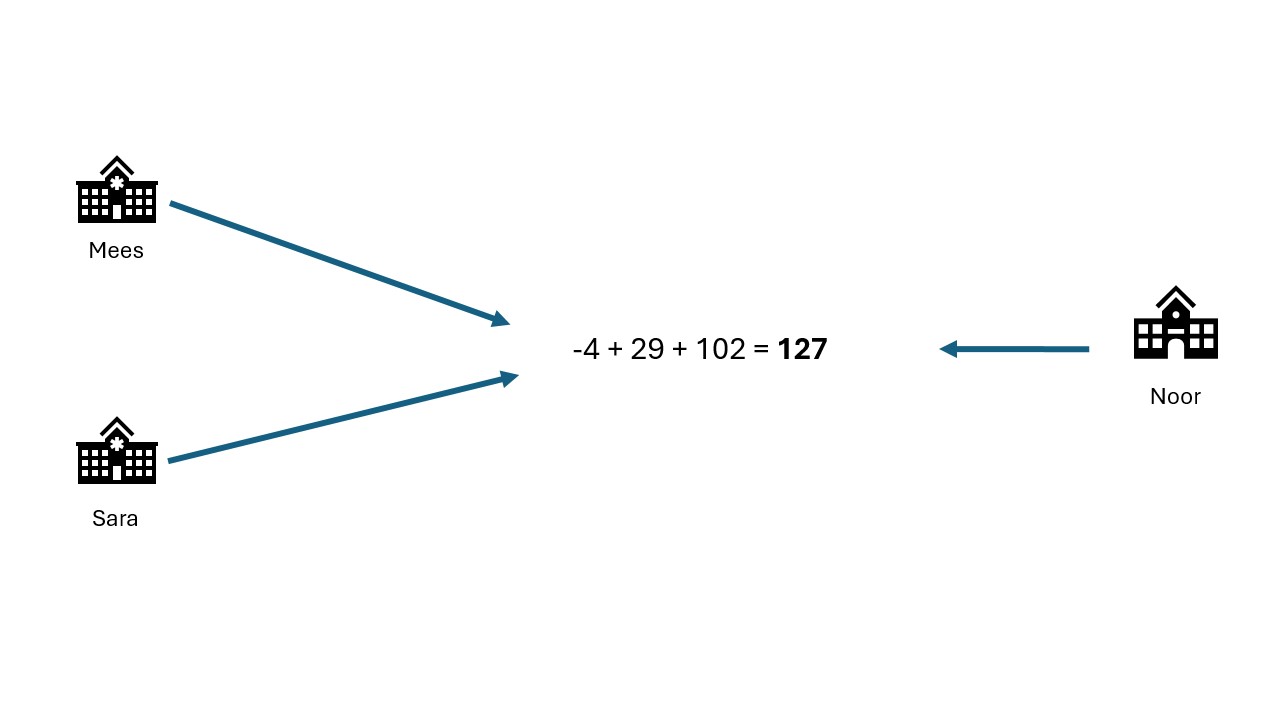
Mees, Sara and Noor want to know how much they weigh in total. Mees weighs 43 kg, Sara weighs 39, Noor weighs 45. All three they think of 2 random numbers \(r_1\) and \(r_2\) so that \(weight = r_1 + r_2 + x\). Finally they compute \(x\) by \(x=weight - r_1 - r_2\). These random numbers can be seen as encrypted data.
After computing the secret shares, they distribute these “cryptographical puzzle pieces” among their peers.
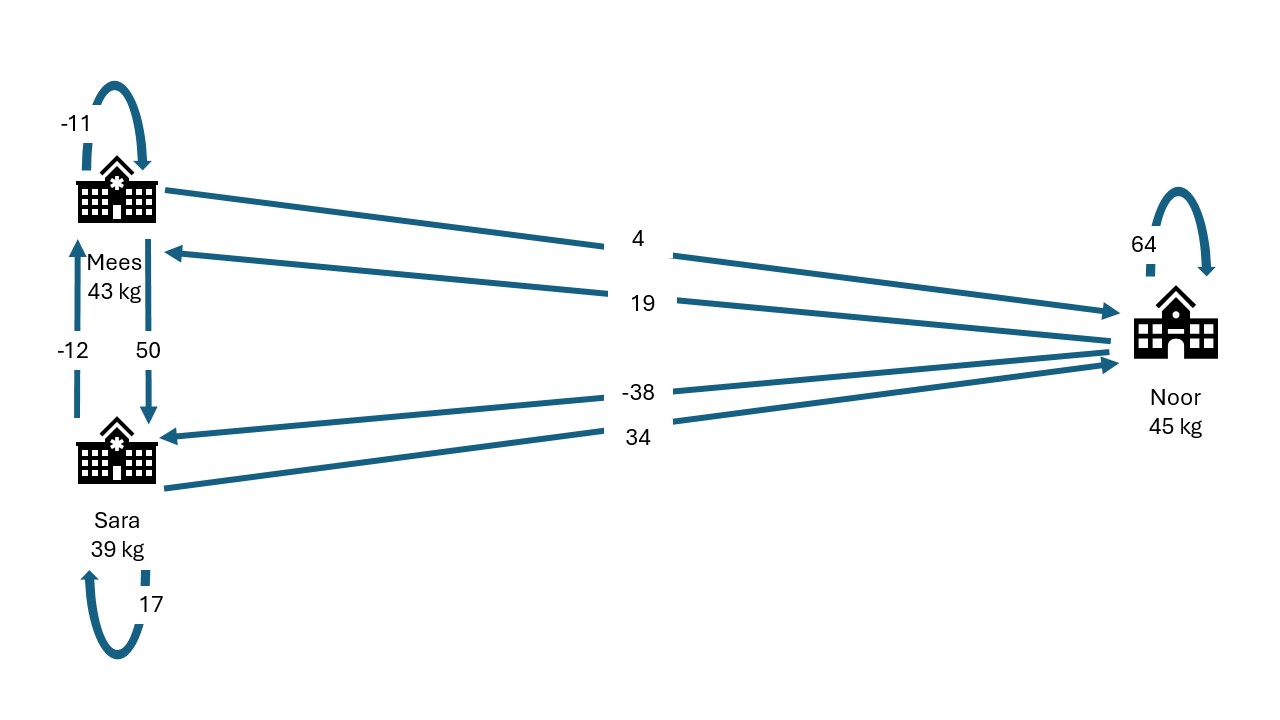
| Mees receives | Sara receives | Noor receives | Sum | |
|---|---|---|---|---|
| Mees generates: | -11 | 50 | 4 | 43 |
| Sara generates: | -12 | 17 | 34 | 39 |
| Noor generates: | 19 | -38 | 64 | 45 |
They sum their shares:
| Mees | -4 |
| Sara | 29 |
| Noor | 102 |
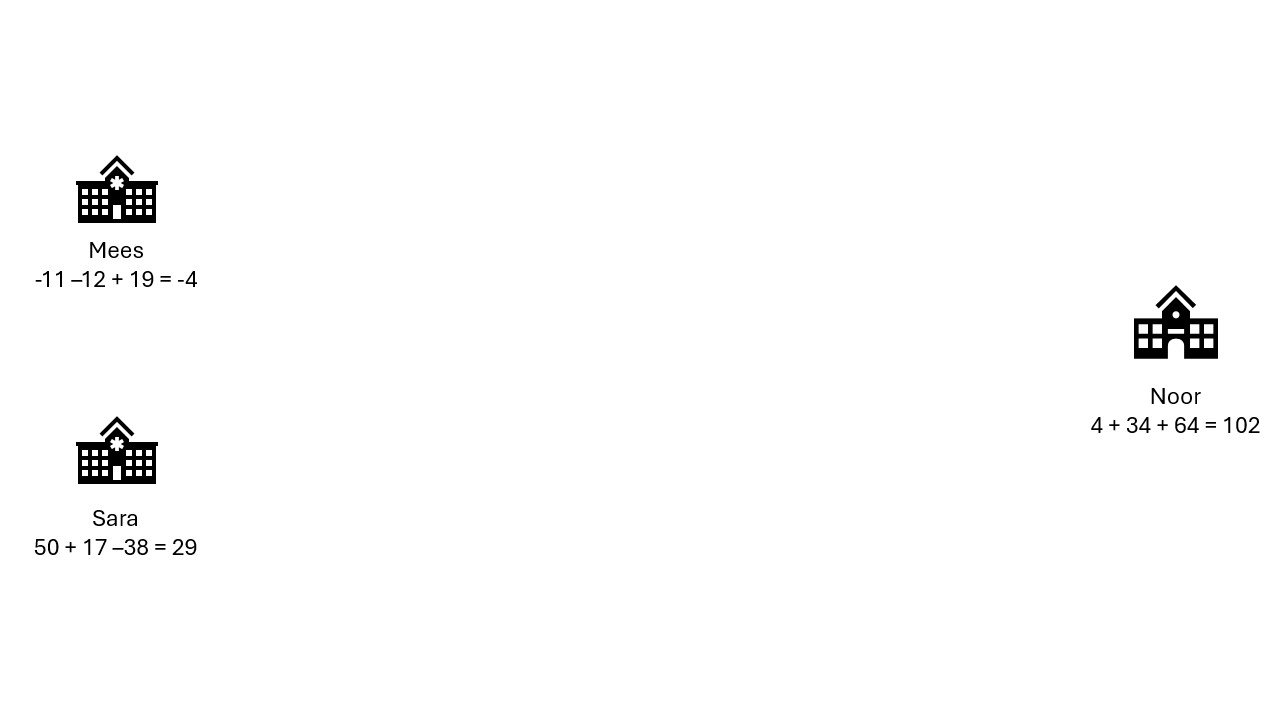
They add their sums together: -4 + 29 + 102 = 127 In this way, they have aggregated their data without sharing their individual data with anyone else.
Oh no! A hacker!
A hacker manages to get access to Mees’ computer that contains his data and the secret shares he received. He also knows the result of the aggregation. Will the secrecy of the three weights still be preserved? What if the hacker gets access to Sara’s computer as well? Will Noors privacy be protected?
If the hacker has access to the result, he can reconstruct Noors weight by subtracting Mees’ and Sara’s weight from the total. The secret shares are not adding any more relevant information.
3. Aggregation preserves privacy?
Consider the dataset with the 3 childrens weights again. The only unencrypted data everybody receives, is the result. Consider the situation where Sara knows Mees very well, and might know approximately how much he weighs. Do you think the privacy of the three individuals is properly preserved?
When receiving a sum from a set of 3 individuals, every record makes up roughly 30% of the final answer. That is a big contribution. It can be quite easy to reconstruct the individual records, for example by crossreferencing with other datasets. Also, if you are able to get your hands on 2 of the datapoints, you will be able to fully reconstruct the third one.
Usually there are guard rails in place when performing PET analysis to reject situations where there are very few datapoints, because the original data is too easy to reconstruct.
Trust is another factor here. If the different parties (Mees, Sara and Noor) have a high level of trust in eachother not to share their data, the risk level is lower than when the parties are known to occasionally leak their data, or don’t have proper security set in place.
Differential privacy
As mentioned before, aggregation of data will not always prevent leaks of sensitive information. Consider the example of Mees, Sara and Noor. We know their total weight is 127 kg. If Sara and Noor get together and subtract their weights off of the total, they will be able to infer how much Mees weighs.
An aggregation is fully differentially private when someone cannot infer whether a particular individual was used in the computation. In the field of differential privacy there are different techniques for adapting analyses to be more differentially private. Often these techniques involve adding noise to either the raw data or the result of the analysis. This makes the result less precise, but with the added benefit that it will be more difficult to infer the original data.
The figure below shows a differential privacy technique where a random subset of the data is replaced with random values. This gives an individual plausible deniability regarding whether they were part of the original dataset. Their data might have been used, or it might have been replaced with noise.
Blocks upon blocks
The previously mentioned techniques are not used in isolation, but are usually stacked on top of eachother to mitigate the privacy risks that are relevant within the usecase. Typically, the process begins by anonymizing or pseudonymizing the data. With vantage6, the data is then placed in a federated setting. Then, the data is analyzed using federated learning, which may also include, for instance, MPC protocols to further safeguard data privacy. Additionally, noise may be added to the raw data as well before it is analyzed, using techniques from differential privacy.
Data partitioning
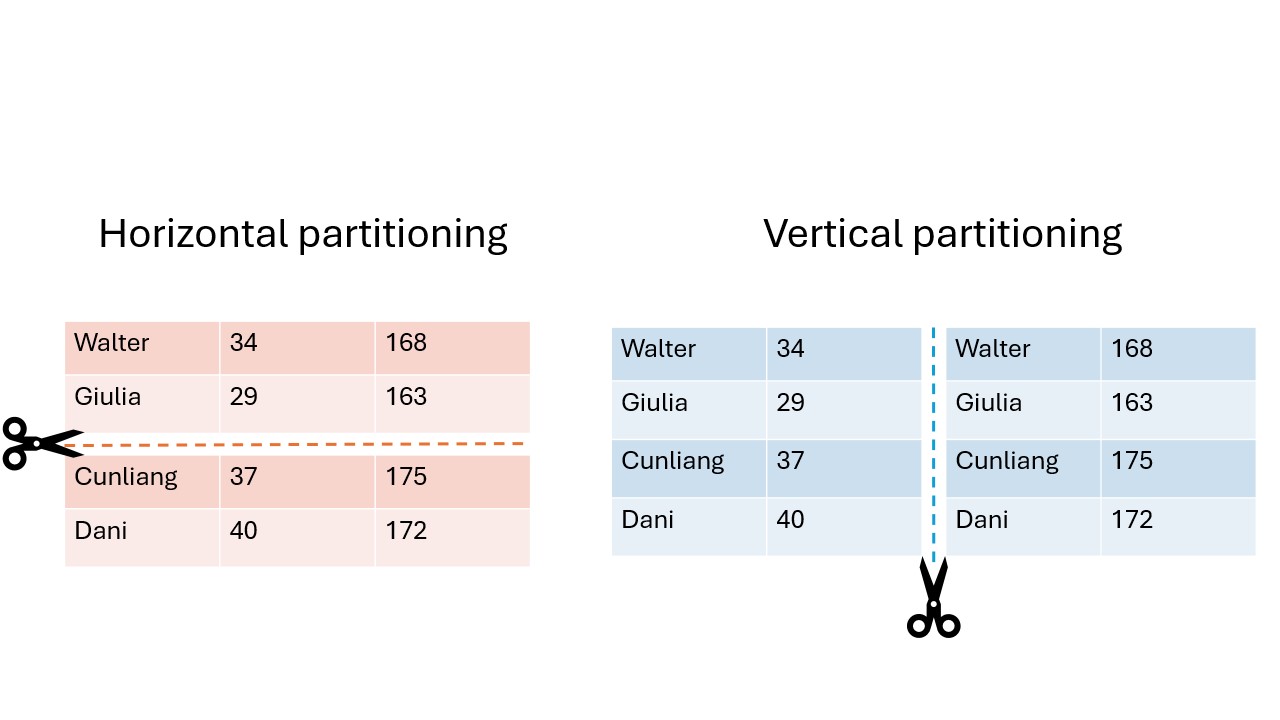
Data sharing challenges come in many different shapes and sizes, but in the end, the goal of the researchers is often to analyze data as if it were available in one big table in one place. There are 2 main ways in which the dataset can be separated over different sources: horizontal and vertical partioning.
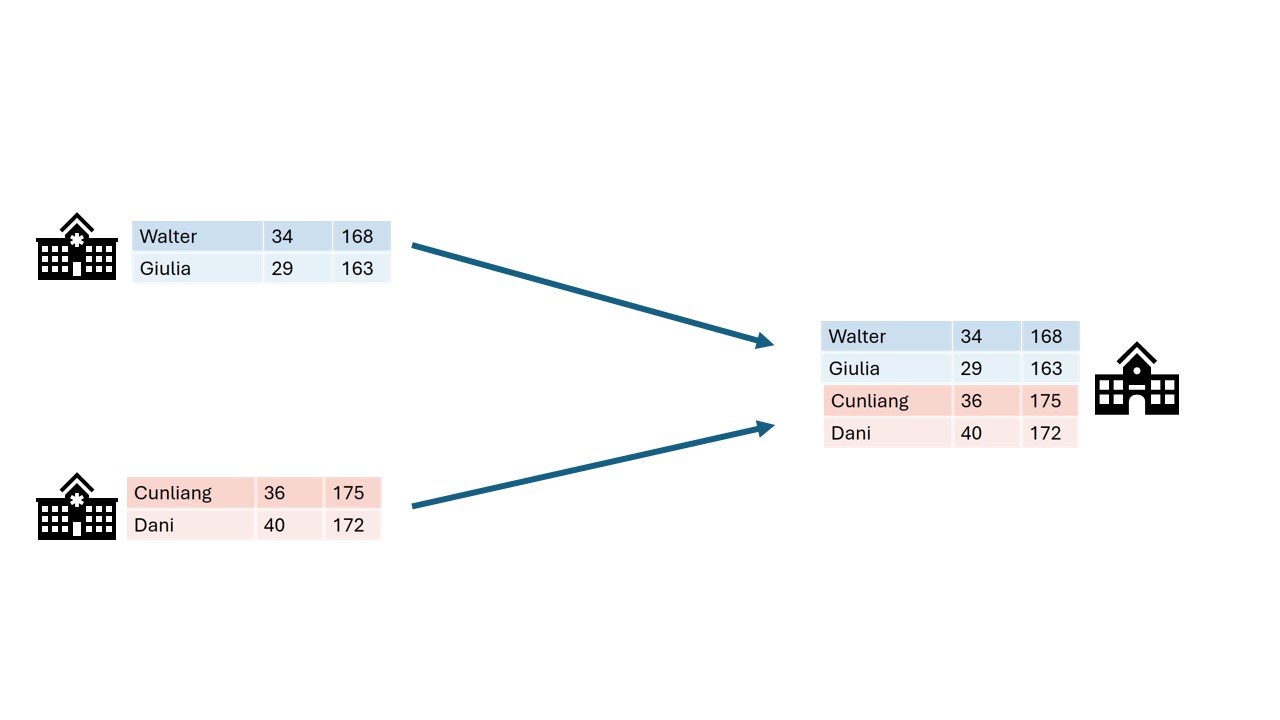
In horizontal partitioning, this giant table has been snipped in pieces by making horizontal cuts. The result is that information of an individual record will stay in one place, but the records themselves have been scattered around in different locations. A common example of horizontal partitioning is when different hospitals have the same data on different patients.
In vertical partitioning, the cuts have been made vertically. Columns have now been divided over different locations. For example, this would be the case if a hospital has data on a set of patients and the GP has different information for the same set of patients. This type of partitioning is usually more challenging because often a way needs to be found to link identities across datasources. Vertical partitioning requires different types of privacy enhancing algorithms than horizontal partitioning.
Data can even be horizontally and vertically partitioned at the same time. In these cases, it may be necessary to combine multiple techniques. For example, you might want to combine census data with medical records from hospitals. This is vertically partitioned because the census and medical features are stored in different places. On top of that, you might want to combine multiple hospitals, that all store their records separately. Since the medical records are physically separated as well, it is horizontally partitioned.
Technology doesn’t solve everything
You have now learned about various technologies for analyzing data while preserving privacy of individuals. However, it should be emphasized that these technologies do not solve all your data sharing problems. Rather, they are only a small piece of the puzzle. In research projects involving privacy enhancing technologies, a lot of work goes into complying with regulations and building trust.
Since these projects have a risk of affecting the privacy of individuals, a Data Protection Impact Assessment (DPIA) is usually required. This is a process that will help identify and minimize privacy risks of a project and is required by the GDPR. There is already a DPIA available for vantage6
Apart from procedures required by GDPR there might be other regulations in place enforced by the owners of the data (e.g. hospitals). For healthcare specifically there will be the European Health Data Space (EHDS). EHDS builds upon the GDPR and ensures the exchange and reuse of healthcare data in a safe and secure way.
The specific situation of a project can affect the way in which the data is allowed to be processed. Some privacy enhancing technologies might be allowed in one project but prohibited in another. It is always important to stay transparent about privacy risks of the technologies you intend to use.
Another factor in performing PET analysis is data harmonization. All parties need to make sure that their data is in the right shape to be combined. For instance, if you have two datasets where one stores the height of patients in a column “height” in centimeters, and another dataset where it is stored in meters in the column “patient_height” you cannot perform your analysis. You will need to make sure all datasets follow the same standards and schemas in order to process them together. There are a couple of datastandards out there to help you with that, such as OMOP CDM or FHIR together with SNOMED-CT.
In conclusion, PETs will help you to extract valuable insights from sensitive data, but they are only one aspect of the process. It is also important to consider other factors such as regulations and data preprocessing.
- Privacy enhancing analysis can derive insights from data without seeing individual records.
- Privacy enhancing analysis usually starts with the anonymization or pseudonymization of the data.
- In federated data analysis the analysis moves to the data, while in classic analysis the data moves around.
- In secure multiparty computation, computations are performed collaboratively without any one party being able to see all the raw data.
- Techniques from differential privacy add noise to the data to make it harder to reconstruct the original records from an aggregation.
- Privacy enhancing analyses usually stack multiple techniques on top of each other to provide multiple layers of protection.
- Horizontal partitioning means the records are split, while in vertical partitioning the features are split.
- Technology is only one part of the story, when doing research on privacy sensitive data.
Content from vantage6 basics
Last updated on 2024-10-03 | Edit this page
Overview
Questions
- Why should I use vantage6?
- How does vantage6 work?
- How do federated algorithms run in vantage6?
- What will be available in vantage6 in the future?
Objectives
- List the high-level infrastructure components of vantage6 (server, client, node)
- Understand the added value of vantage6
- Understand that there are different actors in the vantage6 network
- Understand that the vantage6 server does not run algorithms
- Explain how a simple analysis runs on vantage6
- Understand the future of vantage6 (policies, etc.)
Why choose vantage6
vantage6 is a platform to execute privacy enhancing techniques (PETs). Several alternative platforms for PETs are available, but vantage6 is unique as it provides:
- Open source and free to use under Apache-2.0 licence.
- Container orchestration for privacy enhancing techniques.
- Easily extensible to different types of data sources.
- Algorithms can be developed in any language.
- A Graphical User Interface is provided to operate the platform.
- Other applications can connect to vantage6 using the API.
- Managing and enforcing collaboration policies
- Minimal network requirements at data stations
Project administration in vantage6
vantage6 encompasses a project administration system that allows the user to manage permissions and access to the resources, while assuring the protection of the data. The fundamental concepts of the administration system are defined as follows:
- An Organization is a group of users that share a common goal or interest (e.g., a consortium, an institute, etc.).
- A Collaboration involves one or more organizations working together towards a shared objective.
- A Node is a vantage6 component with access to the organization data, which is capable of executes algorithms on it. It represents the organization’s contributions to the network.
- A Task is a request for the execution of a given analysis algorithm on one or more organizations within a collaboration. These execution requests are handled by the corresponding organizations’ nodes.
- A user is a person that belongs to one organization who can create tasks for one or more organizations within a collaboration.
- An algorithm is a computational model or process -that adhere to the vantage6 framework-, which can be securely distributed to nodes for execution on the corresponding organization’s data.
- An algorithm store is a centralized platform for managing pre-registered algorithms. This serves as an alternative to using algorithms from unknown authors or those lacking transparency regarding their development process and status.
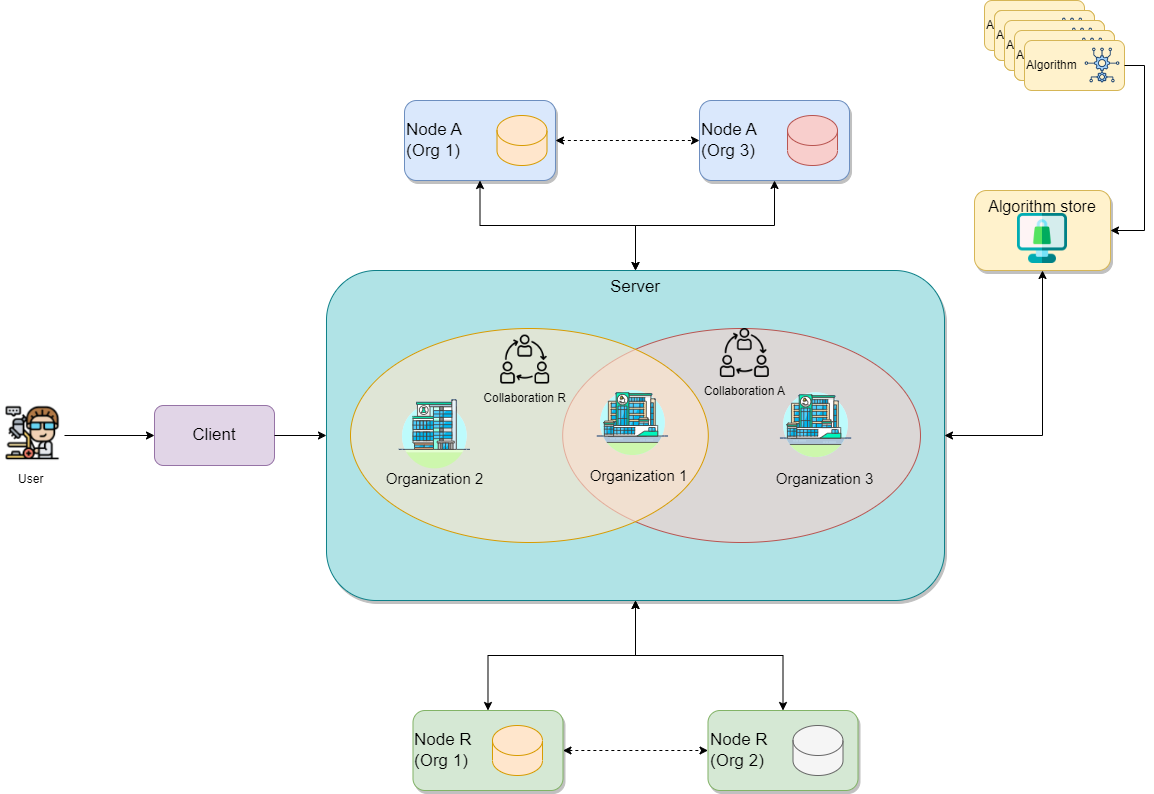
The diagram below illustrates a collaboration between two
organizations. In this scenario, users from Organization 1
and Organization 3 — with the appropriate credentials — can
request the execution of tasks within Collaboration
A. In this case, a user from Organization 1 might
request the execution of an algorithm (previously
registered in an algorithm store trusted by the
collaboration) across all participating organization nodes. In response,
each node from the involved organizations executes the
algorithm on its local data. The resulting (aggregated)
data is then sent back to the server, where it can be accessed by the
requesting user. To enhance the security of the communication, messages
between organizations can be encrypted. In this case, an organization
can have a public key that the other collaborating organizations have to
use in order to exchange messages.
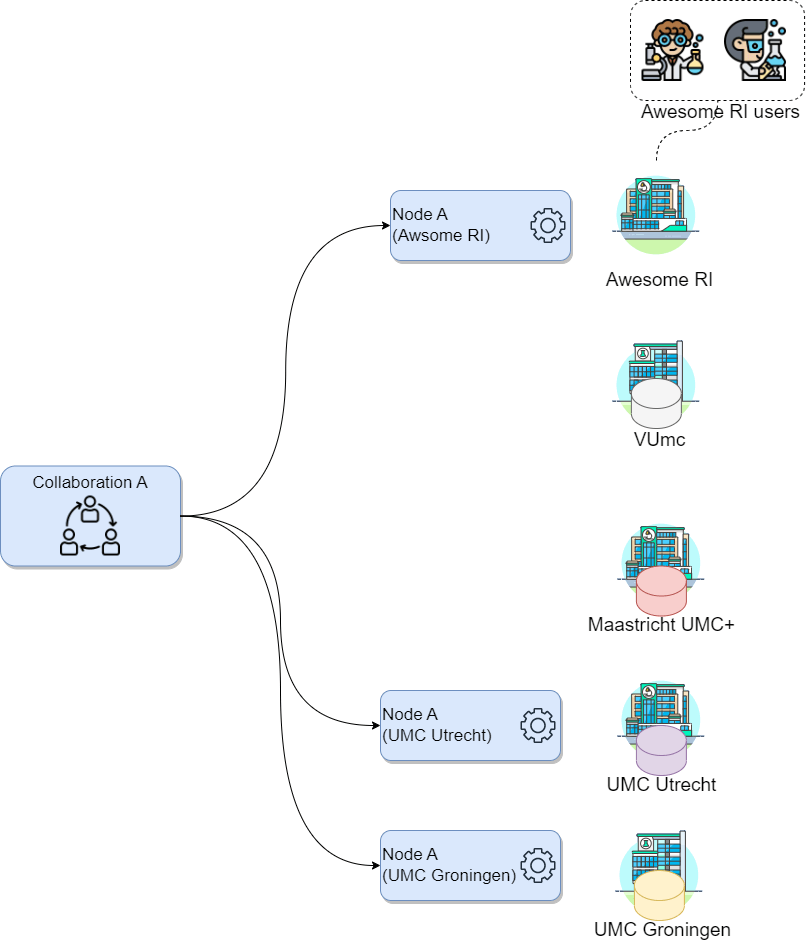
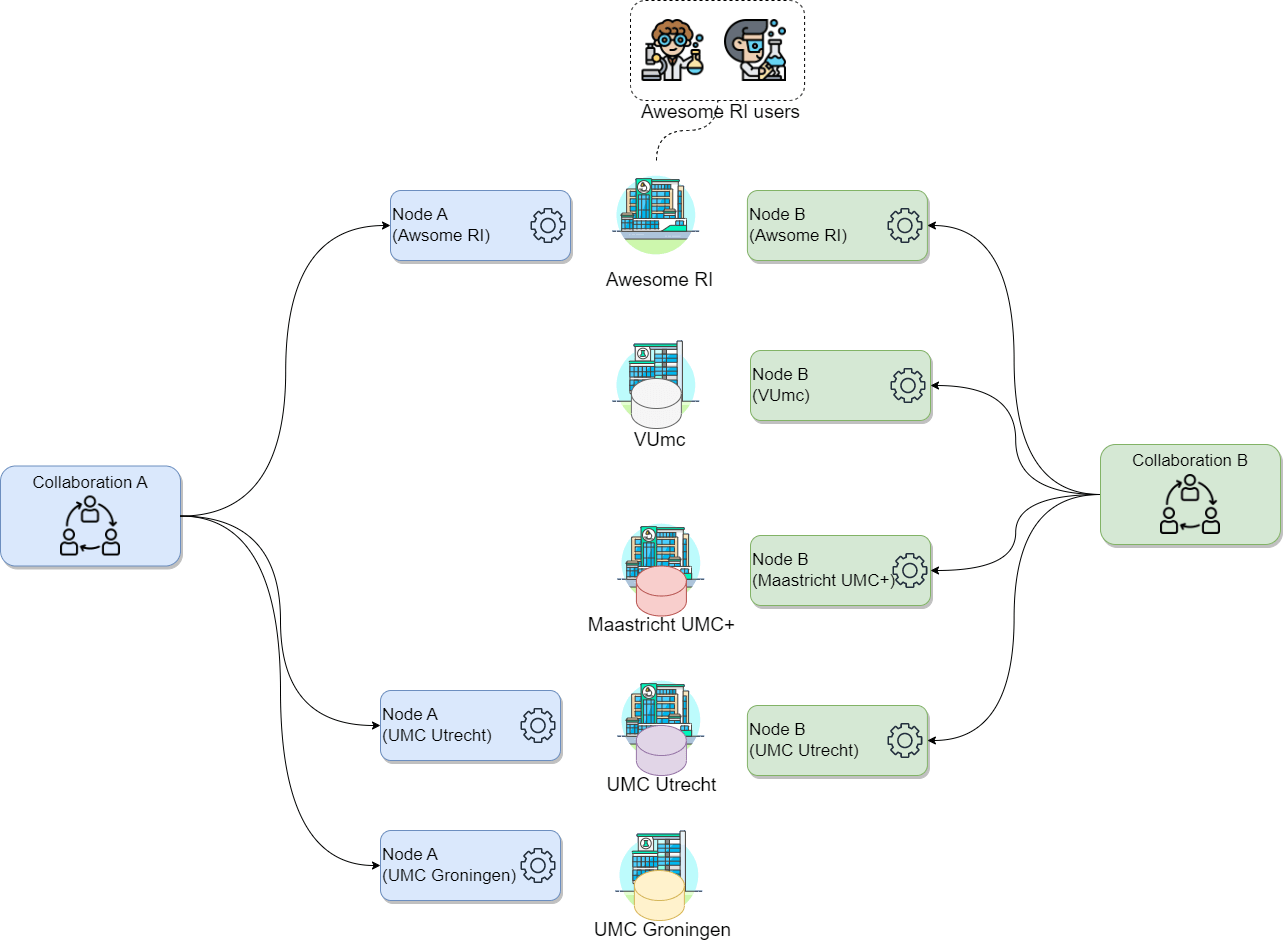
The following diagram expand the previous scenario further: what if
Organization 1 needs to participate on an additional
collaboration with another
organization (e.g., Organization 2)? In
this case, Organization 1 will have two running nodes, one
for each collaboration. Moreover, as also depicted on the diagram below,
each collaboration can make use of one or more
algorithm stores:

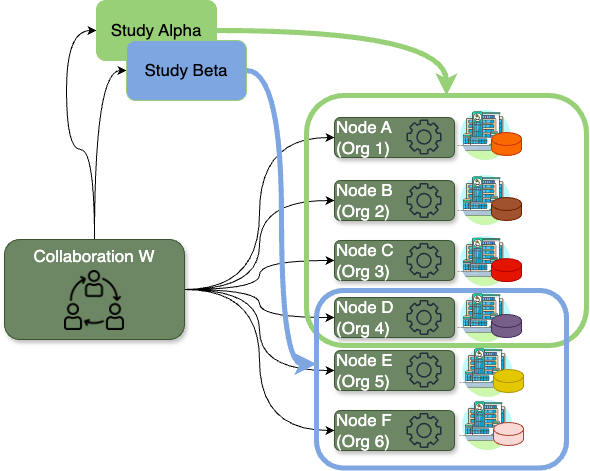
Finally, the concept of study is an important one when using vantage6 for data analysis. A study represents a subset of organizations within a given collaboration that are engaged in a specific research question. By setting up studies, you can more efficiently assign tasks to a specific group of organizations within a collaboration and better manage the results of these analyses.
For example, consider the Collaboration W below, which
includes six organizations. This collaboration might involve two
distinct research questions: one that requires data from organizations
1, 2, 3, and 4, and another that focuses on data from organizations 4,
5, and 6. By establishing Study Alpha and
Study Beta, you, as a researcher, can target your data
analysis tasks in three different ways: you can address the entire
Collaboration W (including nodes A to
F), focus on Study Alpha (nodes A
to D), or concentrate on Study Beta (nodes
D to F).
Challenge 1: Mapping vantage6 to “real life”
Let’s consider a scenario where you, on behalf of your research institute, want to conduct a new study on a particular illness across three major academic hospitals in the Netherlands: VUmc in Amsterdam, Maastricht UMC+, and UMC Utrecht, as these have valuable data related to the illness. Consider the following:
- Your research institute has an existing collaboration (with a different purpose, not related with yours) with UMC Utrecht and UMC Groningen. Hence, there is a vantage6 node already running on your institution for the said collaboration.
- You will be conducting this study with a colleague from your institute named Daphne. Both of you are already registered on the organization but without access to the existing collaborations.
How would the concepts described above map to your potential use case?
- Which organizations will you need to add to your collaboration?
- How many new nodes would you need to set up and on which organizations?
- How many users would be created?
- In this case the organizations would be the academic hospitals as well as your own organization: VUmc, Maastricht UMC+, UMC Utrecht and your research institute. Note that UMC Utrecht must be added to the new collaboration despite being already part of an existing one.
- One node for every organization in the collaboration, so 4. Note that UMC Utrecht needs a new node despite already having one, as the existing one is for a different collaboration.
- There is no need to create new users, as these are already registered on the organization. Note that the users are linked only to the organization, not to the nodes.
The vantage6 infrastructure
Now that we have an overview of how vantage6 manages the project resources and how it can be used to setup the analysis framework, we can see how vantage6 works on a technical level and how the infrastructure maps the aforementioned concepts. In vantage6, a user can pose a question through a client to the vantage6 server. Each organization with sensitive data contributes one node to the network. The nodes collect the computation request from the server and fetches the algorithm from the algorithm store to answer it. When the algorithm completes, the node sends the aggregated results back to the server.
On a technical level, vantage6 may be seen as a container orchestration tool for privacy preserving analyses. It deploys a network of containerized applications that together ensure insights can be exchanged without sharing record-level data.
Let’s explain in some more detail what these network actors are responsible for, and which subcomponents they contain.
Server
The vantage6 server acts as communication hub between clients and nodes. The server tracks the status of the computation requests and handles administrative functions such as authentication and authorization. It consists of multiple applications:
Vantage6 server: Contains the users, organizations, collaborations, tasks and their results. It handles authentication and authorization to the system and acts as the communication hub for clients and nodes.
Docker registry: Contains algorithms stored in container images which can be used by clients to request a computation. The node will retrieve the algorithm from this registry and execute it. It is possible to use public registries for this purpose like Docker hub or Github Containers. However it is also possible to host your own registry, for example a Harbor instance.
Data Station
The data station hosts the local data and the node (vantage6-node). The Vantage6 node is responsible for executing the algorithms on the local data. It protects the data by allowing only specified algorithms to be executed after verifying their origin. The node is responsible for picking up the task and running them in parallel, executing the algorithm and sending the results back to the server. For more details see the technical documentation of the node.
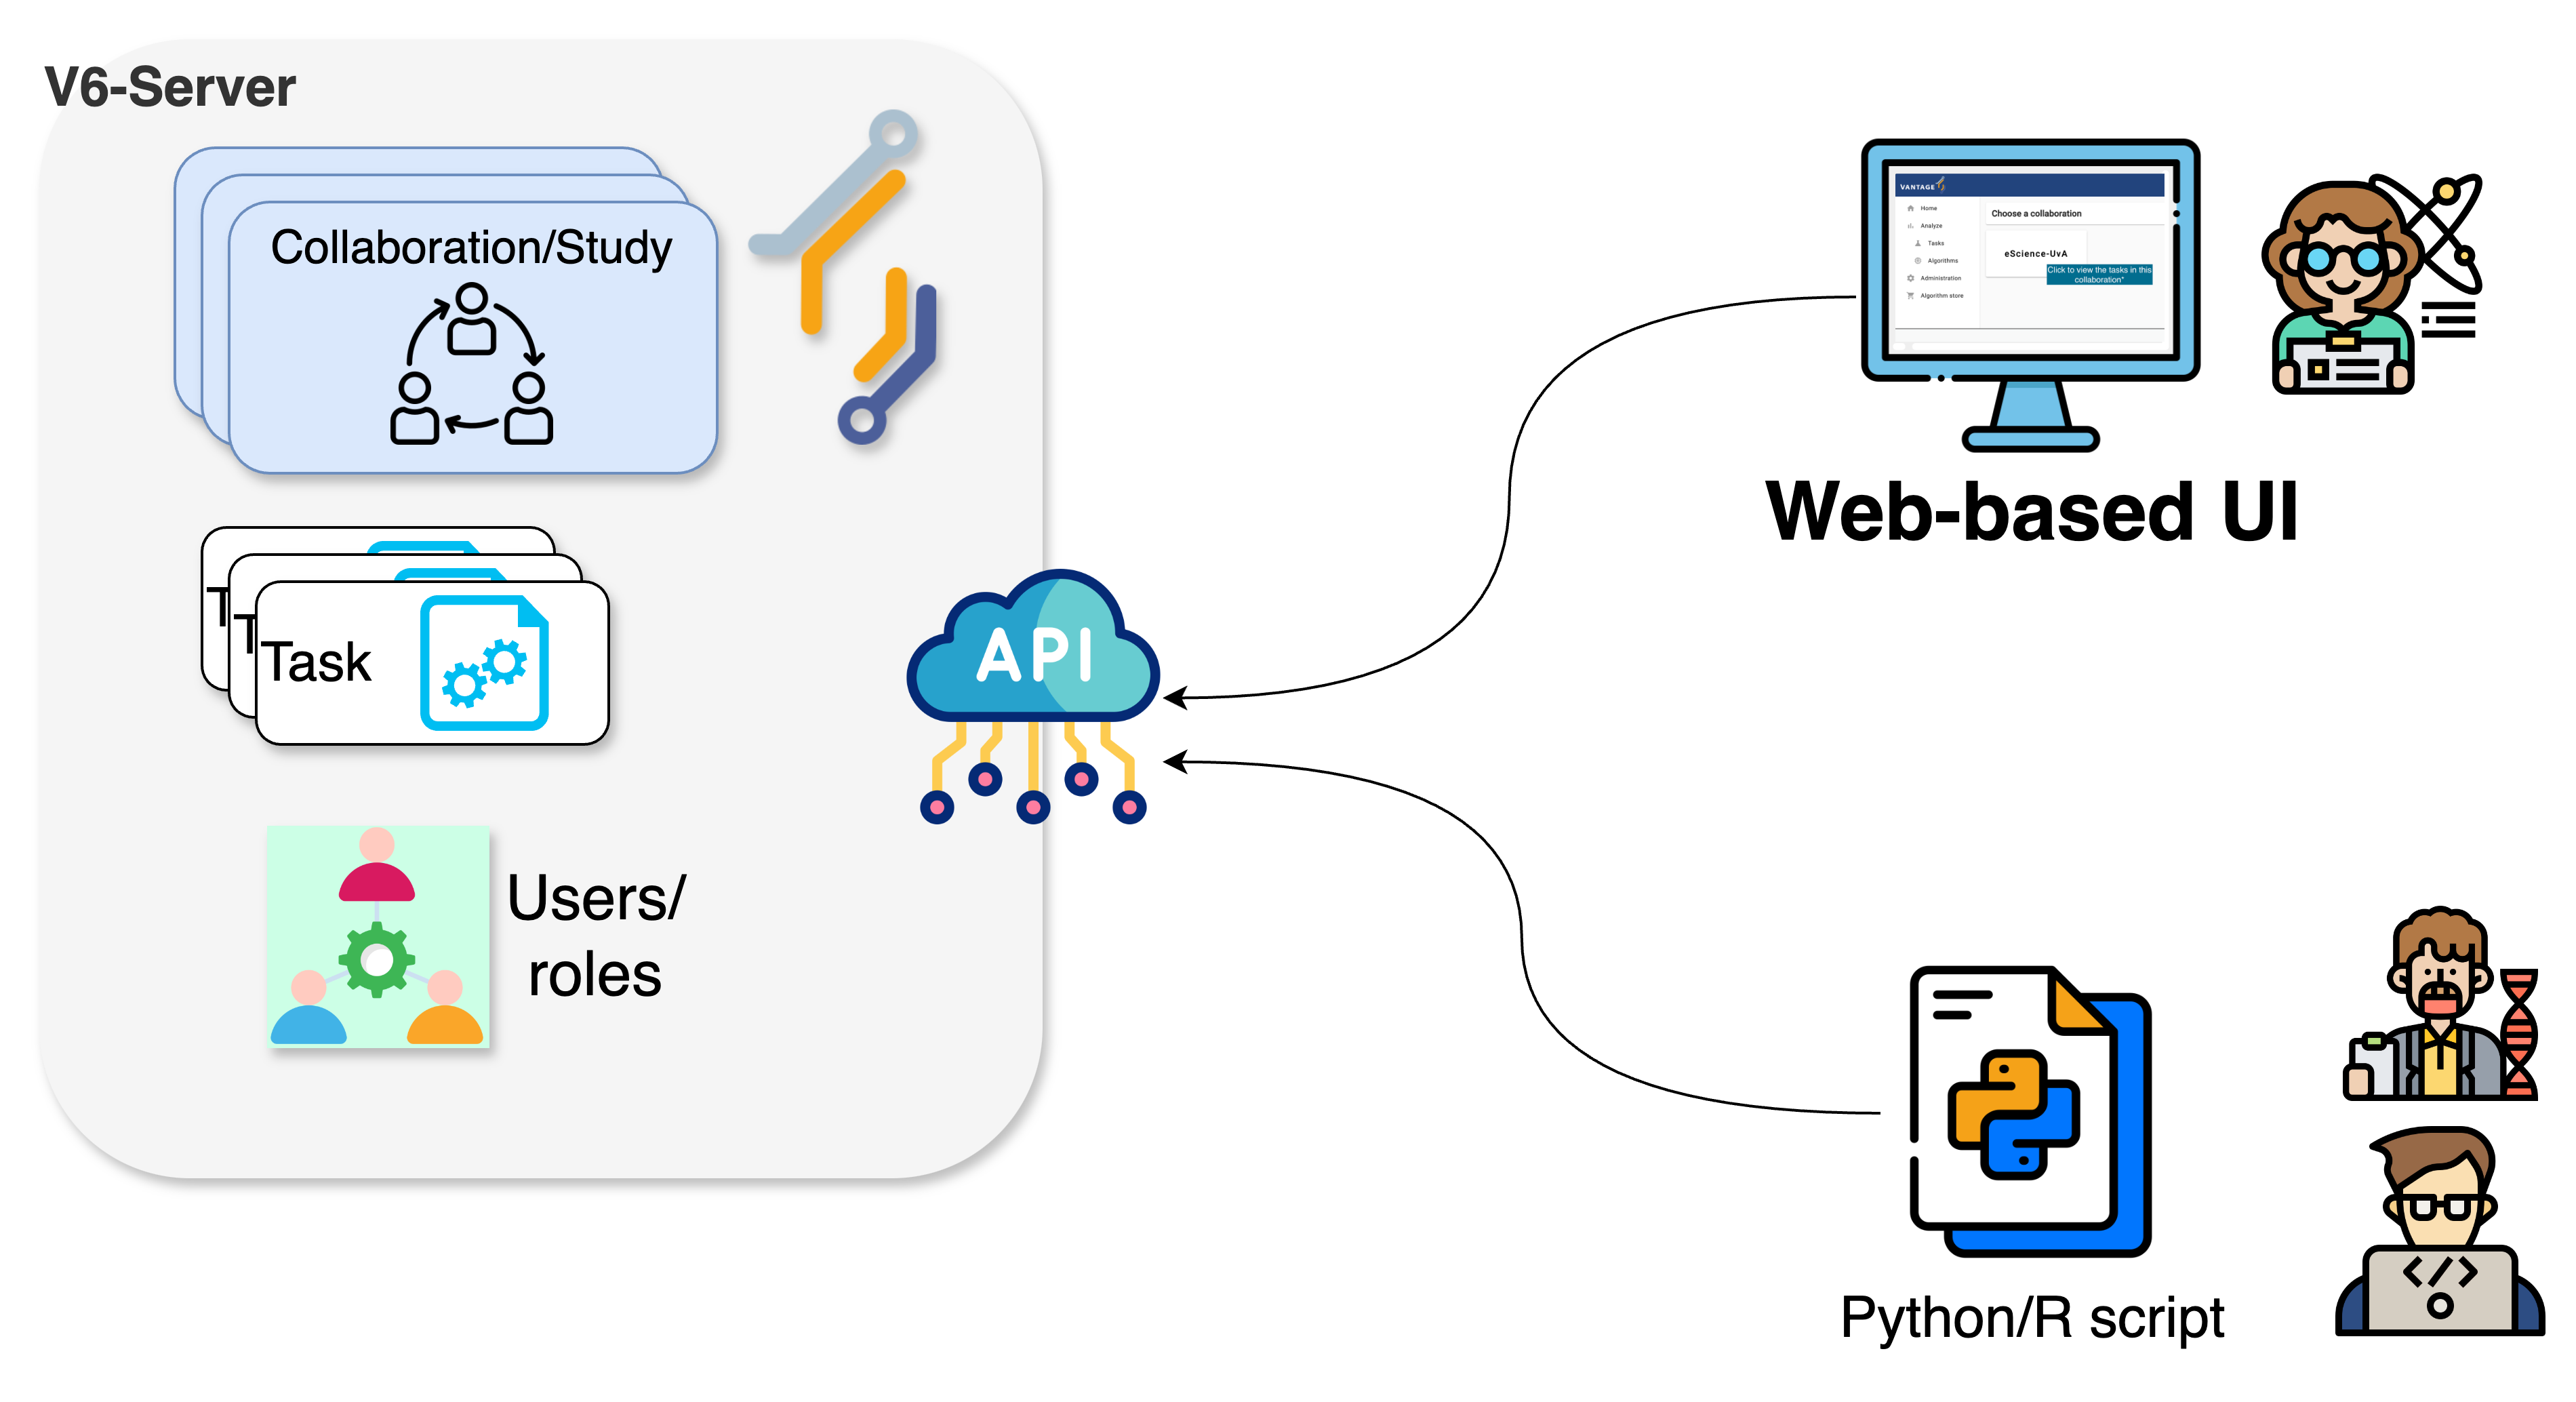
Client
A user or application who interacts with the vantage6-server. They create tasks, retrieve their results, or manage entities at the server (i.e. creating or editing users, organizations and collaborations).
The vantage6 server is an API, which means that there are many ways to interact with it programmatically. There are however a number of applications available that make is easier for users to interact with the vantage6 server:
User interface: The user interface is a web application (hosted at the server) that allows users to interact with the server. It is used to create and manage organizations, collaborations, users, tasks and algorithms. It also allows users to view and download the results of tasks. Use of the user interface recommended for ease of use.
Python client: The vantage6 python client
is a Python package that allows users to interact with the server from a Python environment. This is especially usefull for data scientists who want to integrate vantage6 into their workflow.
Algorithm store
While a vantage6-supported research infrastructure offers a strong defense against many data privacy risks, there remains one crucial security aspect that falls outside the platform’s scope: the validation of the code that will run on this infrastructure. For instance, the administrators of the nodes running within each organization are responsible for defining which algorithms (i.e., which container images) will be allowed for execution on the respective collaborations. As this is a critical and complex task that entails activities like code analysis and verification, working with algorithms from trusted sources is the primary line of defense against potential threats.
Vantage6’s algorithm store is a repository for trusted algorithms within a certain project that aims to enhance trustworthiness by offering a centralized platform for managing pre-registered algorithms. This serves as an alternative to using algorithms from unknown authors or those lacking transparency regarding their development process and status. The algorithm store currently allows researchers to explore which algorithms are available and how to run them. This, streamlines task execution requests within collaborations. Also, the algorithm store integrates additional information to the algorithm metadata such who developed and reviewed the algorithm. Only after complying with the review policies of a store, a new algorithm will be published in the store.
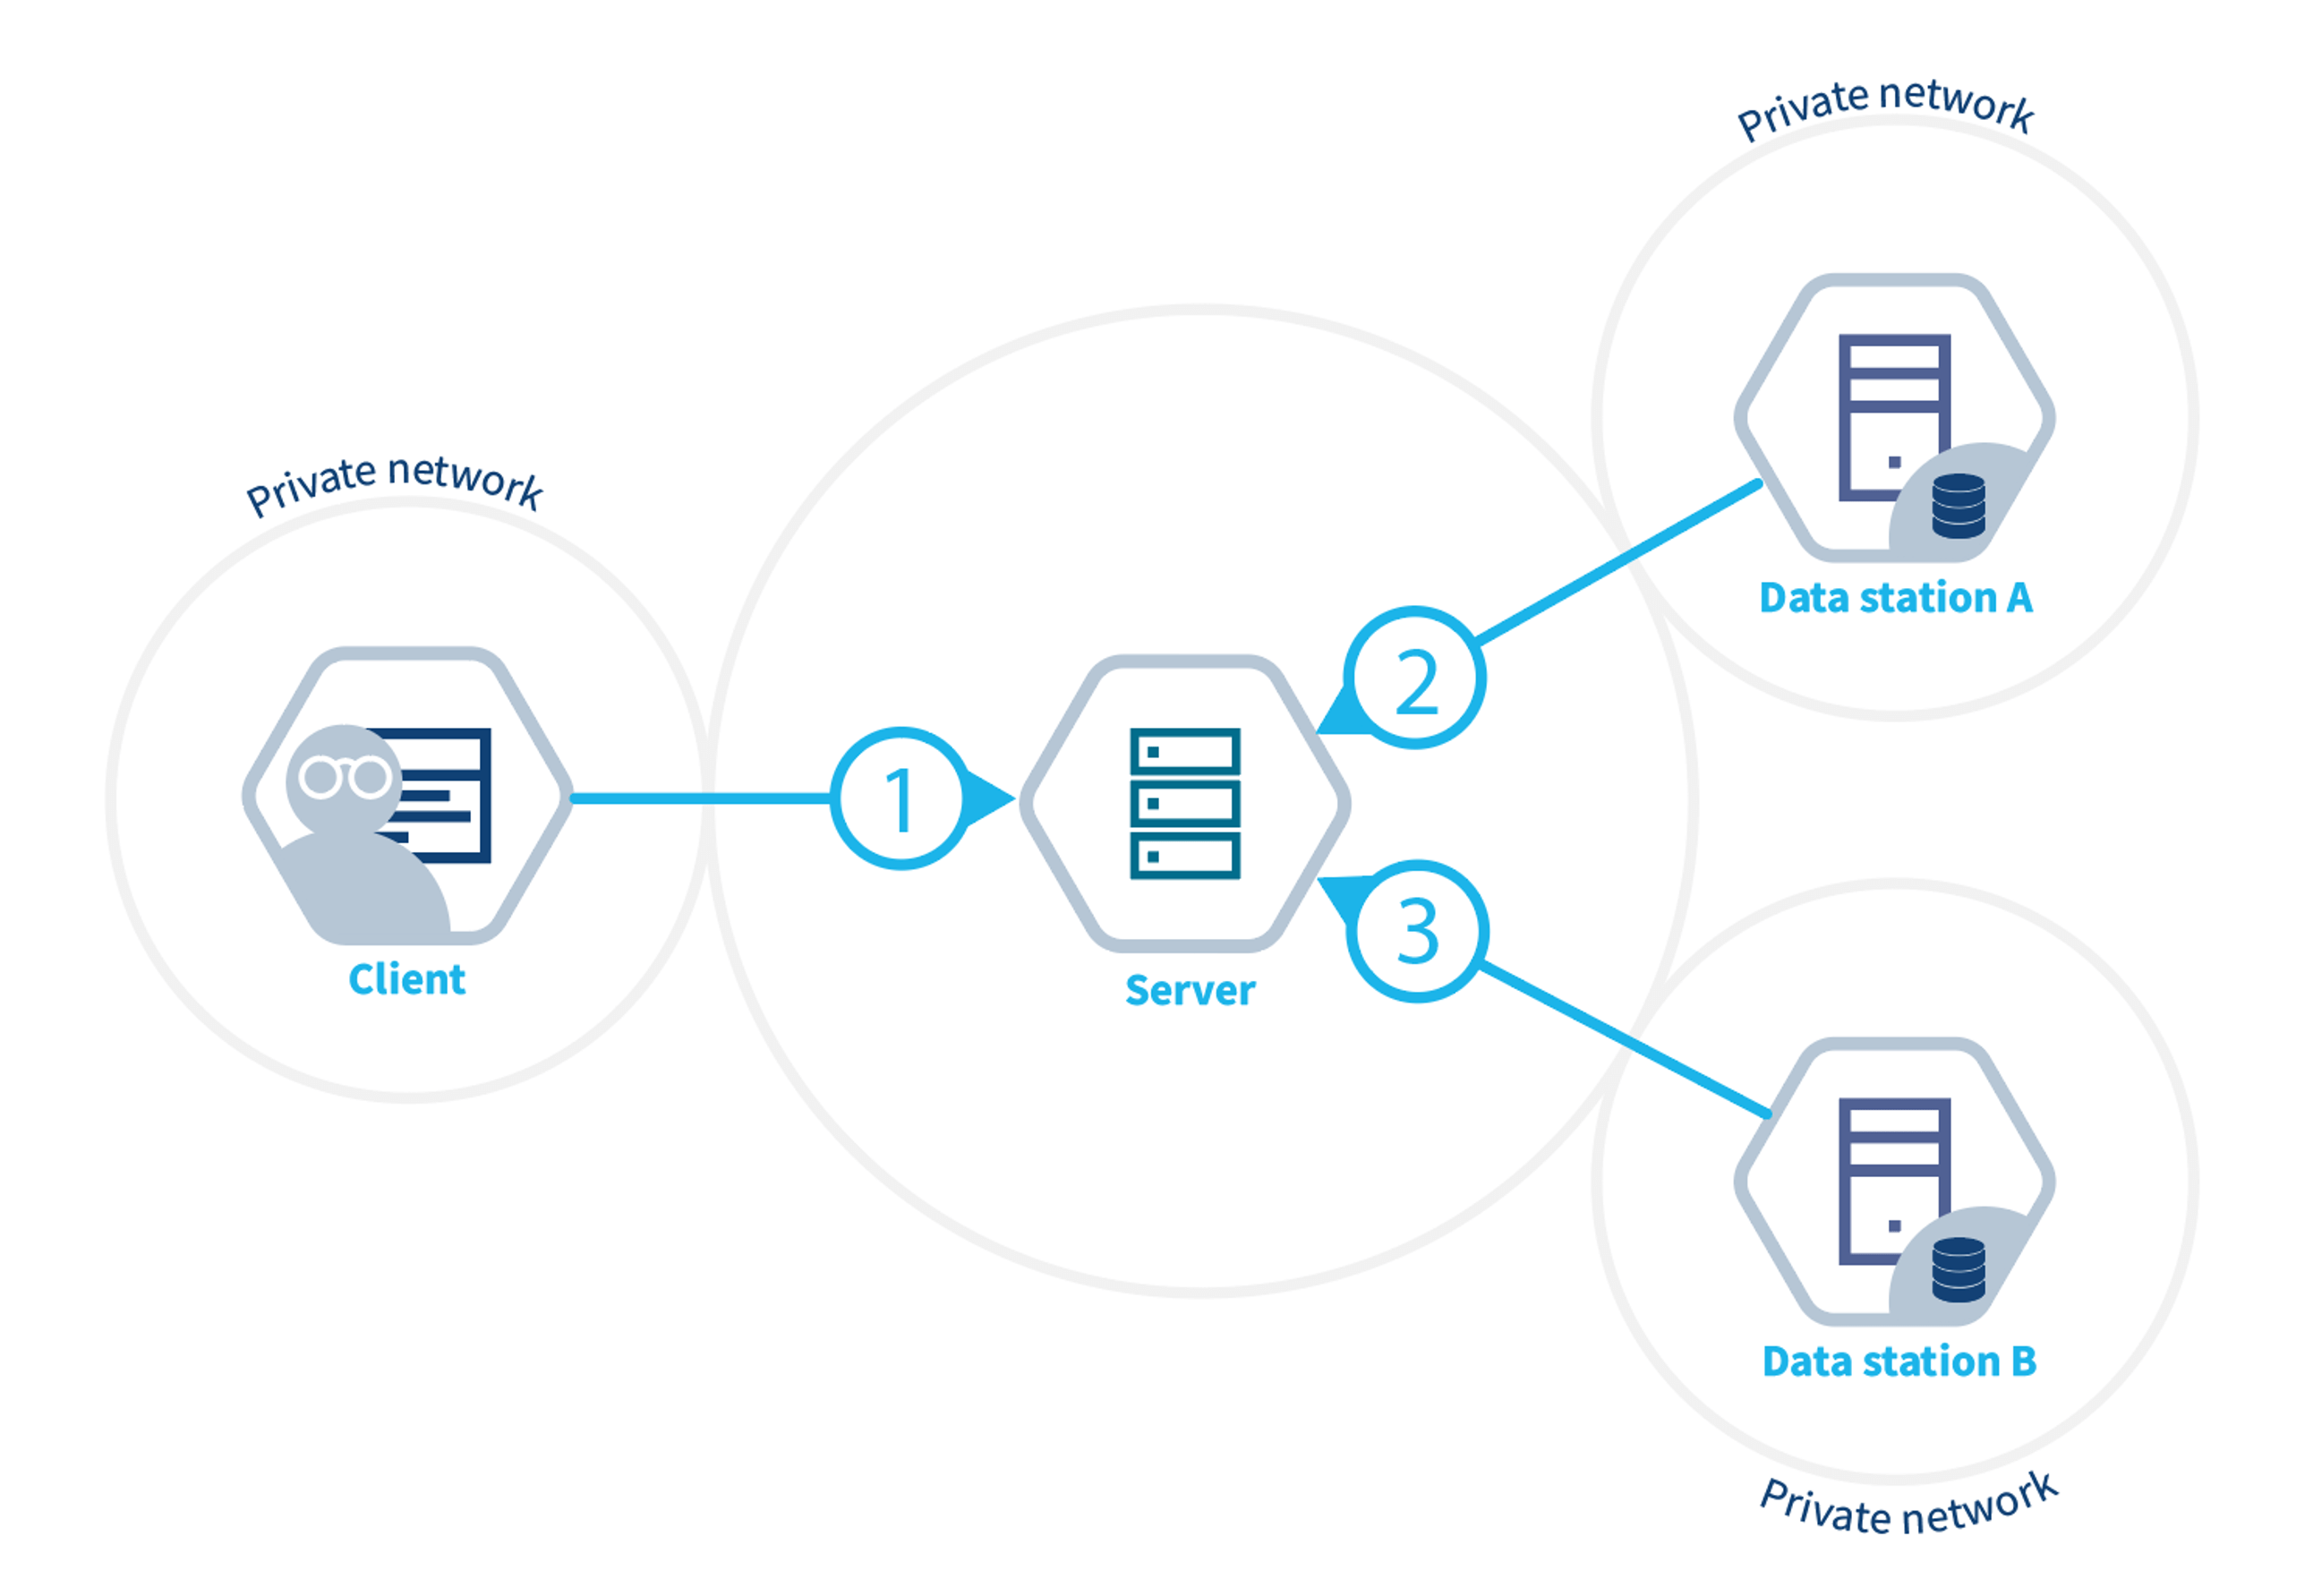
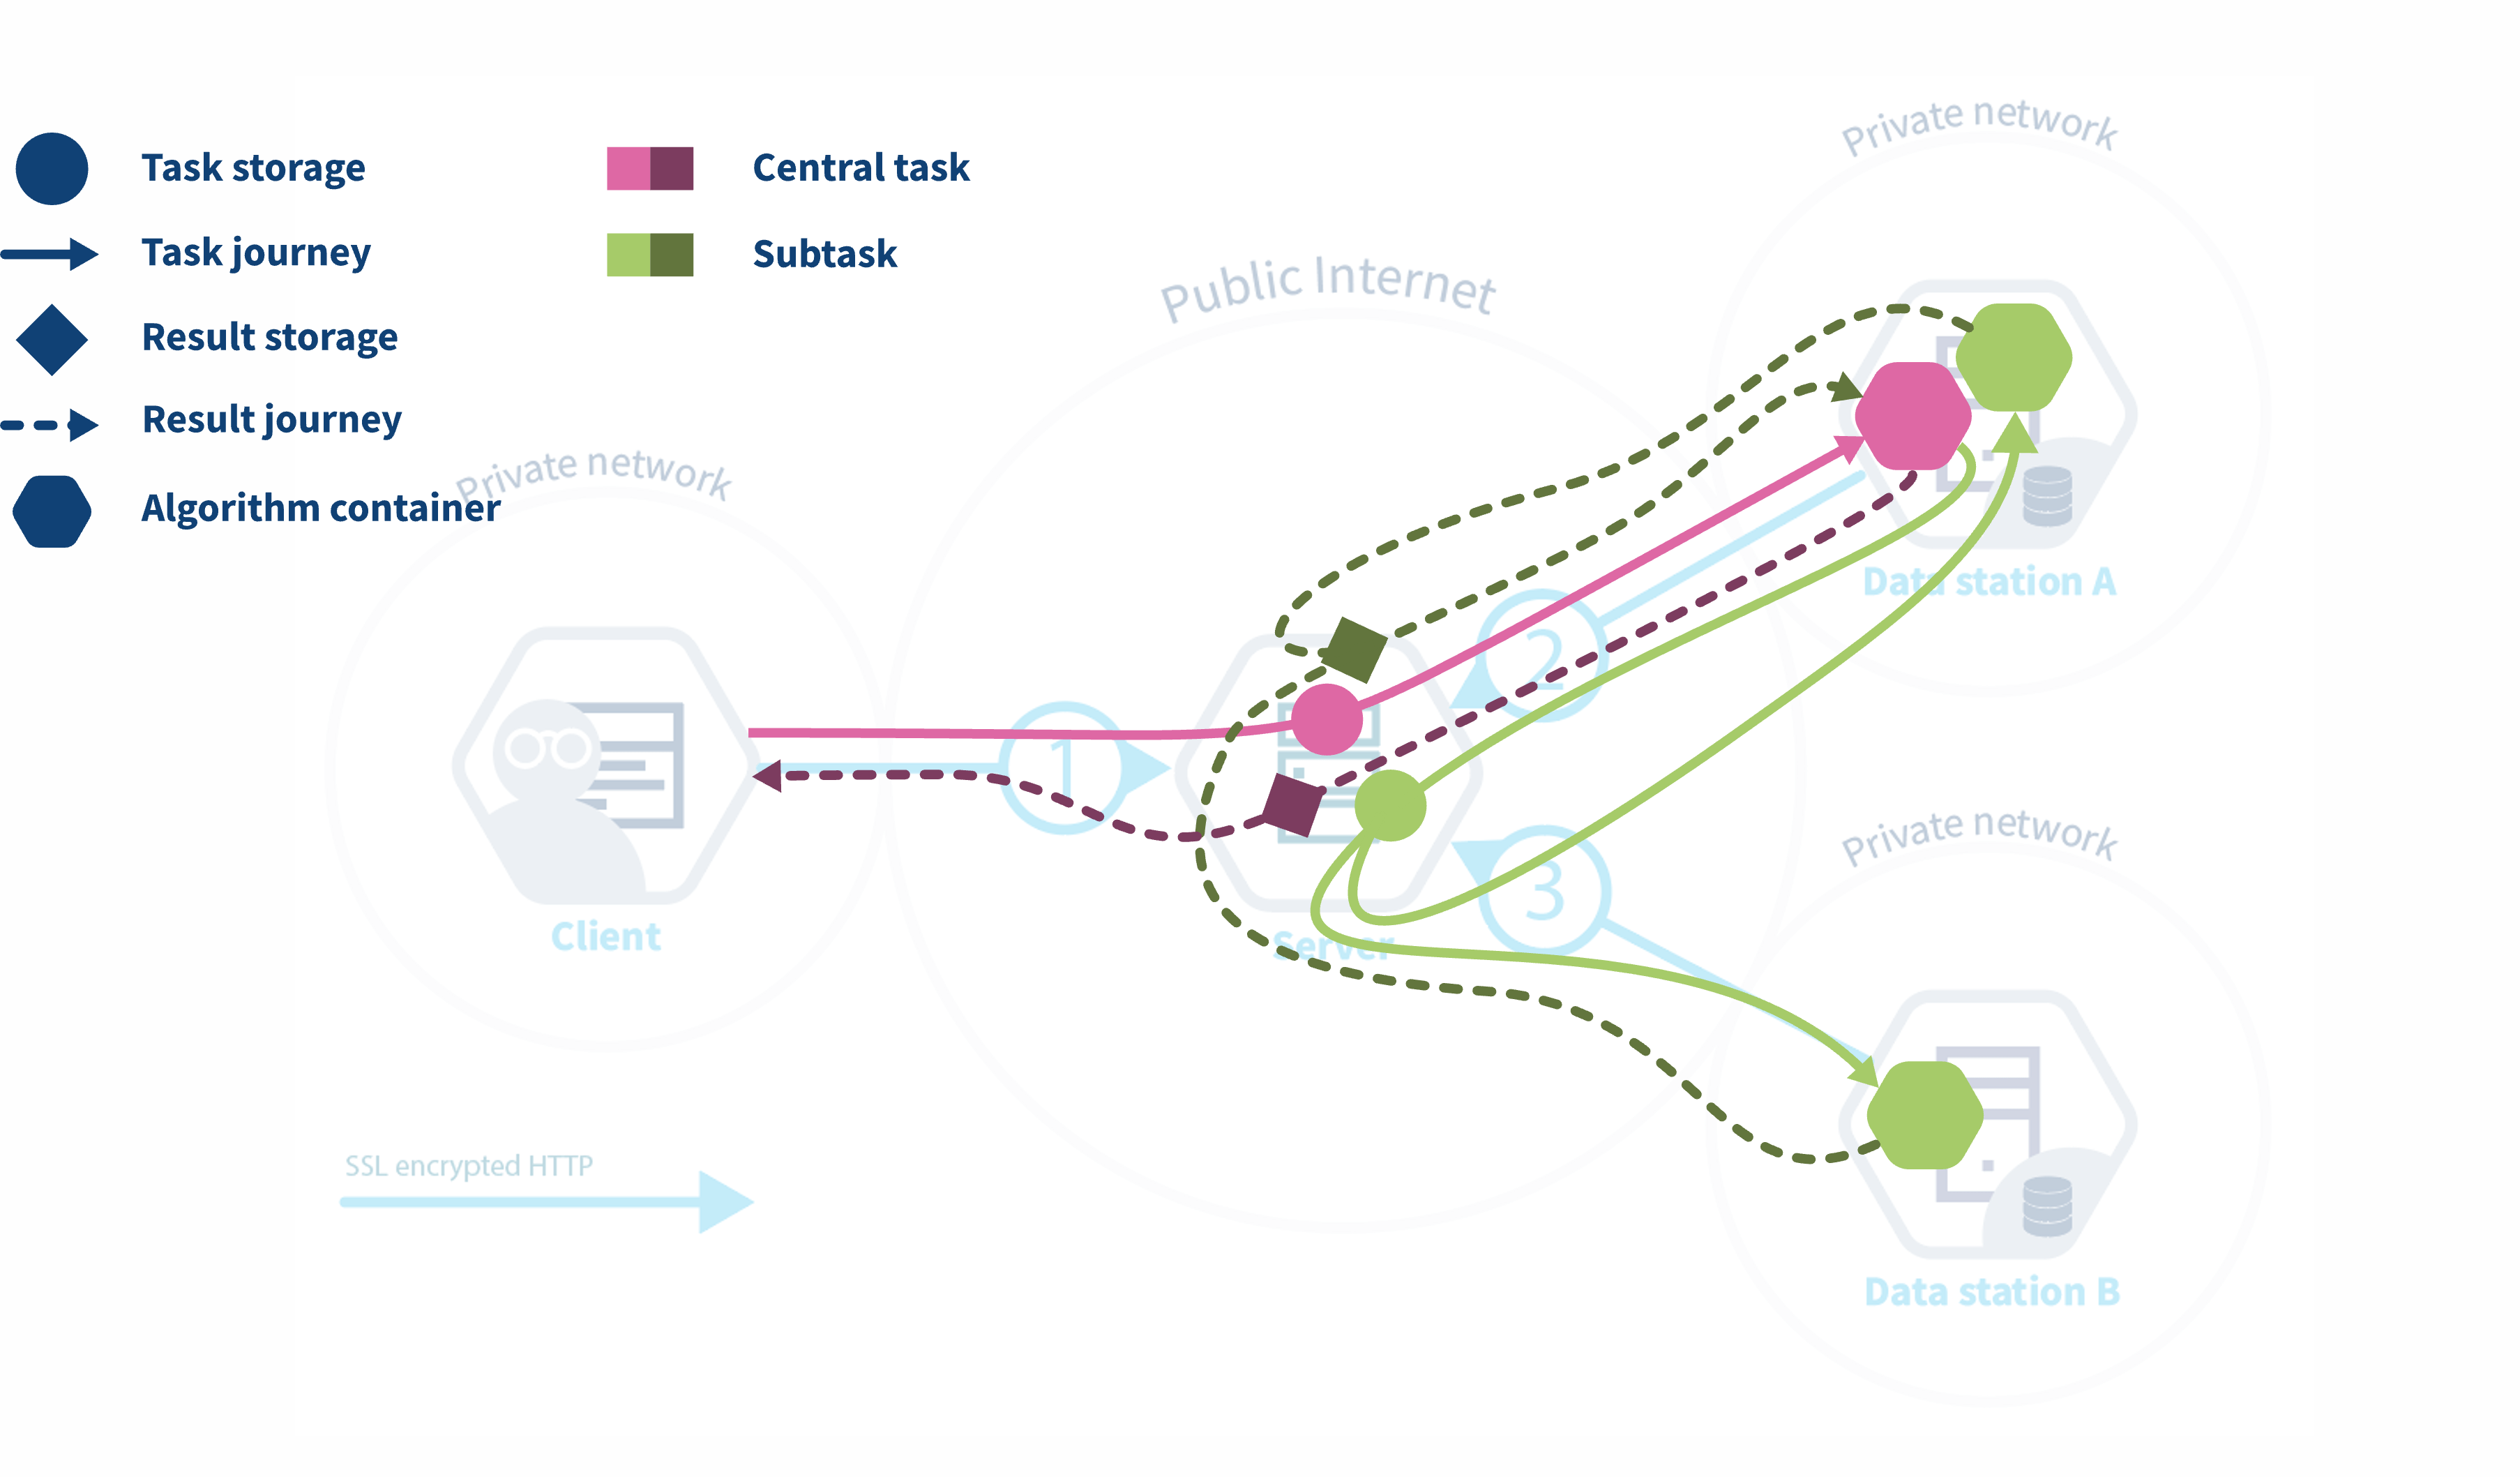
The workflow of a task running in vantage6
The diagram below illustrates what happens when a request is sent by a user to vantage6. In this scenario, a user — with the appropriate credentials — can request the execution of tasks within using the UI. In this case, the user might request the execution of an algorithm (previously registered in an algorithm store trusted by the collaboration) across all participating organization nodes. In response, each node from the involved organizations executes the algorithm on its local data. The resulting (aggregated) data is then sent back to the server, where it can be accessed by the requesting user. To enhance the security of the communication, messages between organizations can be encrypted. In this case, an organization can have a public key that the other collaborating organizations have to use in order to exchange messages.
How algorithms run in vantage6
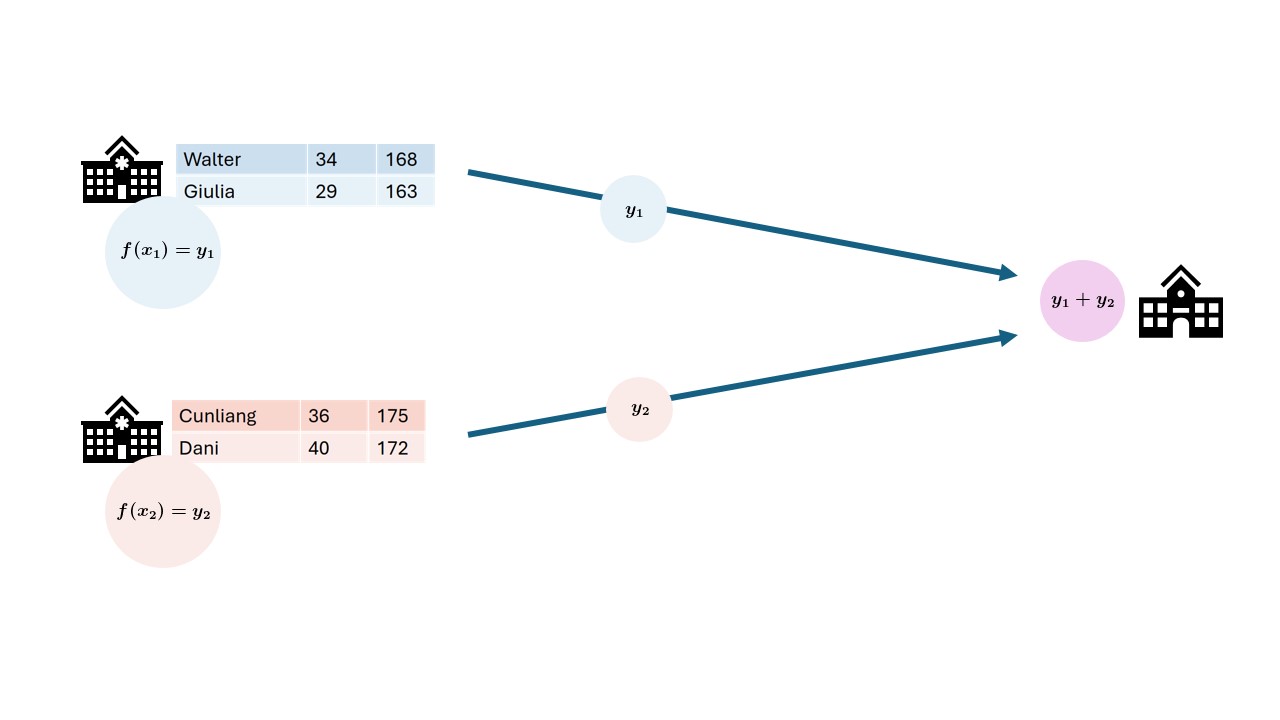
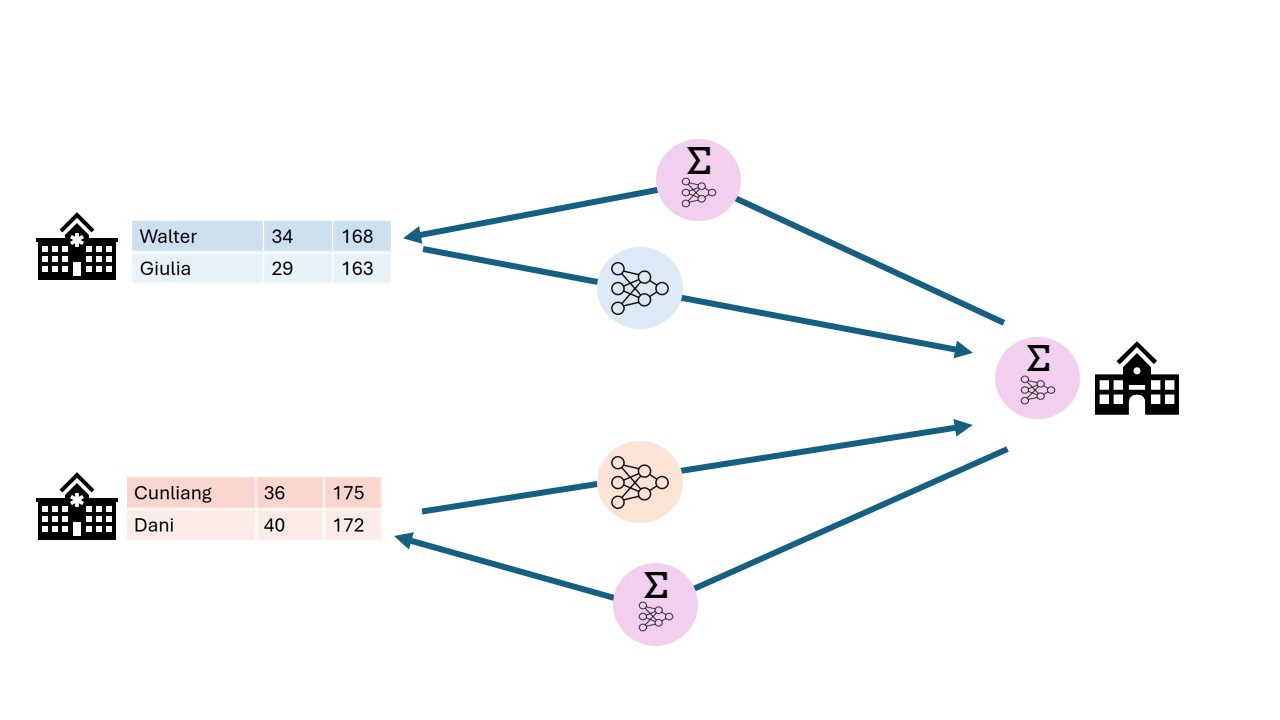
So how does vantage6 relate to the privacy enhancing techniques that we discussed in chapter 1? Let us consider the federated sum from chapter 1 again
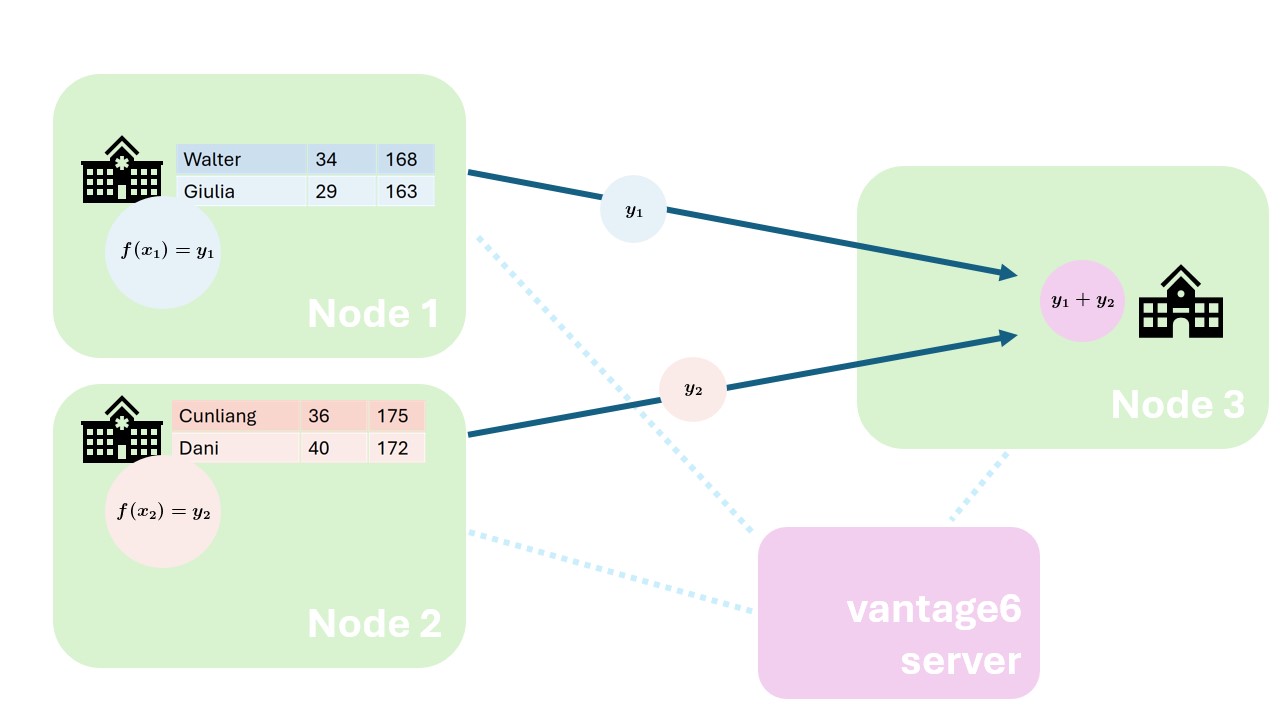
As you can see, both the datasources and the aggregation entity are mapped to nodes. The vantage6 server is on the side, coordinating the analysis.
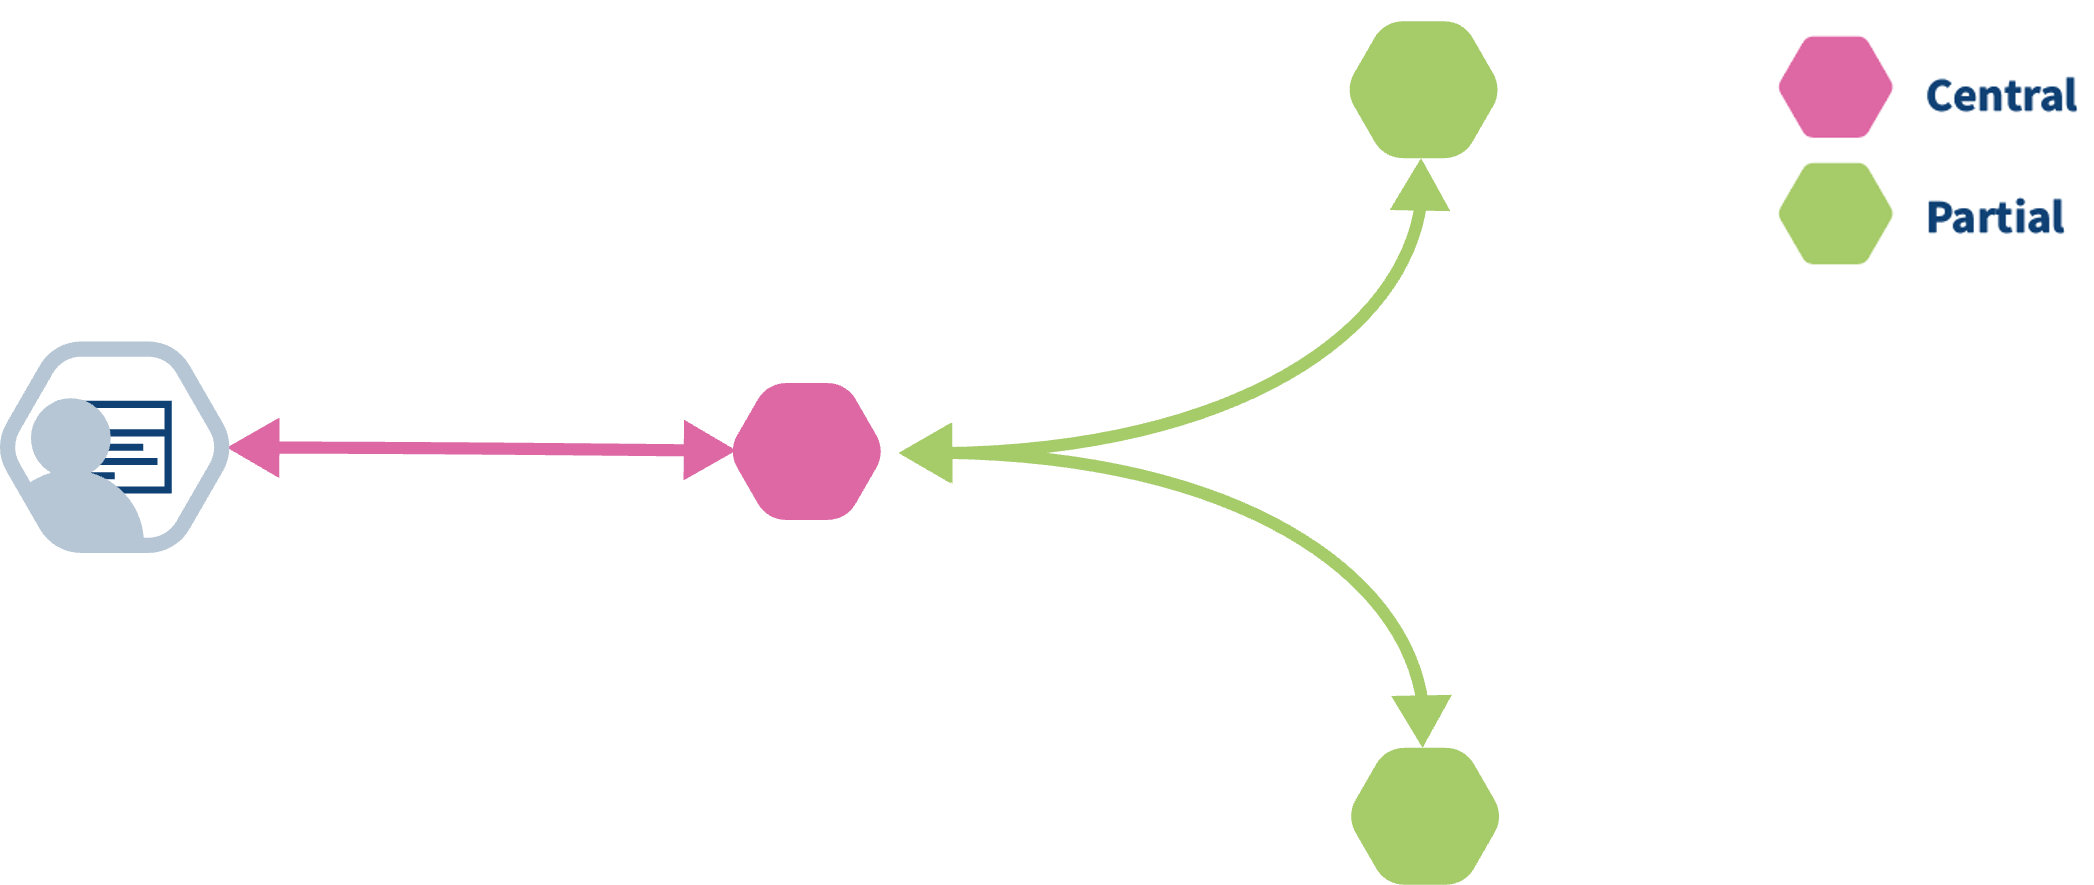
Federated algorithms can be split in a federated and a central part:
Central: The central part of the algorithm is responsible for orchestration and aggregation of the partial results. In our example this would be the aggregation.
Federated: The partial tasks are executing computations on the local privacy sensitive data. These would be the nodes on the left.
Now, let’s see what typically happens if a task is created in vantage6:
- The user creates a task for the central part of the algorithm. This is registered at the server.
- The task registration leads to the creation of a central algorithm container on one of the nodes.
- The central algorithm creates subtasks for the federated parts of the algorithm, which again are registered at the server.
- All nodes for which the subtask is intended start their work by executing the federated part of the algorithm.
- When finished, the nodes send the results back to the server
- Each node’s results are picked up by the central algorithm. The central algorithm then computes the final result and sends it to the server
- The user retrieves the result from the server.
vantage6-server vs central part of an algorithm
It is easy to confuse the vantage6 server with the central part of the algorithm: the server is the central part of the infrastructure but not the place where the central part of the algorithm is executed. The central part is actually executed at one of the nodes, because it gives more flexibility: for instance, an algorithm may need heavy compute resources to do the aggregation, and it is better to do this at a node that has these resources rather than having to upgrade the server whenever a new algorithm needs more resources.
Challenge 2: Who computes what?
Two centers \(A\) and \(B\) have the following data regarding the age of a set of patients:
\(a = [34, 42, 28, 49]\)
\(b = [51, 23, 44]\)
Each center has a data station and we want to compute the overall average age of the patients.
Given that the central average can be computed by summing up all the values and dividing the sum by the number of values, using the following equation:
\(\overline{x} =\dfrac{1}n \sum_{i=1}^{n} x_i = \dfrac{34+42+28+49+51+23+44}7\)
To make it ready for a federate computation, the equation can be rewritten as the sum of the elements of A plus the sum of the elements of B, divided by the number of elements of A plus the number of elements of B:
\(\overline{x} =\dfrac{1}{n_a+n_b} (\sum_{i=1}^{n_a} a_i+\sum_{i=1}^{n_b} b_i) = \dfrac{1}{4+3}[(34+42+28+49)+(51+23+44)]\)
Can you determine which part of the infrastructure will execute each part of the computation, and which is the result returned by the different parts?
The Server starts the central task on one of the two nodes (e.g. Data station A).
The node A starts two subtasks, one per node. Node A will run the following computation:
\(S_a =\sum_{i=1}^{n_a} a_i = (34+42+28+49)\)
and it will return the following results to the central task:
\(S_a=153\)
\(n_a=4\)
Node B will run the following computation:
\(S_b =\sum_{i=1}^{n_b} a_i = (51+23+44)\)
and it will return the following results to the central task:
\(S_b=118\)
\(n_b=3\)
The central task receives \(S_a\) and \(n_a\) from node A and \(S_b\) and \(n_b\) from node B, and will run the following computation:
\(\overline{x} =\dfrac{S_a+S_b}{n_a+n_b}=\dfrac{153+118}{4+3}=38.71\)
Future developments of vantage6
Back in 2018 when the development of vantage6 started, the focus was on federated learning. Since then, vantage6 has been extended to support different types of data sources, different types of algorithms and improved its user experience. Privacy Enhancing Technologies (PET) are a rapidly evolving field. To keep up with the latest developments, the vantage6 platform is designed to be flexible and to adapt to new developments in the field.
From the development team we are working towards making vantage6 the PETOps platform for all your (distributed) analysis needs.
We identified a number of areas where we want to improve and extend vantage6 in order to achieve this goal:
Policies
Currently, vantage6 lets you set several policies, such as the organizations that are allowed to participate in a collaboration, the algorithms that are allowed to run on the nodes, and the data that is allowed to be used in a collaboration. We want to extend this to a more generic policy framework in which any aspect of the vantage6 platform can be controlled by policies. This will maximize the flexibility of the platform and make it easier to adapt to new use cases.
For example, it would be possible:
- Define the version of vantage6 that is allowed to be used in a collaboration
- Which users is allowed to run a certain algorithm
- Which algorithms are allowed in a collaboration/study
- Define privacy guards at algorithm level
Model Repository
Currently, vantage6 is focused on privacy enhancing techniques. Some of these techniques result in a model that can be used to make predictions. We want to extend vantage6 with a model repository in which these models can be stored, shared and used. This will make it easier to reuse models and to compare the performance of different models.
- vantage6 is an open source platform to execute PET analysis.
- A client is used to interact with the system.
- A vantage6 server orchestrates the execution of algorithms.
- The nodes contain the data and execute the computation.
- The algorithms in vantage6 have a federated part, running on local data, and a central part, aggregating the results.
Content from Running a PET analysis without programming on vantage6
Last updated on 2024-10-15 | Edit this page
Overview
Questions
- How can I perform basic administrative activities on vantage6 using the web-based UI?
- How do I check the status of a specific collaboration or study in the vantage6 UI?
- How do I request a task through the vantage6 UI?
Objectives
- Explore specific data analysis scenarios that further illustrate the concepts introduced in episode 2.
- Understand the UI-based workflow for performing a data analysis on the given scenarios.
Prerequisite
Make sure you completed the Episode 2 where the concepts the UI is based on are introduced.
From theory to practice: a hypothetical case study using vantage6 collaborations
In vantage6 a collaboration refers to an agreement between two or more parties to participate in a study or to answer a research question together. This concept is central to the Privacy Enhancing Technologies (PETs) that vantage6 supports. Each party involved in a collaboration remains autonomous, meaning they retain control over their data and can decide how much of their data to contribute to the collaboration’s global model and which algorithms are allowed for execution.
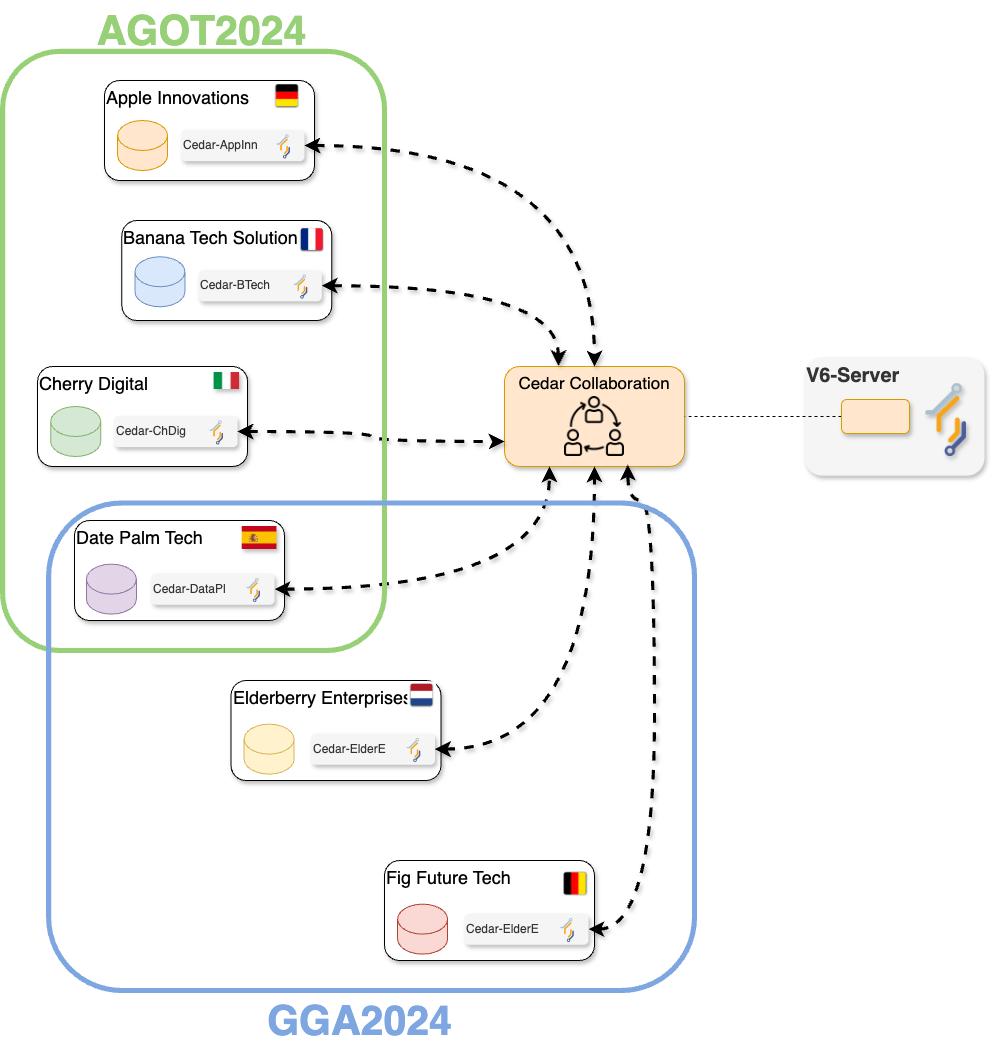
To illustrate this in practice, you will work on a simulated collaboration scenario: an international consortium project of multiple health research institutes, working together on two studies:
Age-Related Variations in Overweight Prevalence: A Comparative Study Across Gender and Age Groups (AGOT2024) .
The Effect of Gender on Height Development Across Various Age Groups (GGA2024).
The first study, AGOT2024, involves the analysis of age and weight-related data available on a subset of the institutions participating in the collaboration. Likewise, GGA2024 involves the analysis of age and height-related data from a different (and potentially overlapping) subset of the collaboration’s participants. In this Episode you will play the role of a researcher of one of the institutions that conform the consortium. As seen on the previous Episode, this means that you will be able to perform data analysis on the whole collaboration, or on any of the two studies defined for it. The following illustrates the kind of collaboration you will be part of (yours may have a different number of nodes, with different names and study configurations).
The consortium members already took care to ensure that their corresponding datasets follow the same structure (variable names and data types). This is key for making the federated analysis possible. The following is an example of how the ‘default’ database on all the nodes within the collaboration look like.
| gender | age | height | weight | isOverweight | ageGroup |
|---|---|---|---|---|---|
| M | 39 | 152 | 108 | False | 30 - 40 |
| M | 8 | 118 | 106 | False | 0 - 10 |
| M | 16 | 161 | 110 | True | 10 - 20 |
| M | 94 | 110 | 115 | True | 90 - 100 |
| M | 47 | 117 | 152 | True | 40 - 50 |
| F | 29 | 127 | 110 | True | 20 - 30 |
| M | 5 | 95 | 65 | False | 0 - 10 |
| M | 39 | 142 | 196 | False | 30 - 40 |
| F | 20 | 189 | 112 | False | 20 - 30 |
| F | 84 | 145 | 116 | False | 80 - 90 |
Interacting with the v6 server
To perform a data analysis, or any other kind of management activity within the collaboration you are part of, you need to interact with the vantage6 server. As described in Episode 2, the vantage6 server is the central component responsible for managing the entire federated/multi-party computation infrastructure and facilitating communication between the various entities within the vantage6 platform. There are two ways of interacting with the server: either by using a web-based user interface, or by programmatically requesting actions to the server API -the same API that powers the web interface behind the scenes. In this Episode you will perform data analyses on the simulated collaboration scenario using the web-based interface, the most user-friendly one (in Episode 4 you will learn how to configure your own collaborations, and on Episode 5, you will explore how to interact with the server programmatically for more advanced use cases).
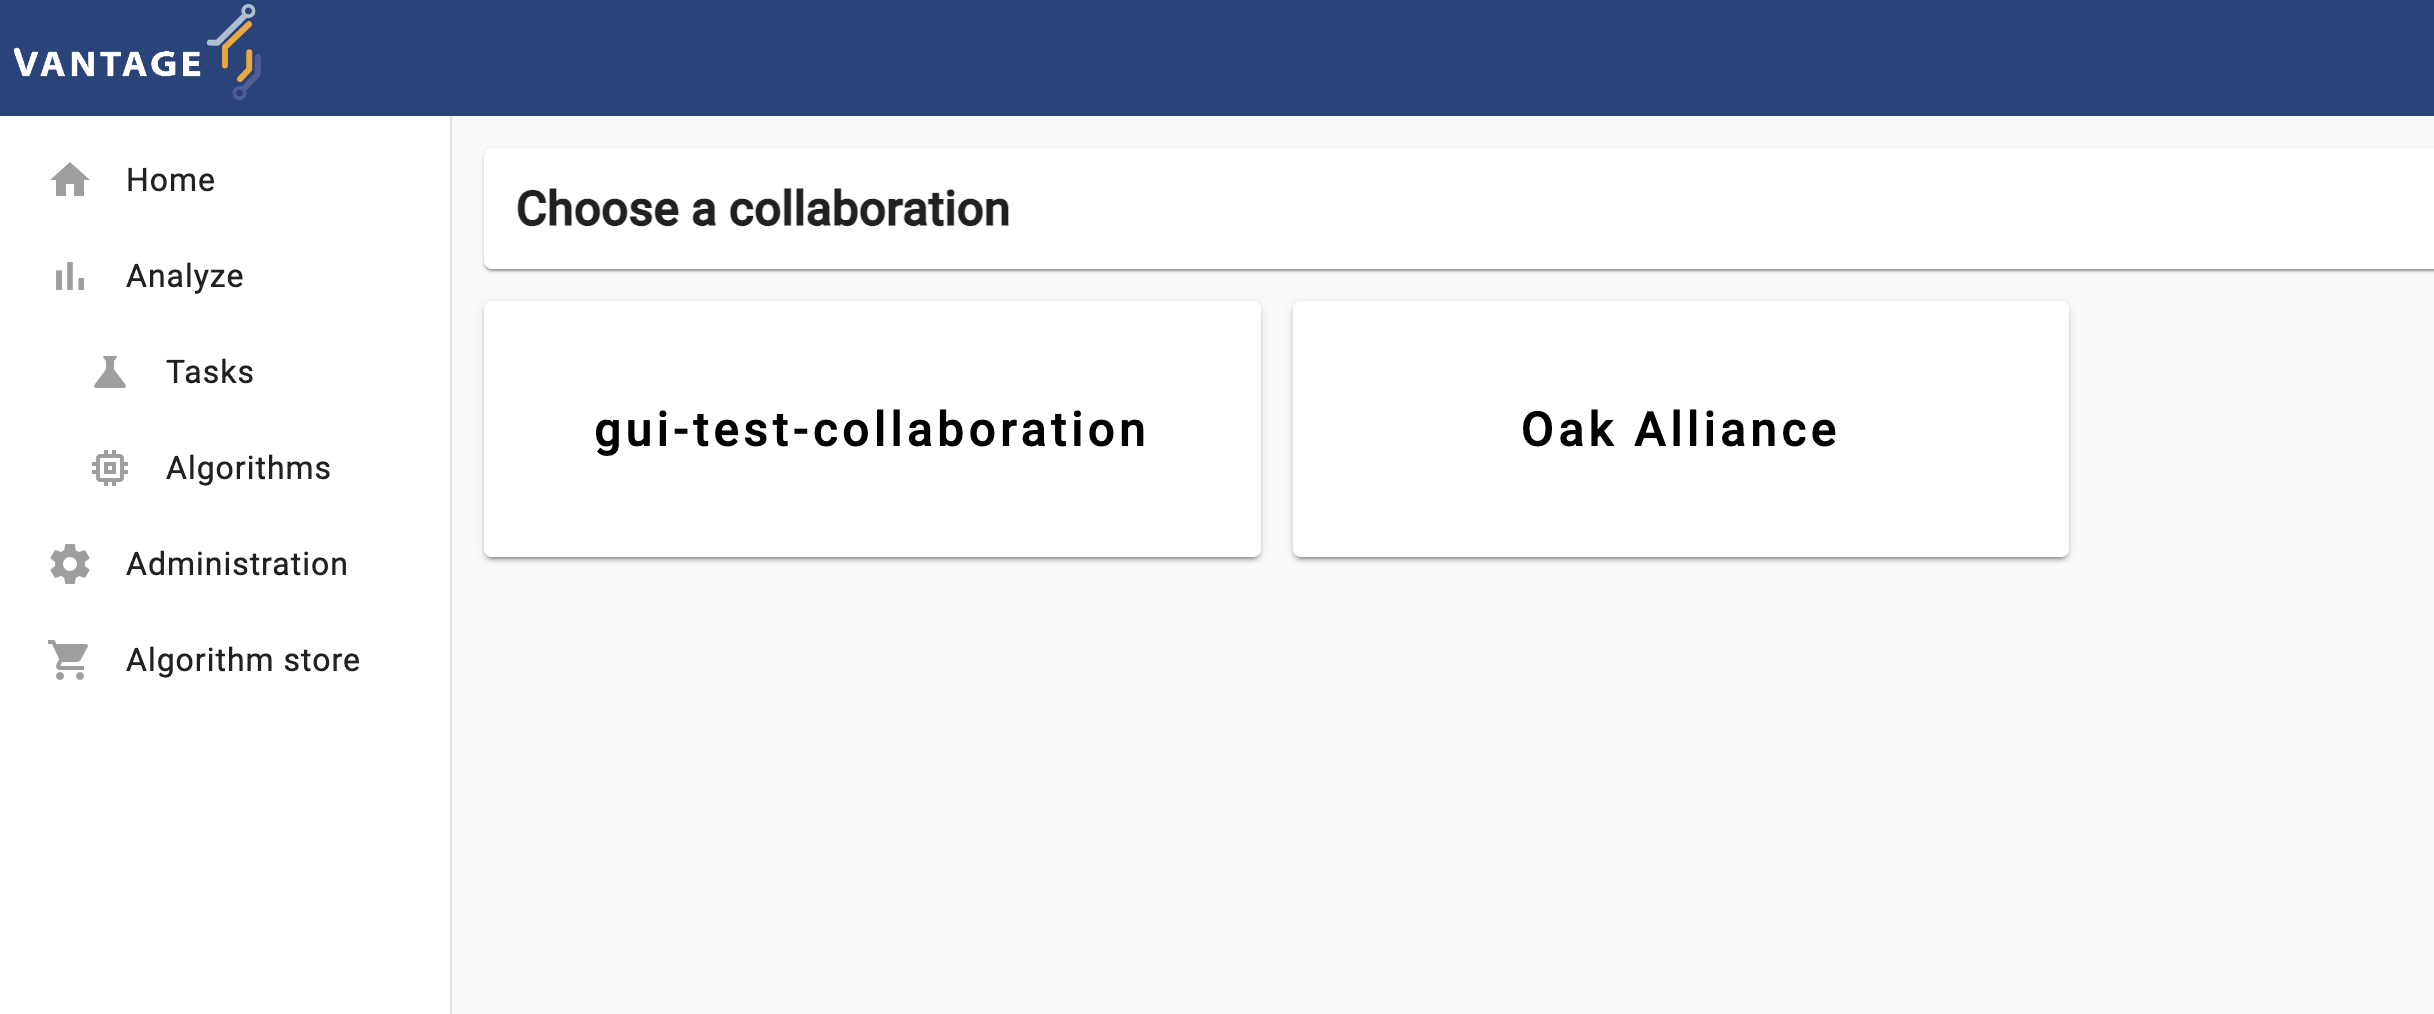
Navigating through vantage6’s UI
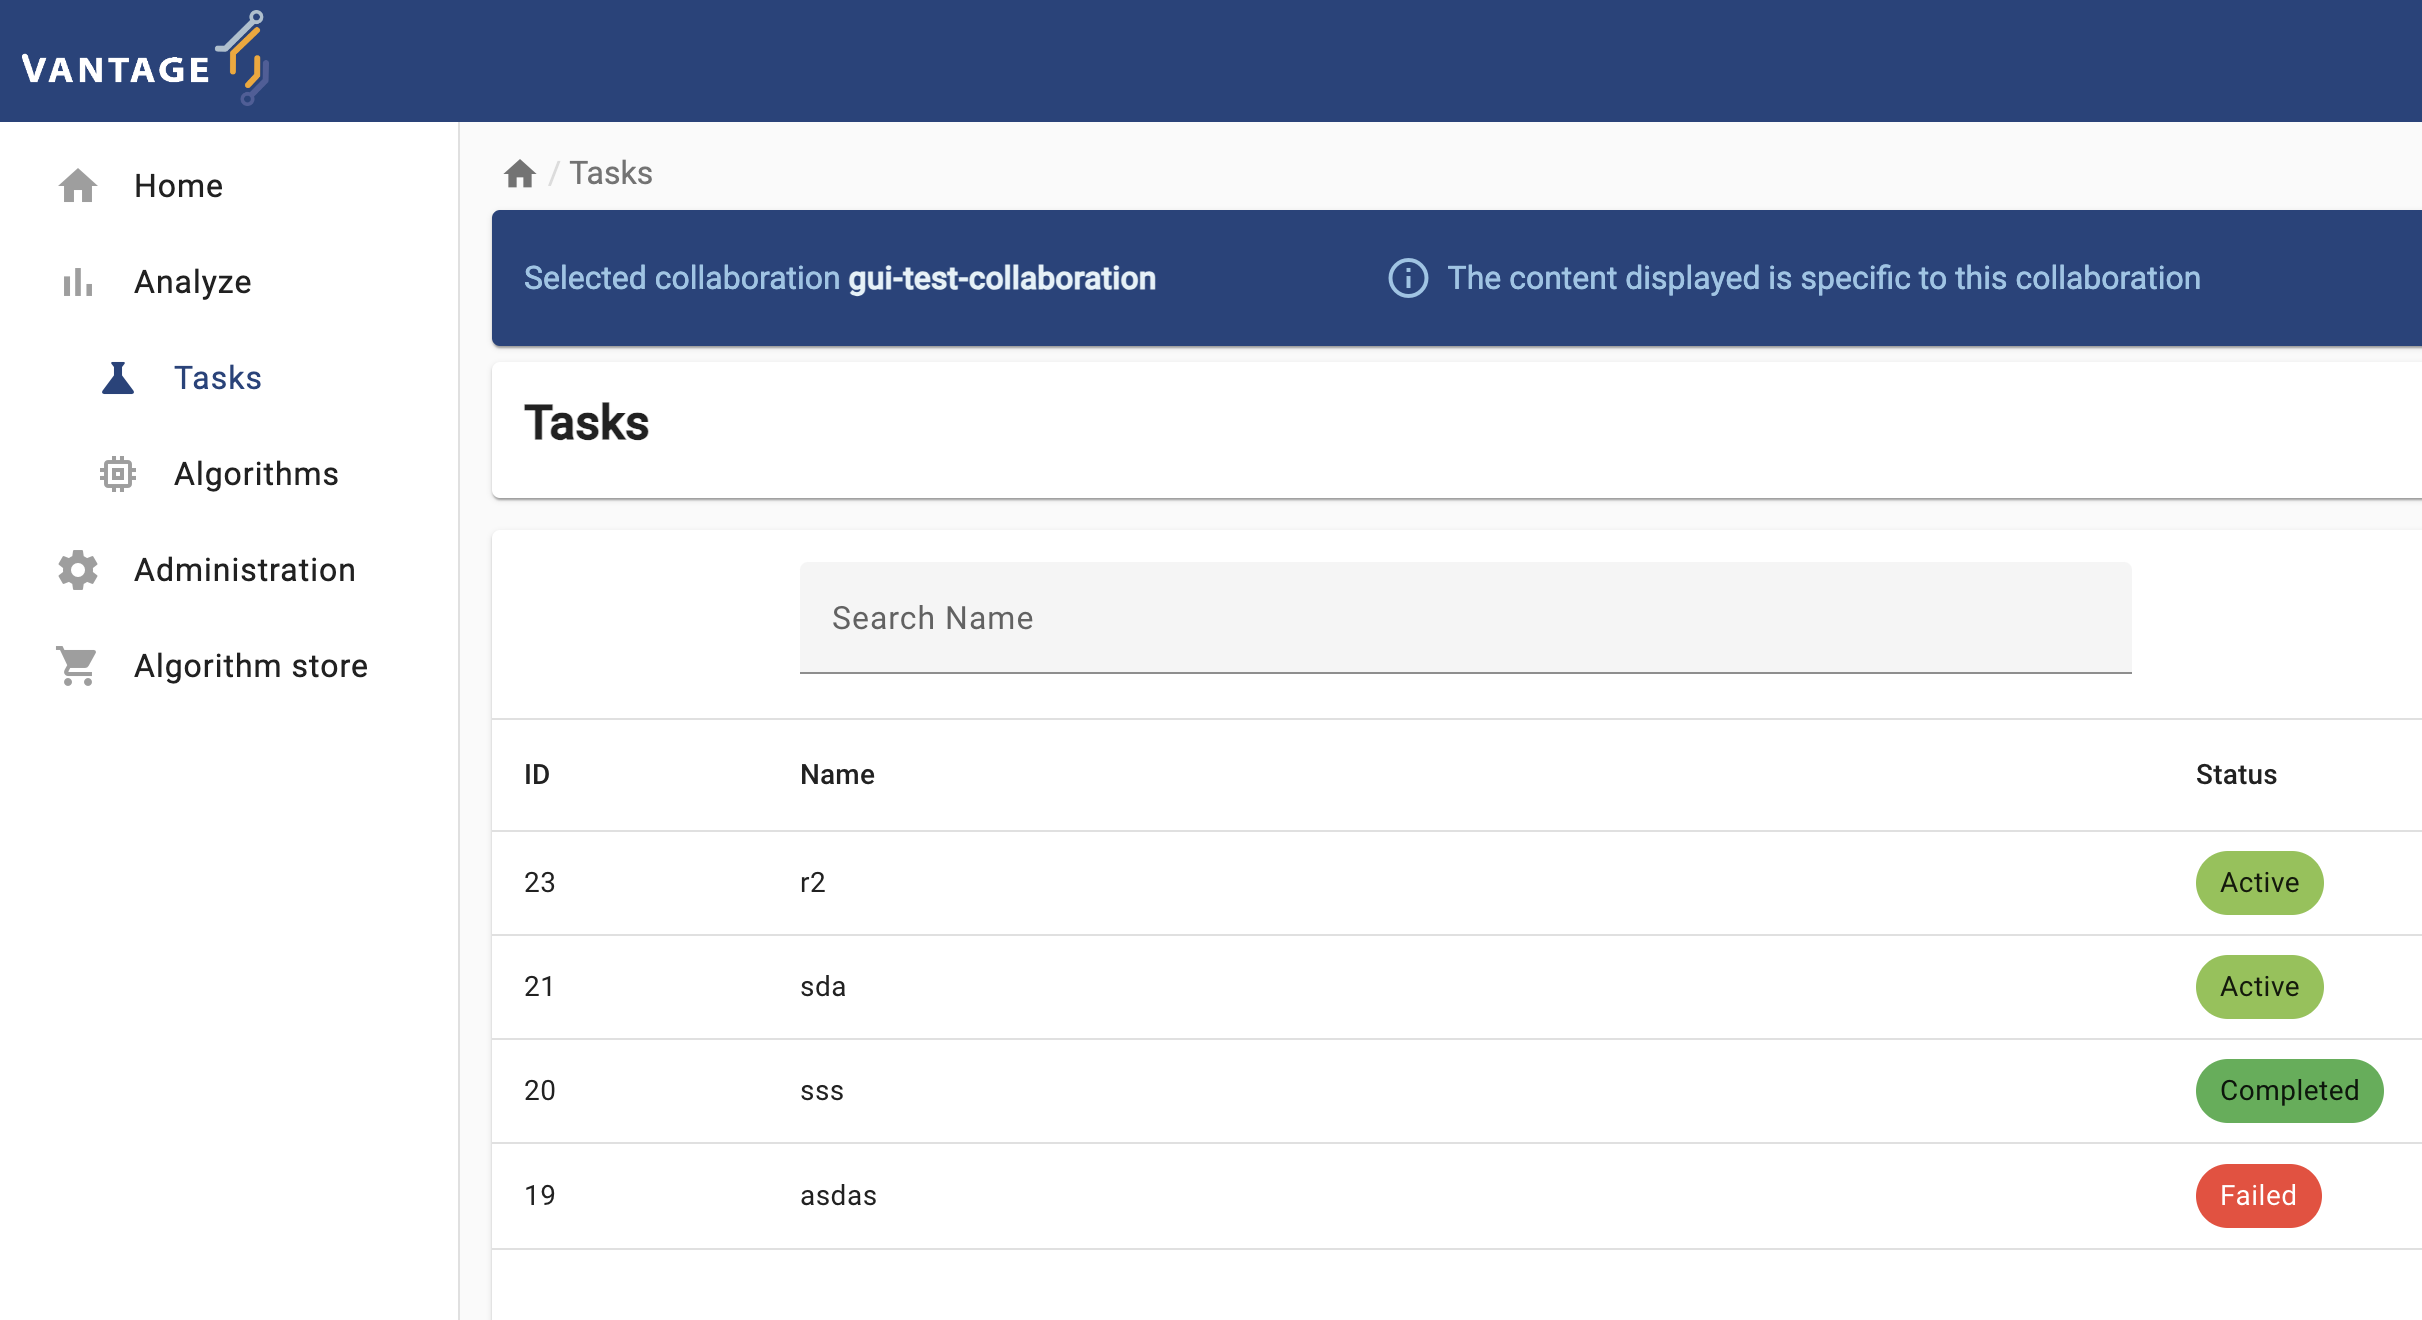
The elements and navigability of vantage6’s UI are based on the concepts introduced in Chapter 2. For instance, as seen on the screenshots below, upon selecting a collaboration on the start page, if you select ‘Tasks’ you will see the status of the tasks created for that particular collaboration.
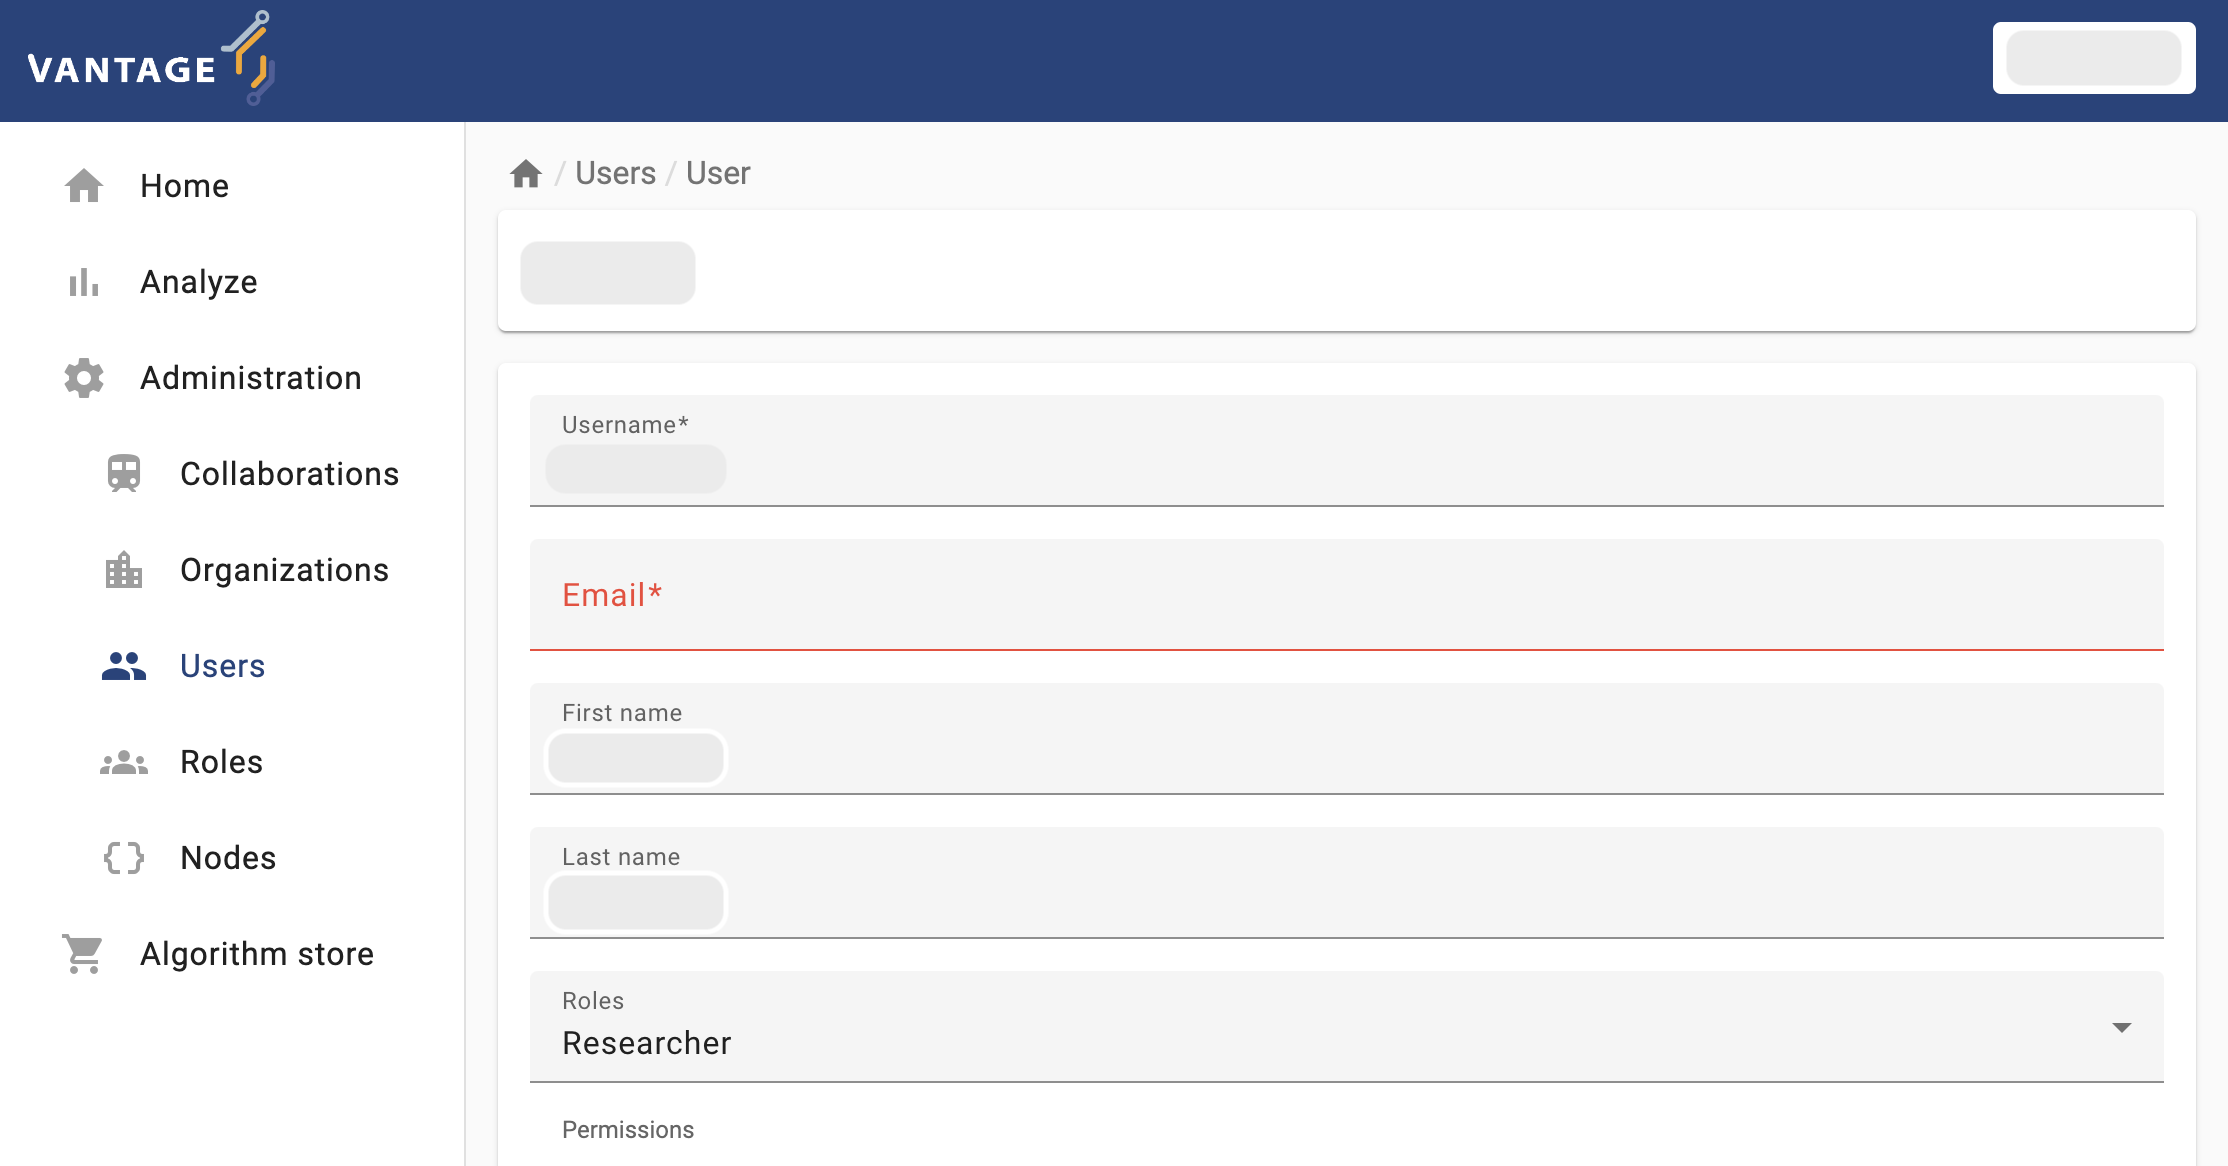
Likewise, expanding the Administration icon in the left
panel will let you choose vantage6 entities youn can manage:
Organizations, Collaborations,
Roles, Users, and Nodes. You can
click on an entity to see more details or to edit the entity.

Getting familiar with the vantage6 UI
To get familiar with vantage6’s UI, you will start with a simple task: edit the details of your own user (the connection details for this activity will be given by the instructors). Log into the UI using the information provided and navigate to the administration page and try to update your email, first name, and last name.
Running a PET (privacy-enhancing technology) through the user interface (no coding involved!)
Now that you are familiar with the UI basics, the next two details you need to figure out as a researcher, in order to perform you analysis are (1) which kind of analysis I need perform, and (2) on which data nodes it will be peformed? There is another important consideration, though: is my collaboration or my studies ready for my analysis? Keep in mind that each node within your collaboration is autonomously managed by the organization it was configured. This means that you although you can include them in your analysis, you can’t control them (they may just be offline for no reason).
Challenge 2: checking the status of the nodes through the UI
With your researcher credentials, explore the collaboration you have access to. Check which organizations are part of it and if they are online. Also check which organizations were assigned to each study (AGOT2024, GGA2924). Based on this:
- Which study is ready for executing an analysis?
- If you need to perform an analysis for the study that is not ready, which organization you would need to contact to fix this situation?
Running a federated algorithm
Now you will perform an analysis on the study that is ready for it (i.e., the study with no offline nodes). As this is an introductory exercise, you will first use the simple algorithm introduced in Chapter 2: the Federated Average.
Challenge 3: as a researcher, requesting an algorithm execution! (partial function)
Login with your researcher credentials.
Select
Analyzeon the Administration option from the panel on the left, and then select your collaboration.-
Select
+ Create taskto create a new task on your collaboration.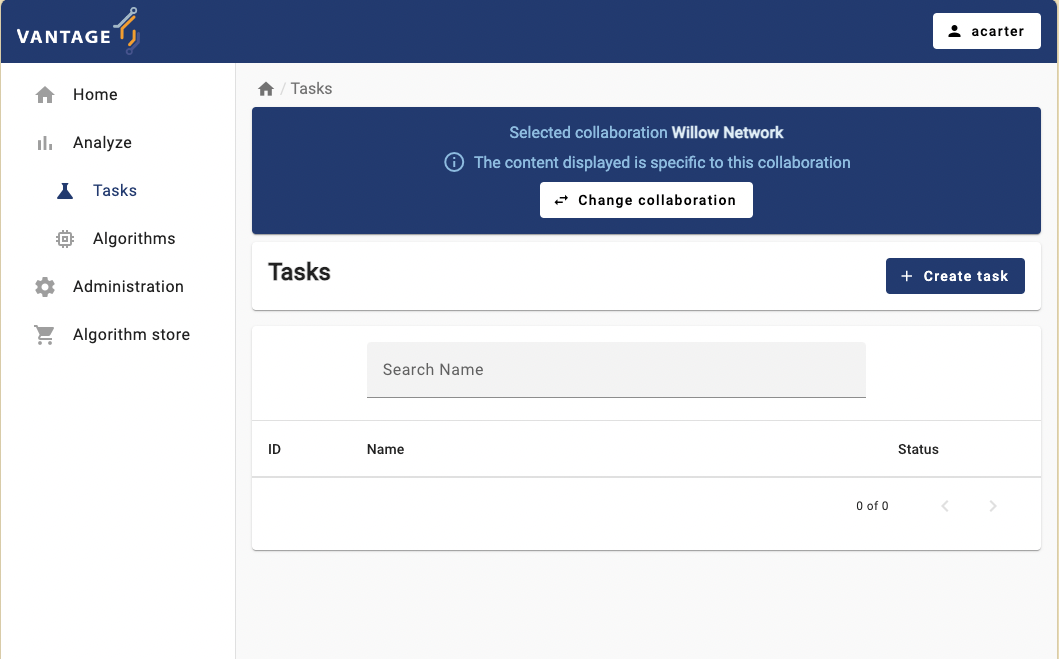
-
As the first step, you can choose between running the task on the entire collaboration, or on one particular study (i.e., on a subset of the collaboration’s institutions). Choose the study that is ready for an analysis.
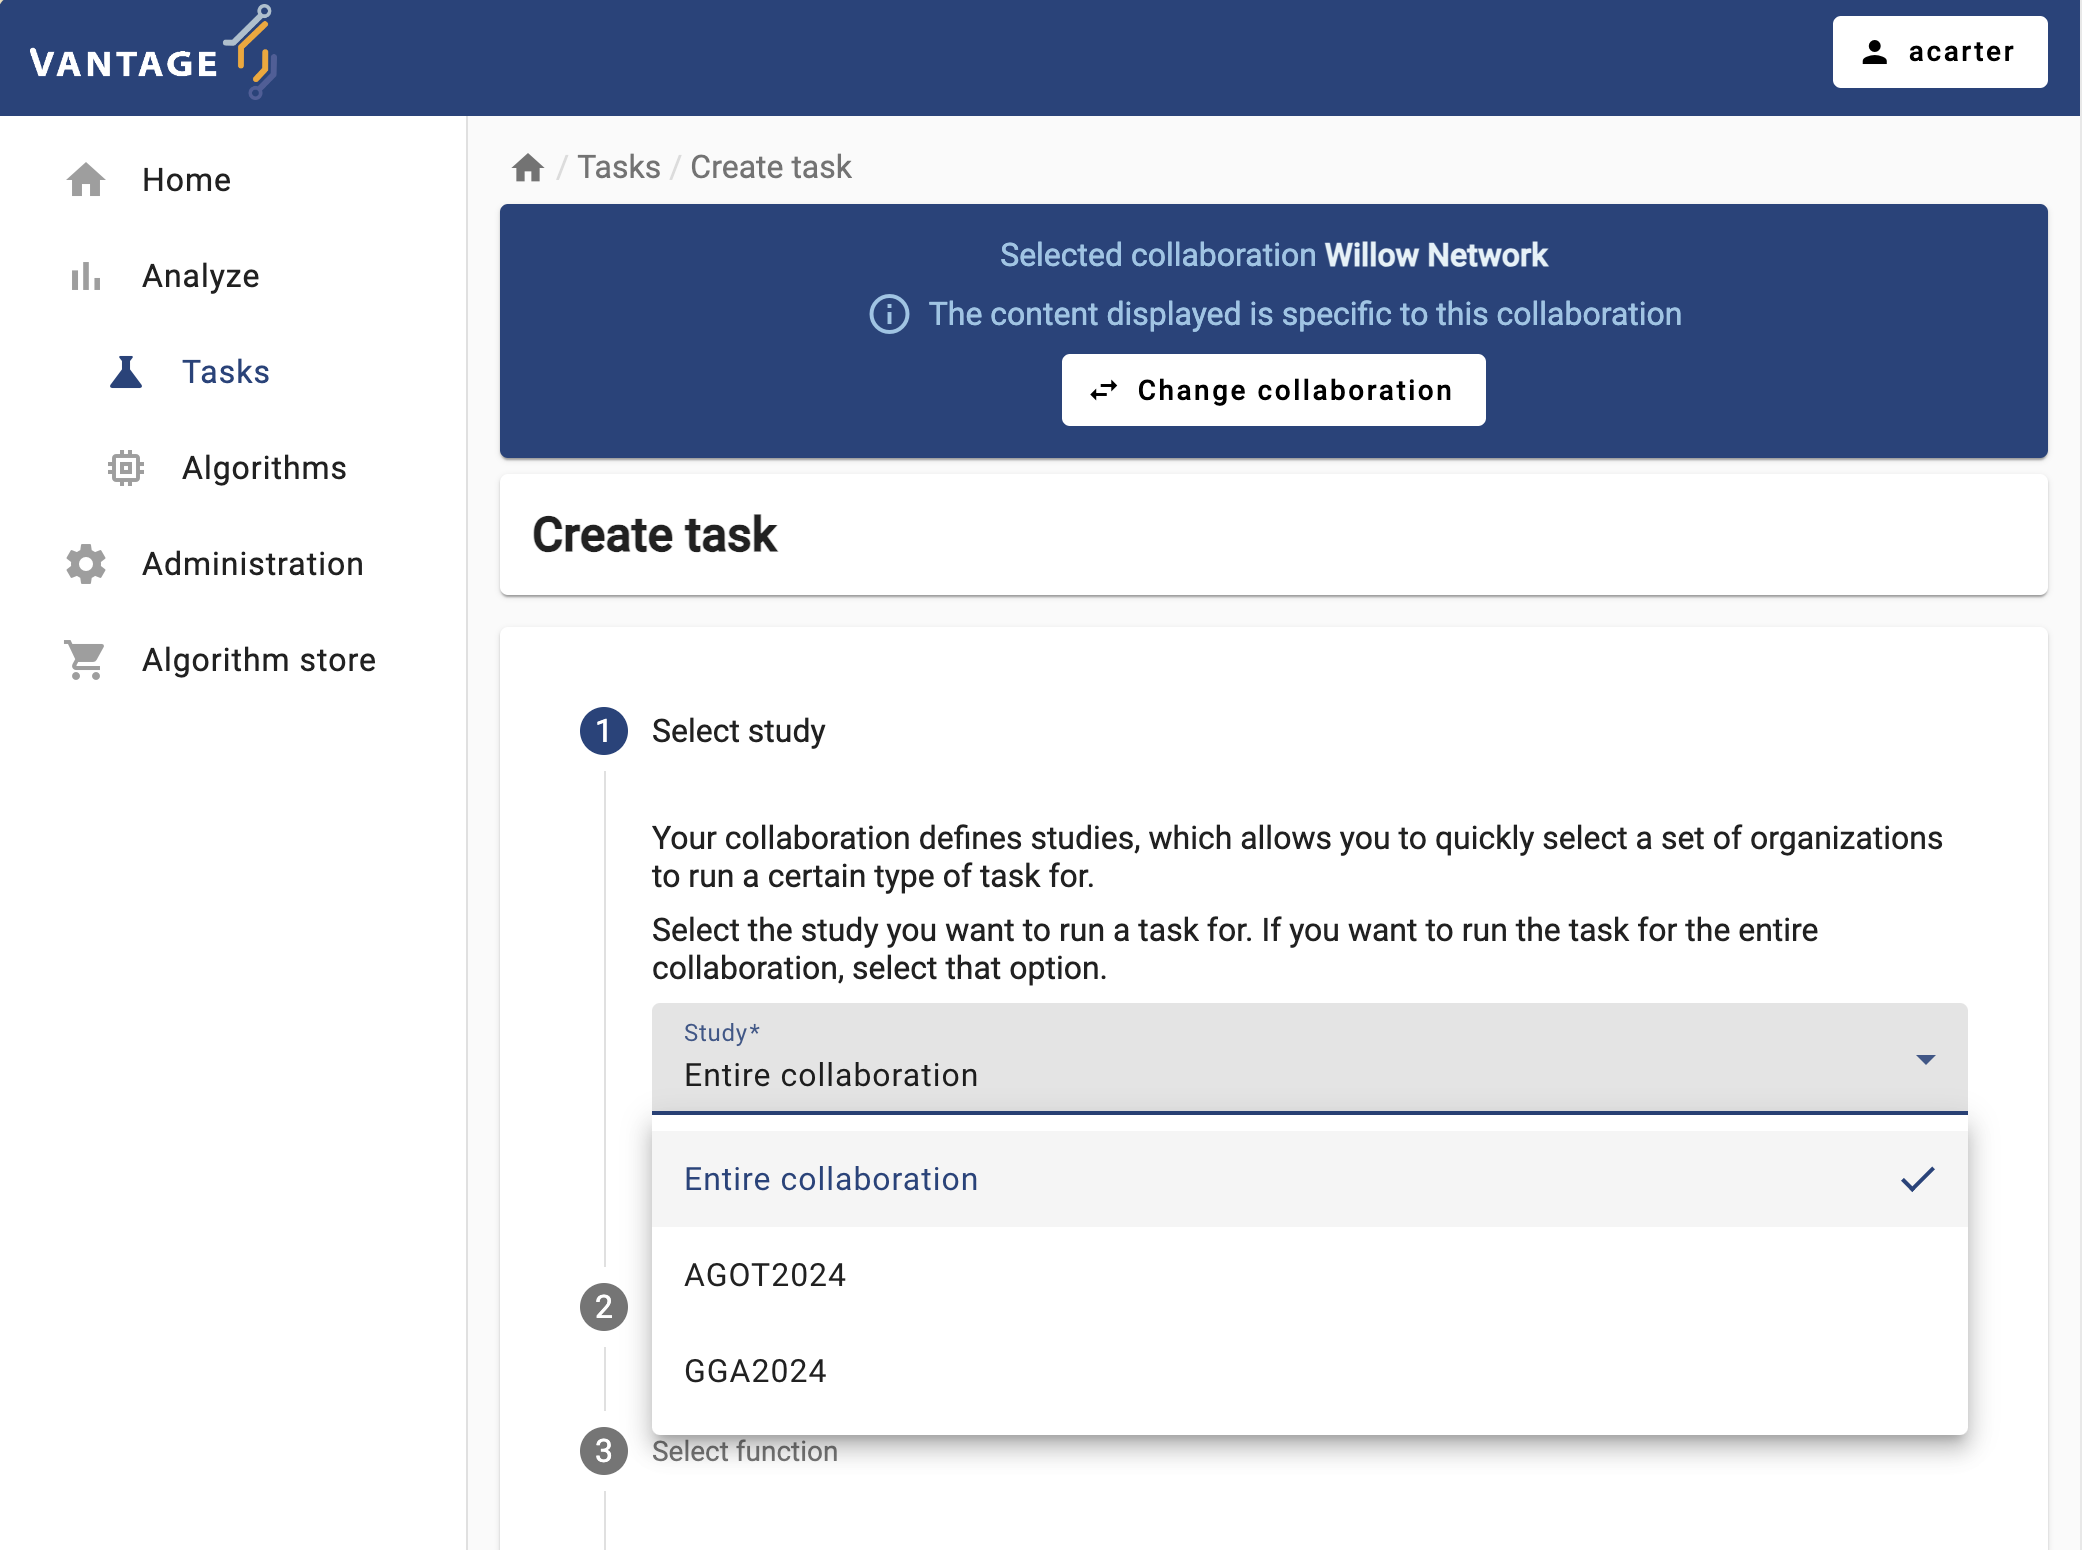
-
The ‘Average’ algorithm should be listed under the ‘Select which algorithm you want to run’ dropdown menu. Select it, and provide a name and a description.

-
Now the UI will let you choose between the two functions you explored in Challenge #2. For now try to run the
partial_average, selecting ALL the organizations.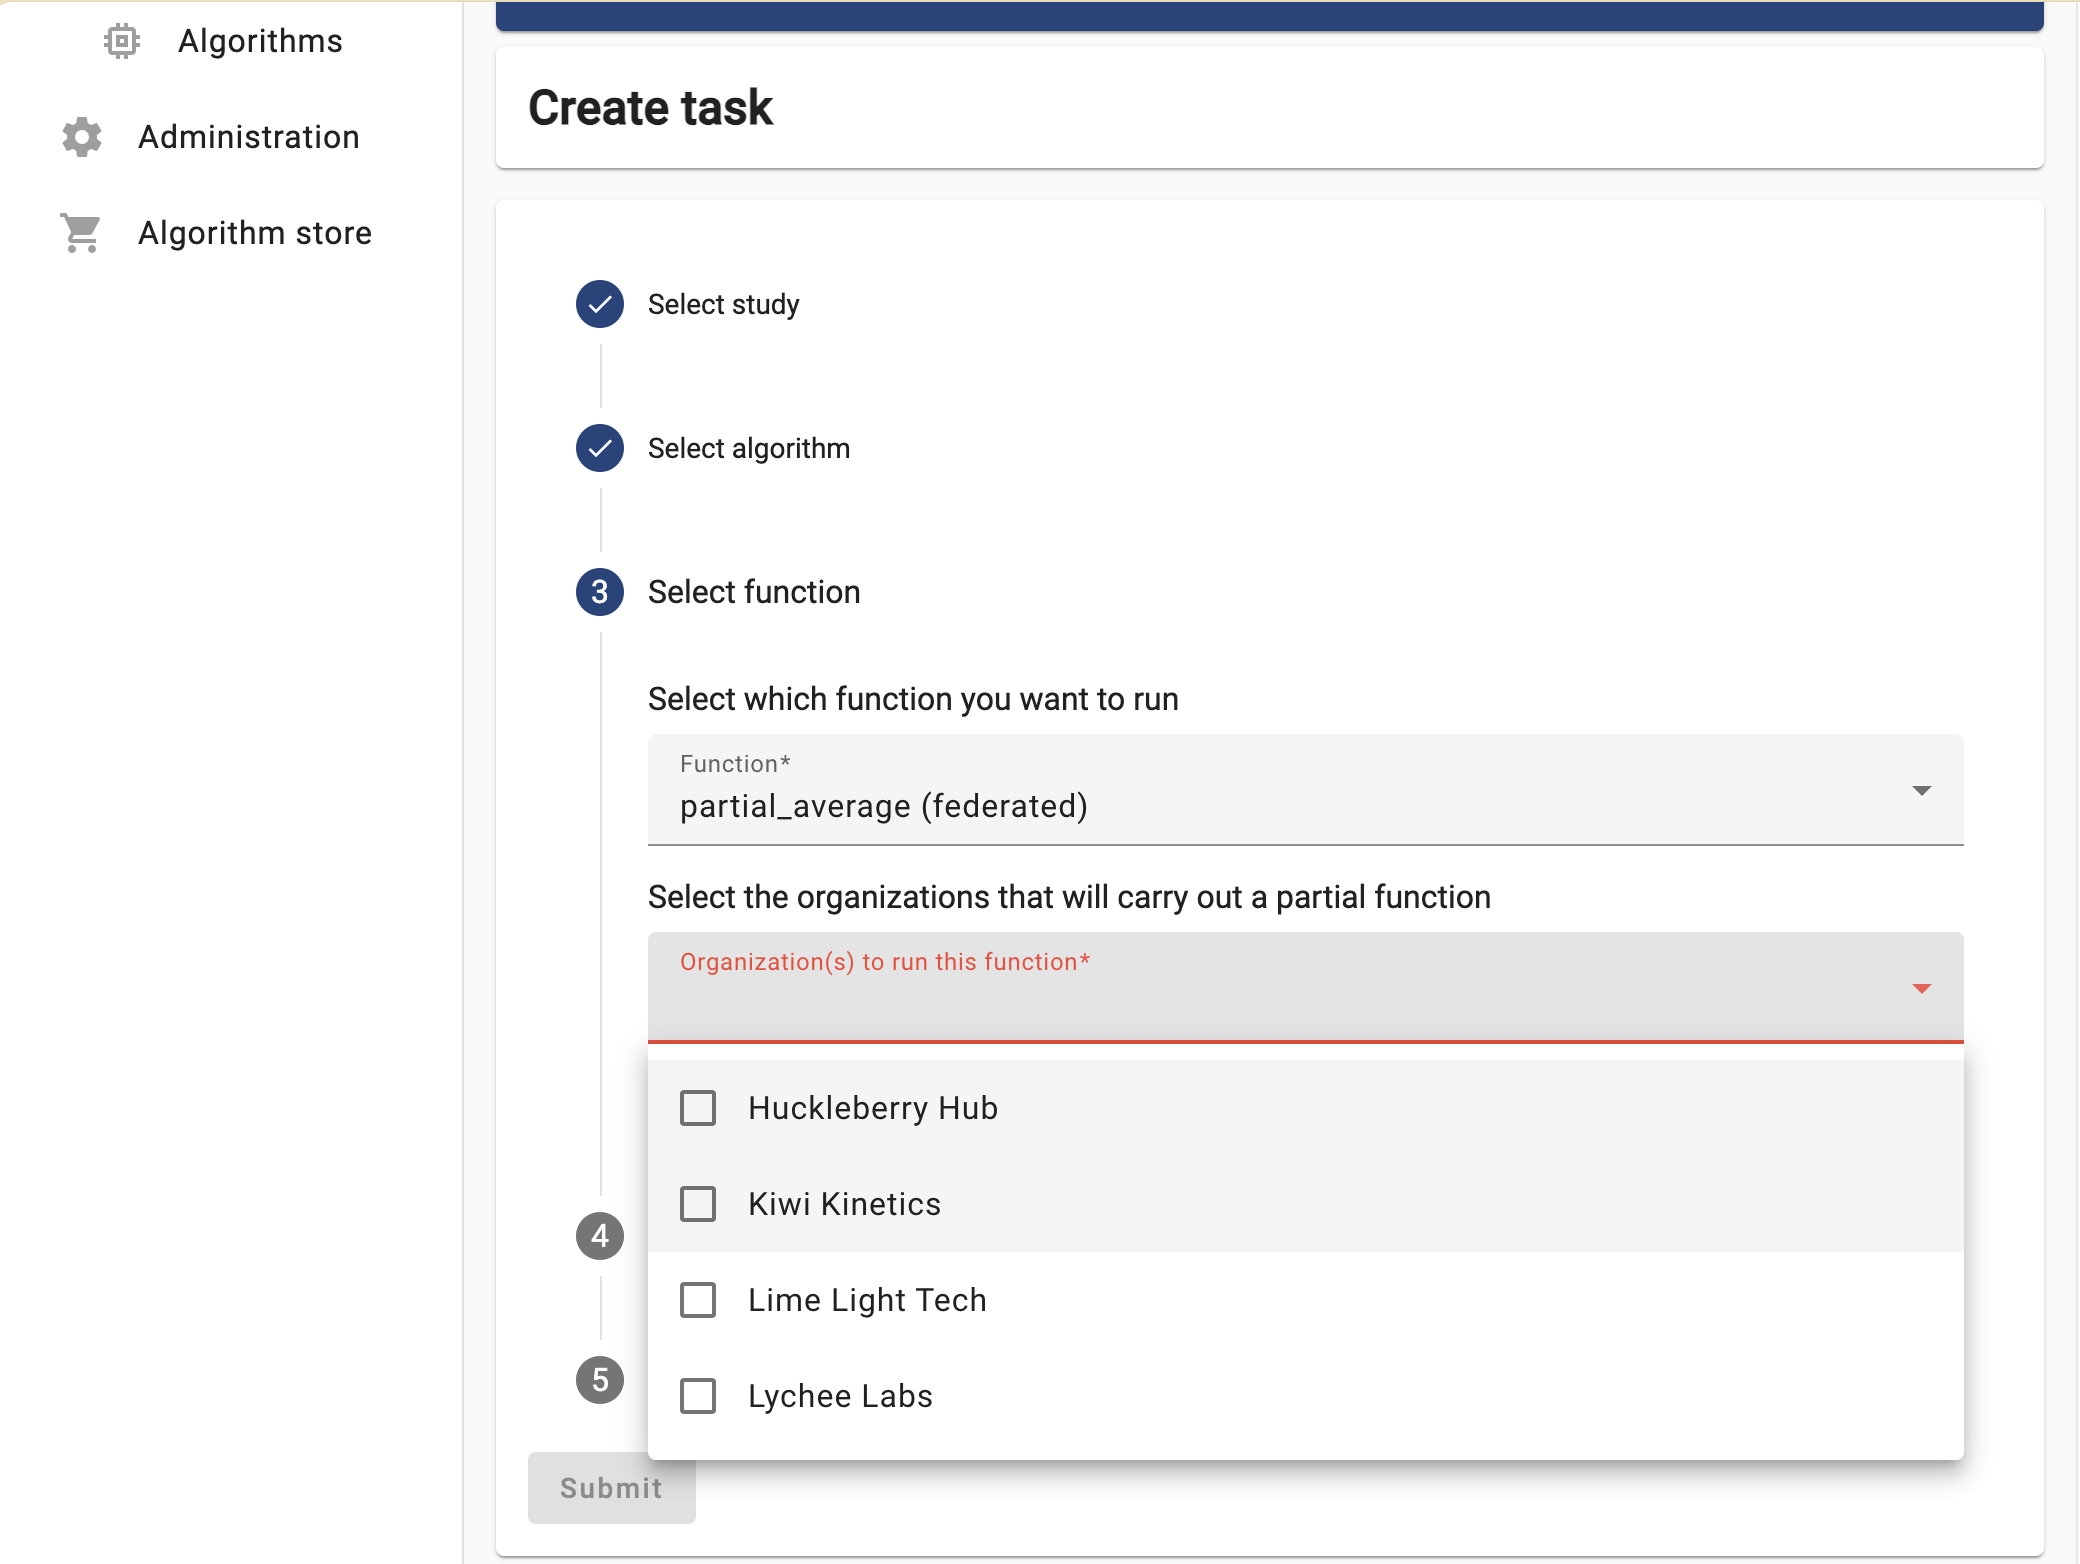
Select the ‘default’ database, choose any numerical column relevant for the study you selected, and then click on ‘Submit’.
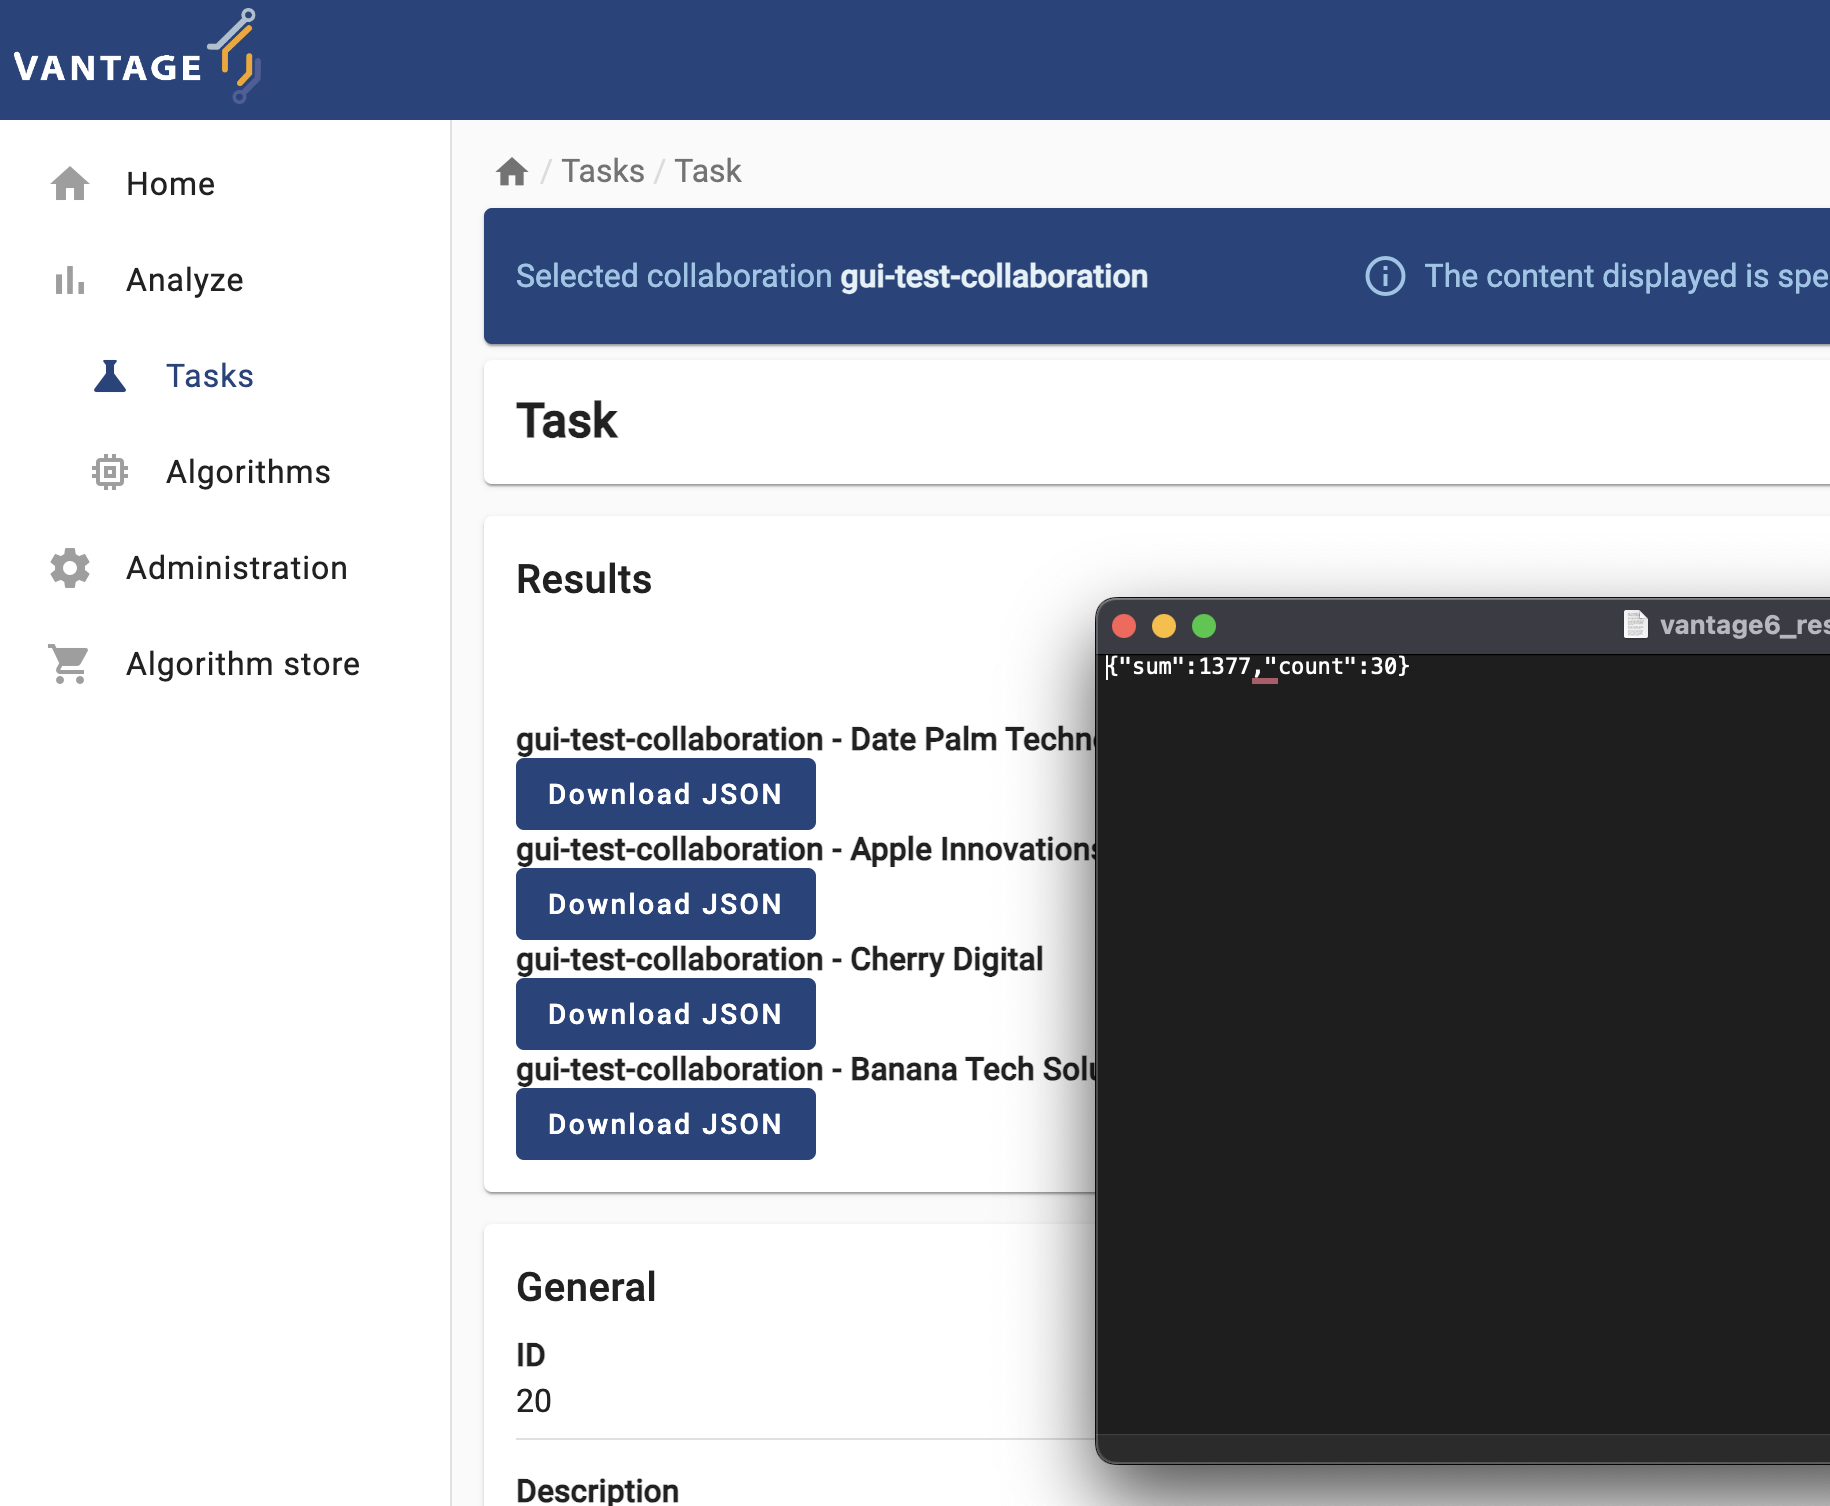
The task you just requested should be listed with a ‘pending’ status. Once finished, download the JSON results and open them on a text editor.
Based on these results, discuss the following:
- What does the content of these files mean? Why the
central_averagefunction is returning this?
Each node, after executing the partial_average function,
returns the two values needed by the central function of the ‘federated
average’ algorithm (as described in Chapter 2): the number of records
within the database, and their sum. These values are ‘encoded’ as a JSON
document, so they can be read, programatically, by the
central_average.
Challenge 4: let’s see what the central function does!
Repeat the same process from Challenge 3 (again, on the Study that is ready for it), but this time choose the ‘central’ function. As you see, when choosing this function only one organization can be selected.

Once again, wait for the process to finish and check the JSON results. Keep an eye on the Tasks section, and see how the processes are created.
Discuss the following:
There is a node that appeared twice in the processes list during the algorithm execution: in the Main process and on the Child processes list. Take a look at the source code of the algorithm you have just executed. Can you spot in the code why this happened?
Can you identify, within the same source code, where the data you saw on Challenge 3 was created?
Given the source code above, why does the
central_averagefunction, unlikepartial_average, not get any data as an input?

In this exercise you created a task for a ‘central’ function, which, when executed requests other nodes to run a ‘partial’ one, combining their results upon completion. The central function is designed in a way that it make the request to all the nodes within the collaboration/study. As the node that gets the request to execute the ‘central’ function, is also part of the collaboration, it ends executing two tasks: the central task, and the partial one.
Here, the ‘partial’ part of the algorithm encodes its result as the JSON document seen on the previous challenge.
The
central_averagefunction is designed just to aggregate the results of the partial averages sent by the other nodes. Hence, it doesn’t need direct access any dataset.
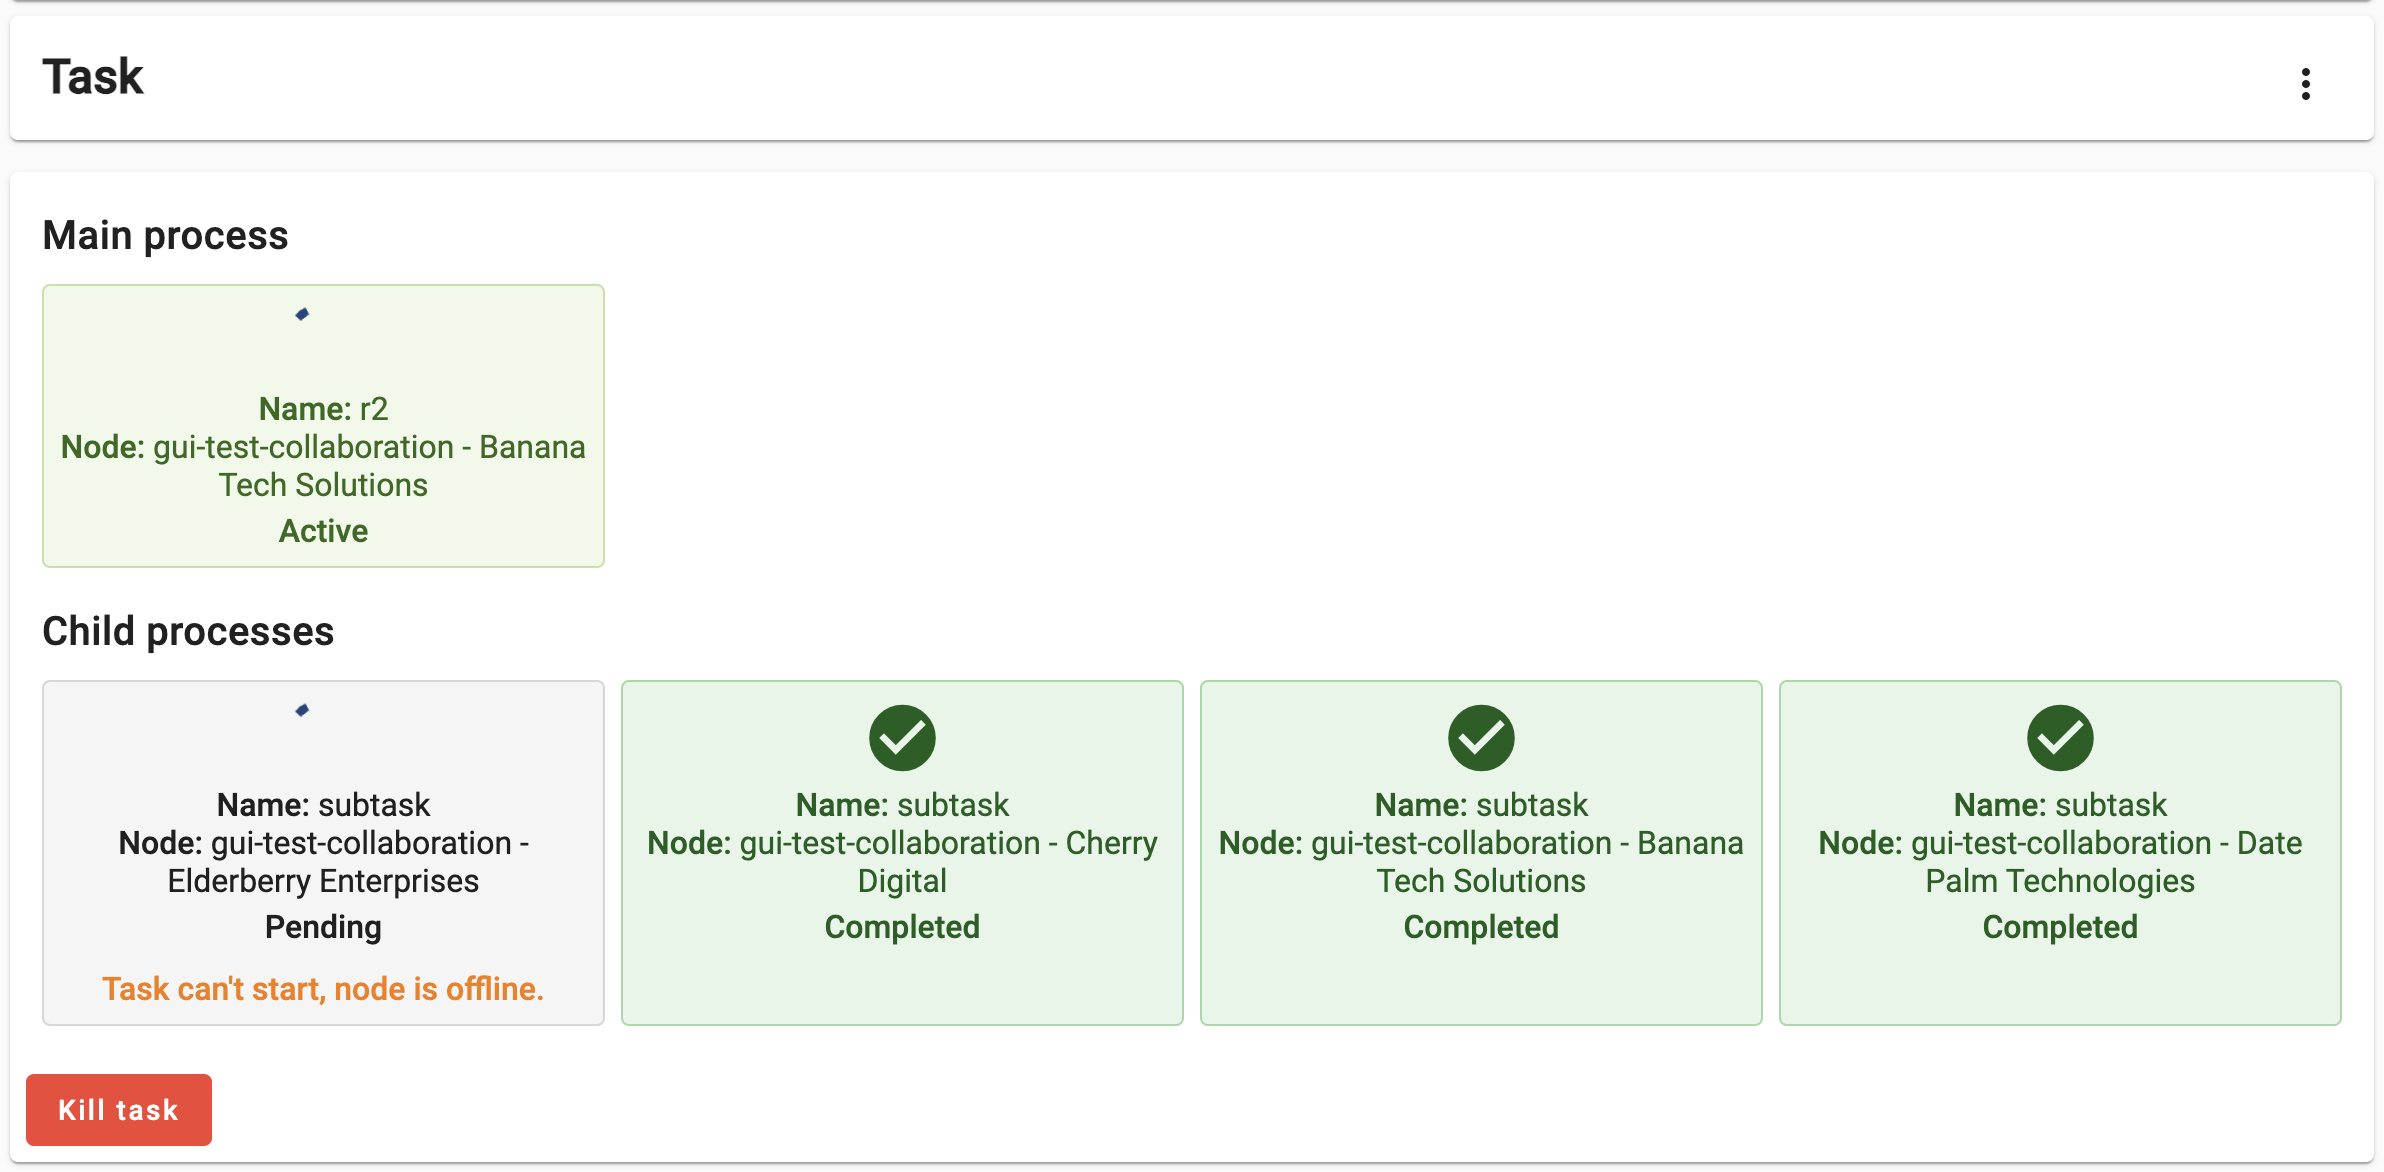
Challenge 5: handling problems through the UI!
Based on your current understanding of the federated average algorithm, speculate on what would happen if you run the ‘central’ function of this algorithm on a study that includes ‘offline’ nodes. Once you have made your prediction, validate it by repeating the process from the previous challenge, this time using the study with the ‘offline’ node.
Discuss the following:
- What happened with the Task? What can you do about it with the UI?
The algorithm didn’t crash, but is kept on hold (with the Active status) indefinitely. The Central task requests all the nodes in the study to run the ‘partial’ function. As the server is unable to transfer this request to the offline node, this child process is kept on hold, until the node is back online.
Consequently, the Main process is also kept on hold, and the process stays with an ‘Active’ status indefinitely (or until the node is back online).
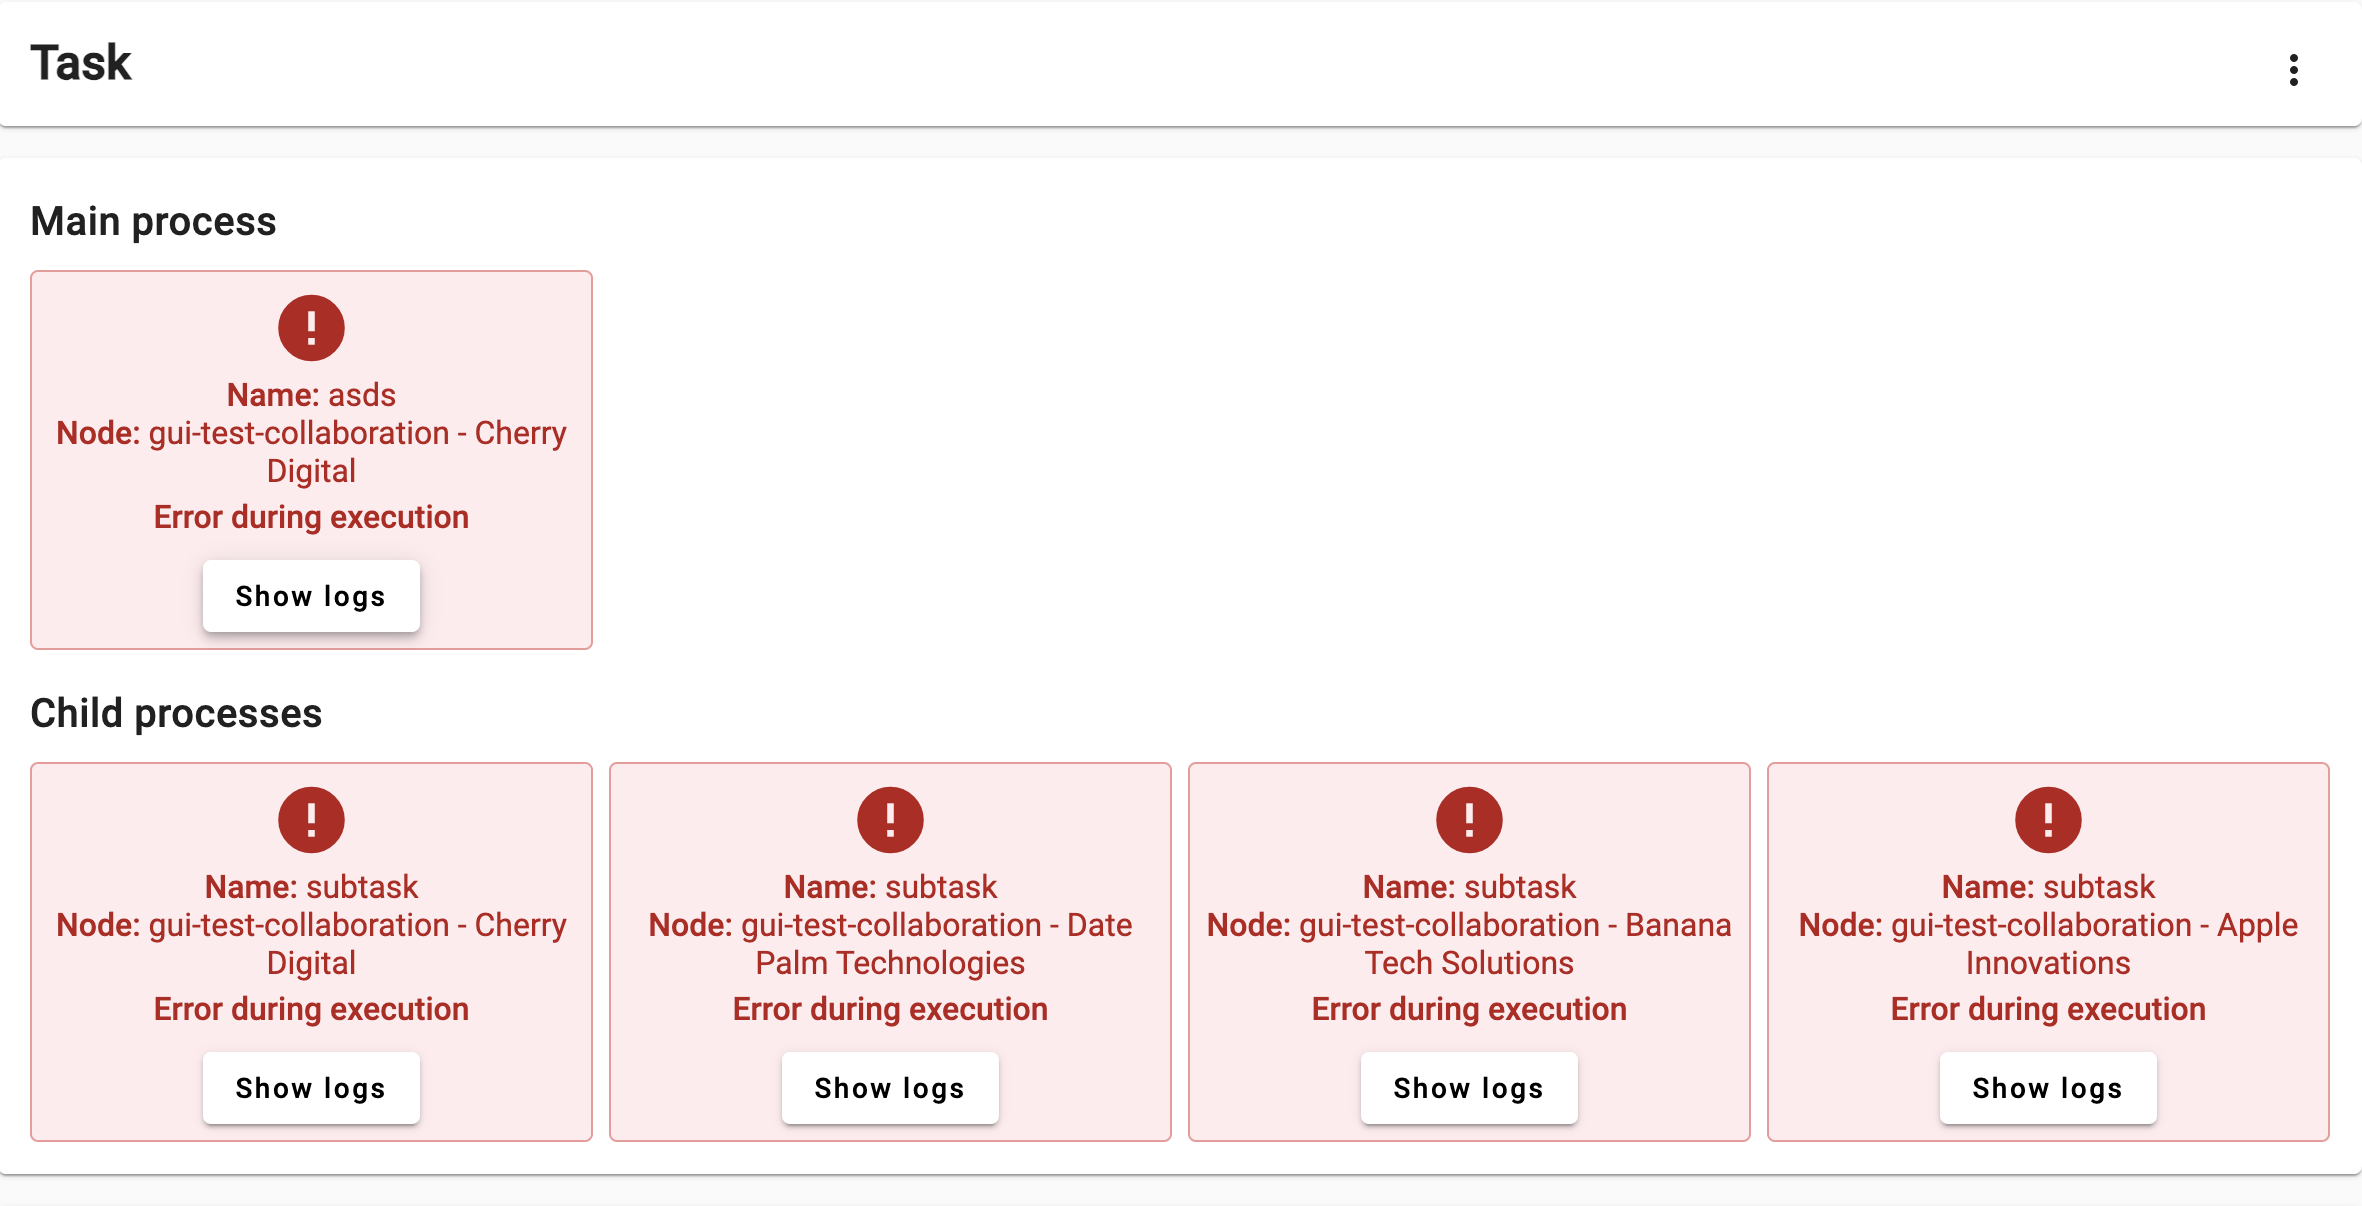
Challenge 6: handling problems through the UI, again.
This time, let’s try to do something that may make the federated average algorithm not work as expected. Create a task, this time selecting the ‘operational’ study (the one with all of its nodes online), and use the central function in it. This time, choose a non-numerical variable (see the table sample).
Look at the logs and discuss the following:
- Why did both
partial_functionandcentral_functioncrash? (See source code)
- The
partial_functioncrashed while trying to parse the input as a number. Thecentral_functioncrashed due to a division-by-zero.
Challenge 7: Play around with other algorithms!
See if you can run a Kaplan-Meier analysis or Crosstab analysis on the same study.
- Go to analyze, and create a new task as before
- Select a different algorithm from the dropdown menu
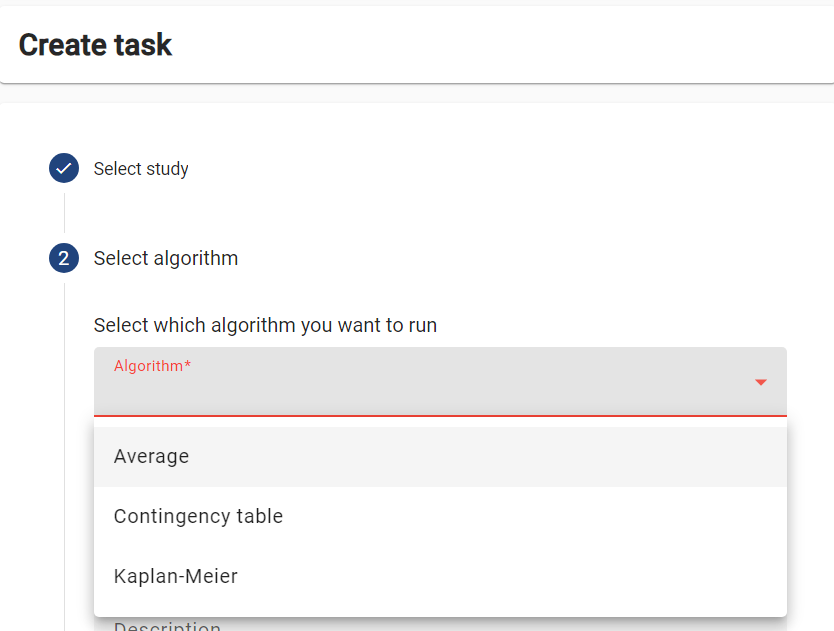
- Follow the same steps as before to create a task
You will encouter different input parameters and output for each algorithm.
Content from Managing vantage6 server via the user interface
Last updated on 2024-09-24 | Edit this page
Overview
Questions
- What is the permission system in vantage6?
- What are the default roles in vantage6?
- How to create a new organization using vantage6 user interface (UI)?
- How to create a new user using vantage6 UI?
- How to create a new collaboration using vantage6 UI?
Objectives
- Understand the permission system of vantage6
- Understand the default roles in vantage6
- Be able to create a new organization using the vantage6 UI
- Be able to create a new user using the vantage6 UI
- Be able to create a new collaboration using the vantage6 UI
Vantage6 permission system
Vantage6 uses a permission system to control who can do what in the system. The permission system is based on roles, which are collections of rules that define the permissions of a user. A user can have multiple roles, and the permissions of the user are defined by the assigned rules.
The permission rules define what each entity is allowed to do, based
on the operation (view, create, edit, delete, send, receive), the scope
(own, organization, collaboration, global), and the resource
(e.g. users, organizations). Users can be assigned anywhere between zero
and all of these permission rules. For example, having the rules with
create in the scope organization for the
resource user means that the user can create users for the
organization they belong to.
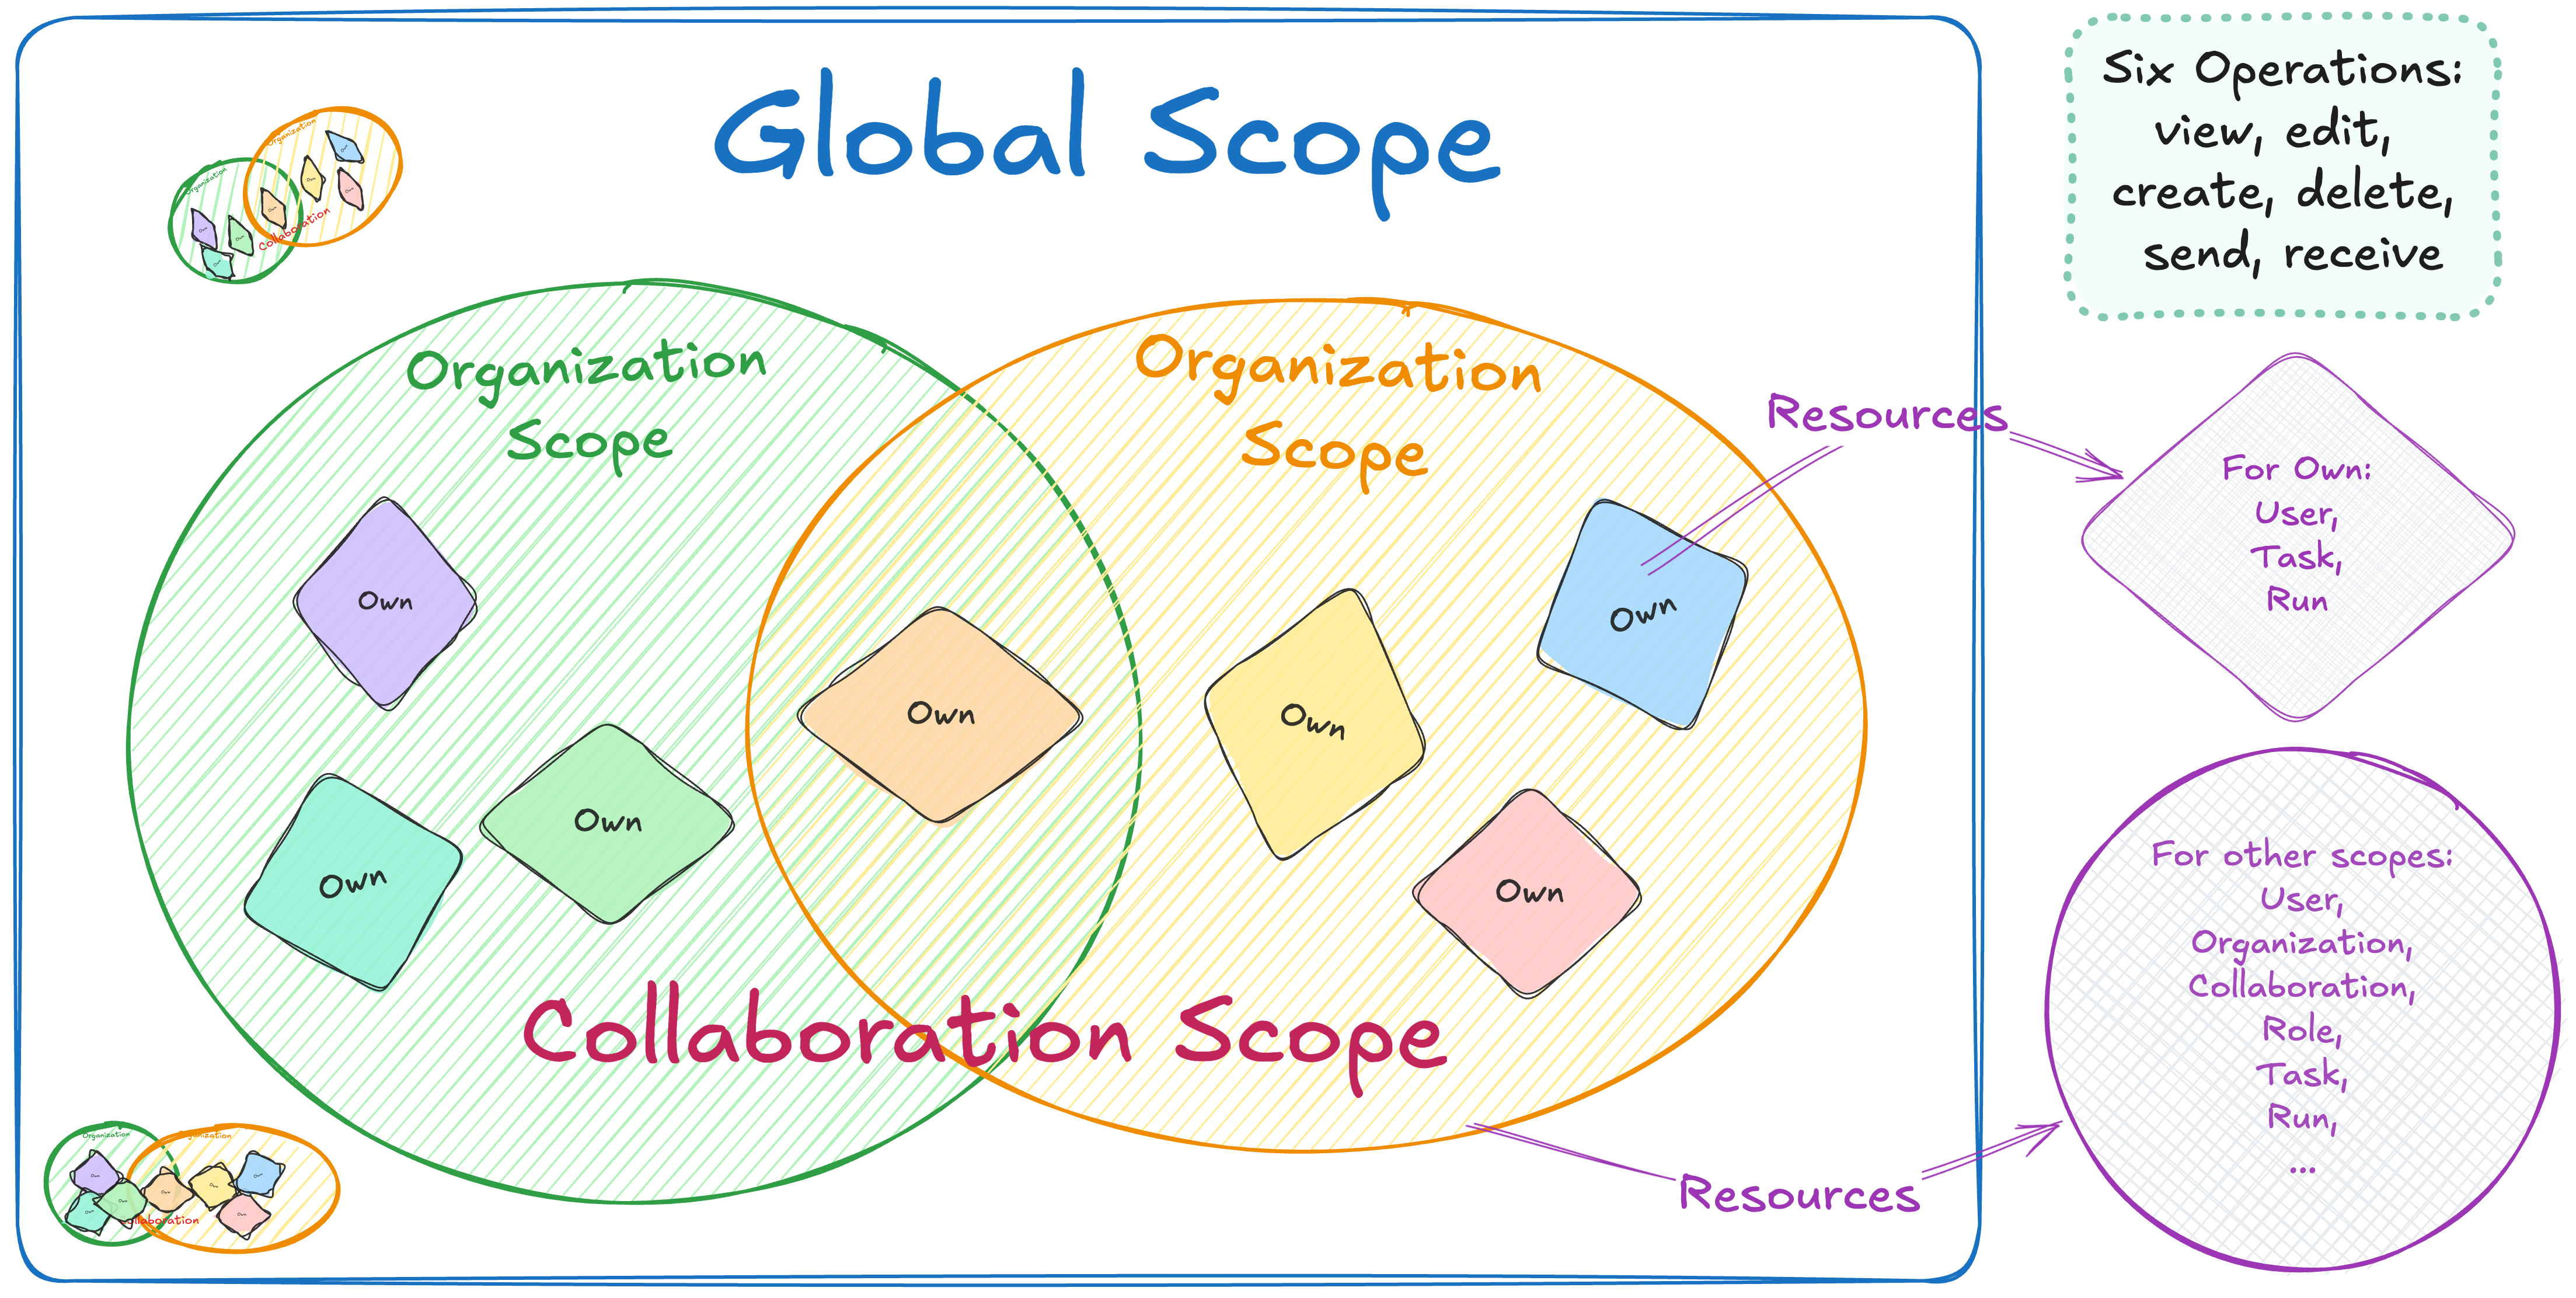
There are six operations: view, edit, create, delete, send and receive. The first four correspond to GET, PATCH, CREATE and DELETE requests, respectively. The last two allow users to send and receive data via socket events. For example, sending events would allow them to kill tasks that are running on a node. For more details about Send and Receive operations, see the vantage6 documentation.
The scopes are:
- Global: all resources of all organizations
- Organization: resources of the user’s own organization
- Collaboration: resources of all organizations that the user’s organization is in a collaboration with
- Own: these are specific to the user endpoint. Permits a user to see/edit their own user, but not others within the organization.
Note that not every resource has all scopes and/or operations. For
example, the collaboration resource does not have
create operation for the organization scope,
as it does not make sense to create a collaboration that only your own
organization can participate in.
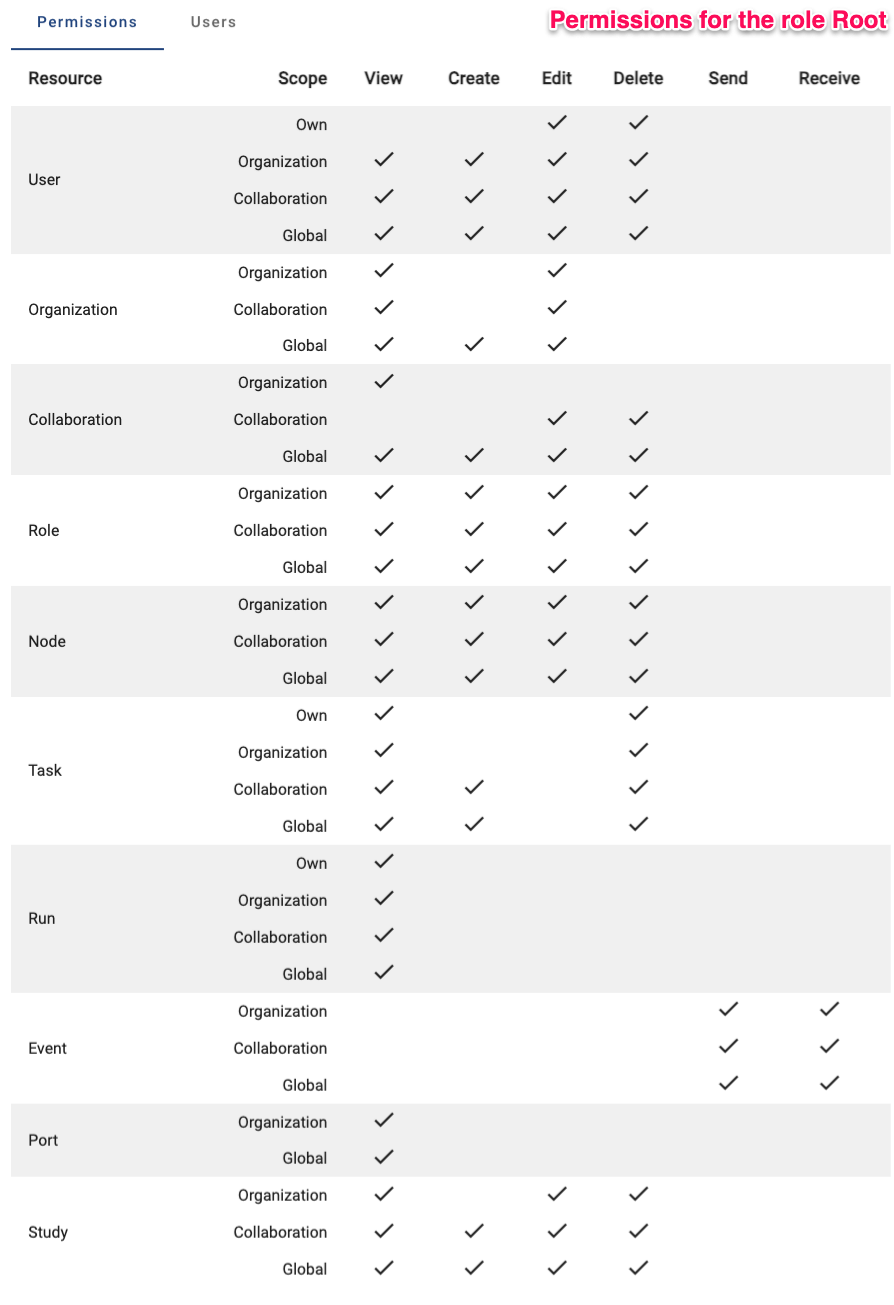
To make it easier to assign permissions, there are also predefined roles:
- Root: has all permissions (👉 see image below)
- Collaboration Admin: can do almost everything for all organizations in collaborations they are a member of
- Organization Admin: can do everything for their own organization
- Researcher: can view the organization’s resources and create tasks (👉 see image below)
- Viewer: can only view the organization’s resources
The permissions are set up in the Roles tab in the
administration page. You can click on a role to see the permissions of
that role. You can also create a new role by clicking the
Create role button.
The permission structure allows for a lot of flexibility, but it can be complex for beginners to set up. The default roles provide a quick way to set up permissions, but it is recommended to review them before using them in a project.

Challenge 1: What can you do in vantage6?
Go the administration page in the vantage6 UI, check the permissions that you have, and answer the following questions:
- What is your role in vantage6?
- Do you have the permissions to create a new organization, a new user or a new collaboration?
- Do you have the permission to remove an existing organization, a user, or a collaboration?
- Check it with your instructor.
- Yes, you should be able to create a new organization, a new user, and a new collaboration. If not, ask your instructor to give you the necessary permissions.
- Check it with your instructor.
Manage vantage6 project using the UI
In this section, we will go through the steps to create a new organization, a new user and a new collaboration using the vantage6 UI.
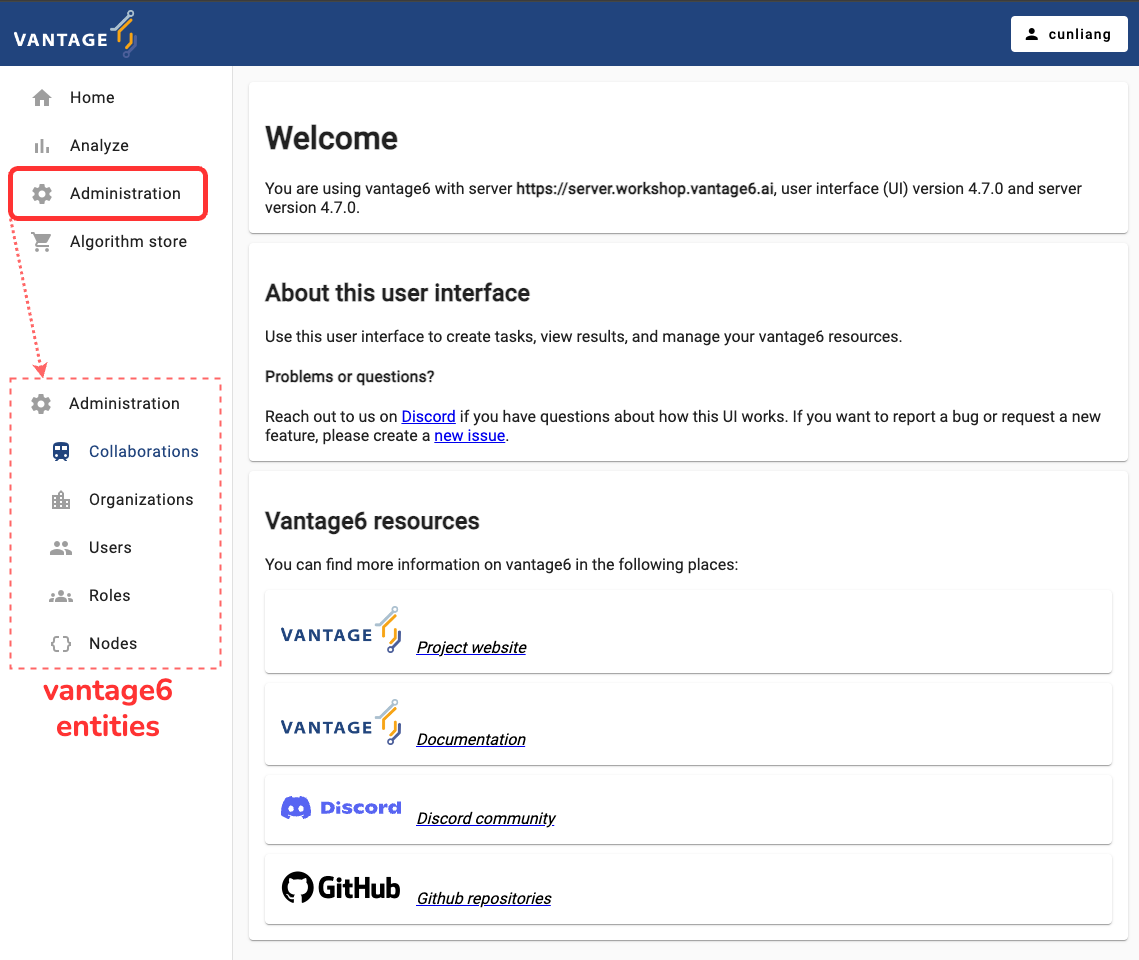
First you need to log in to the vantage6 UI, and then go to the
Administration page. You can find the
Administration tab in the left side of the start page.
Clicking on the Administration tab will show you all tabs
for vantage6 entities.
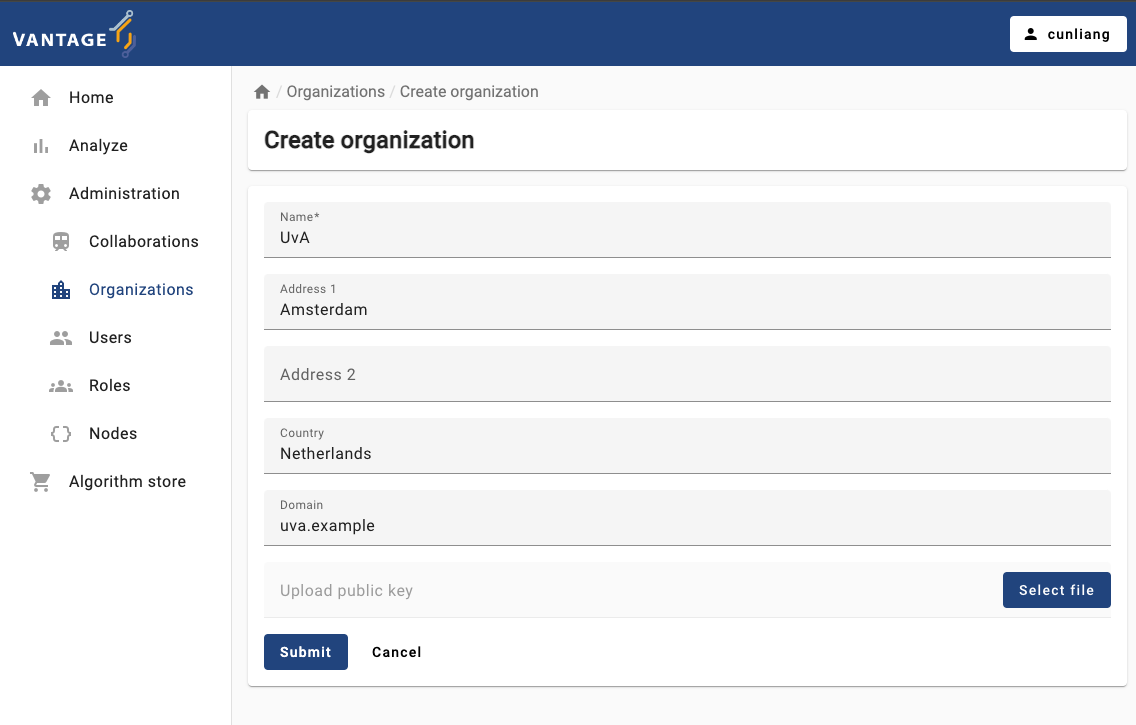
Create a new organization
It’s quite straightforward to create a new organization in vantage6. Here are the steps:
- Click on the
Organizationstab in the administration page. - Click on the
Create organizationbutton. - Fill in the details of the new organization.
- The
Upload public keyfield is optional. You can upload a public key for the organization if you want to use encryption in the collaboration. But note that we DO NOT use encryption in this course. For more details about encryption, see the vantage6 documentation.
- The
- Click on the
Submitbutton to create the new organization.
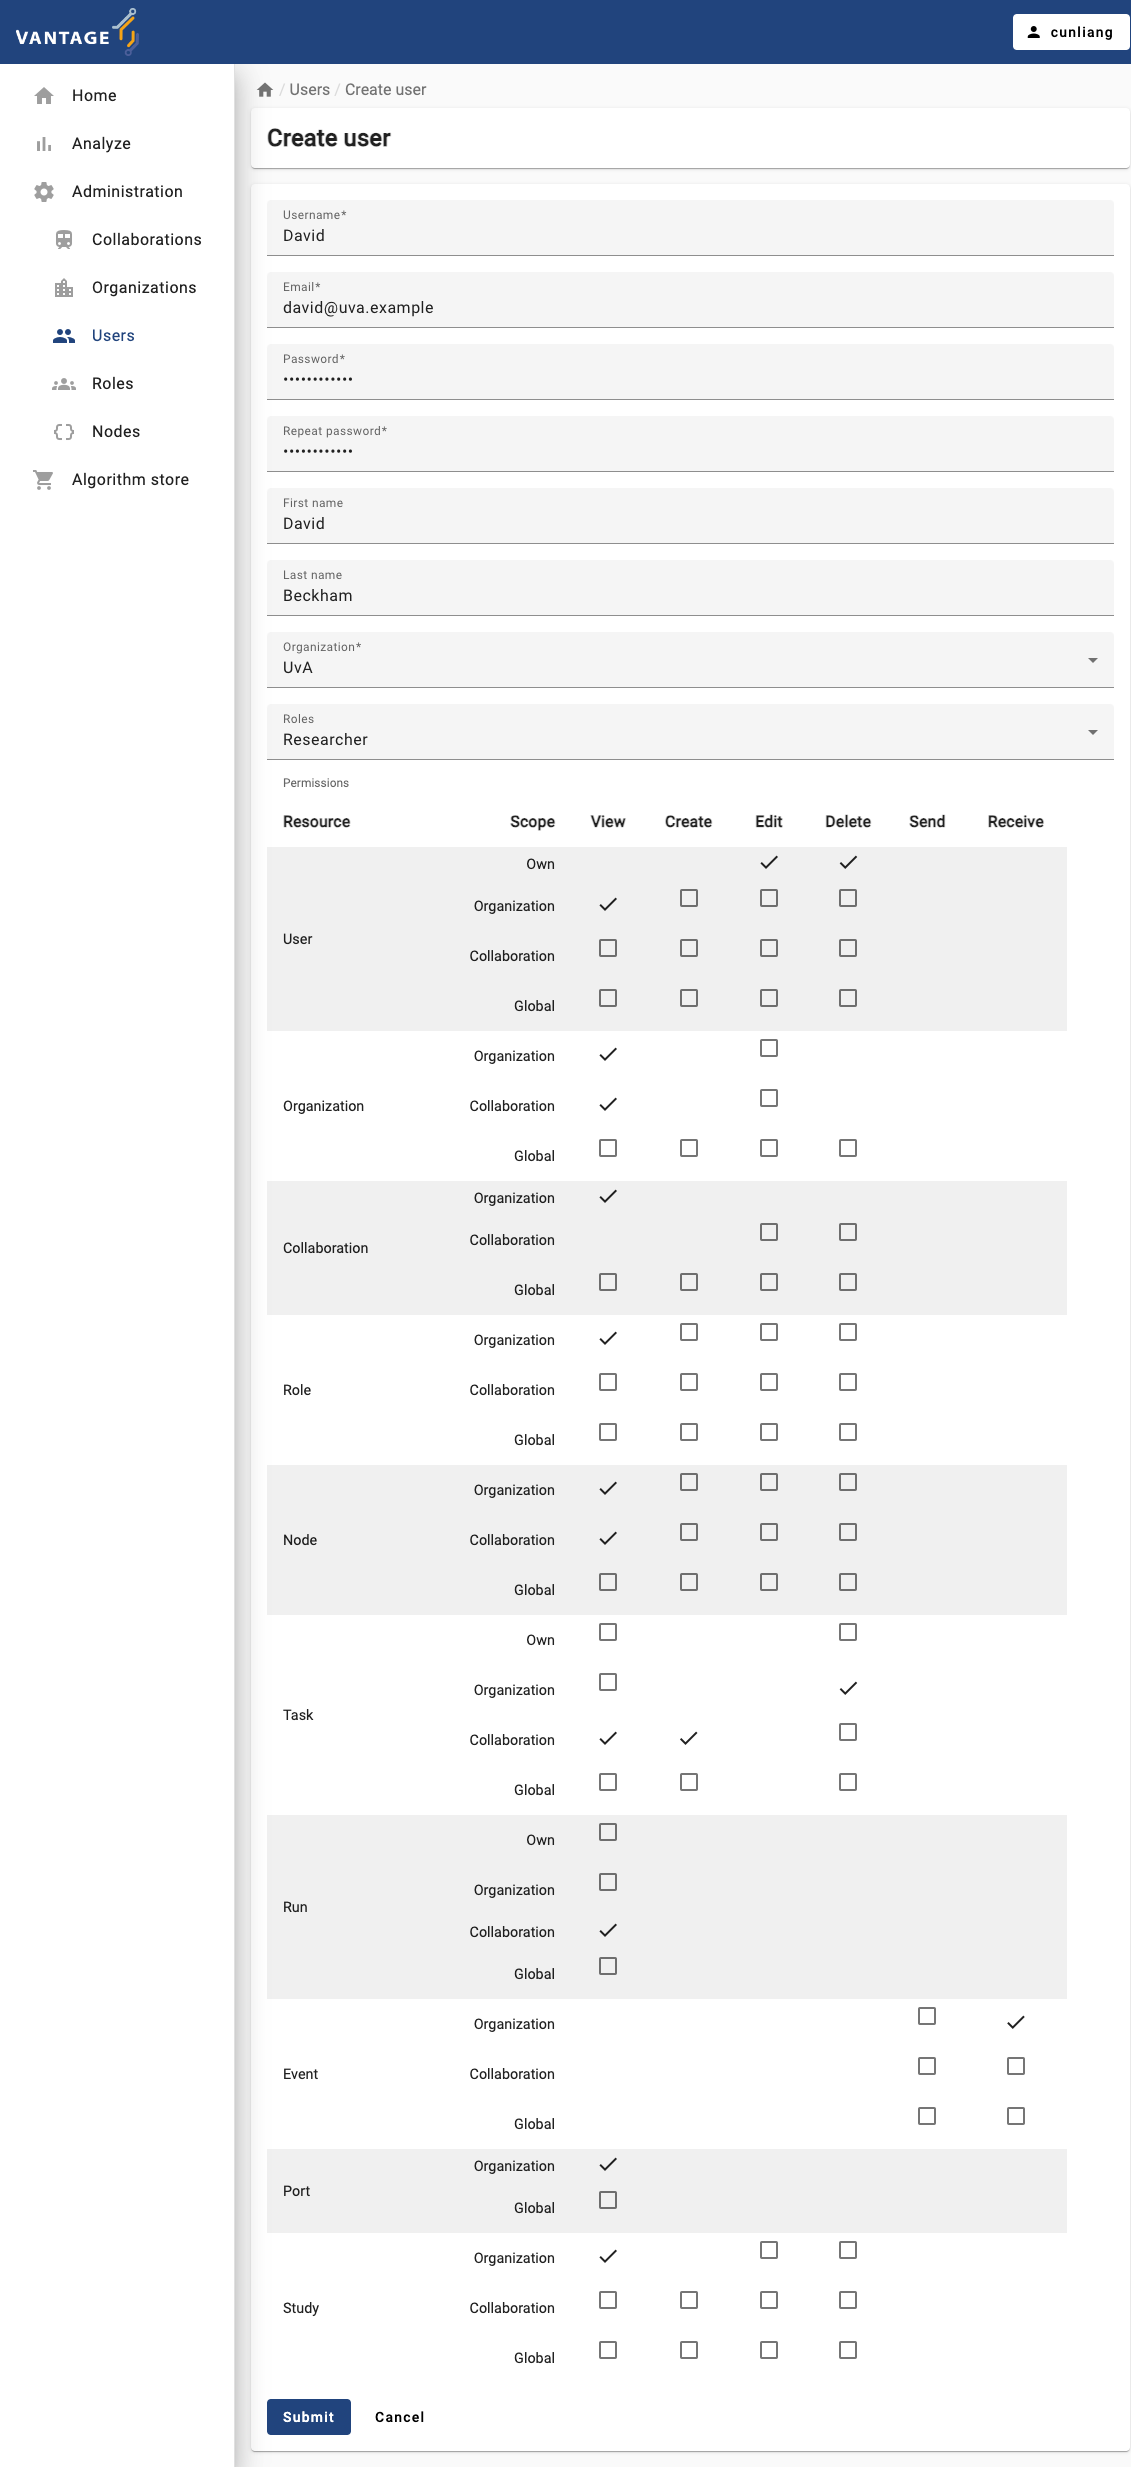
Create a new user
Now let’s create a new user for the organization we just created. Here are the steps:
- Click on the
Userstab in the administration page. - Click on the
Create userbutton. - Fill in the details of the new user.
- You can assign the user to an organization by selecting it from the
Organizationdropdown. Only one organization can be selected. - You can assign roles to the user by selecting them from the
Rolesdropdown. Here we assign theResearcherrole to the new user. You can give the user more permissions by assigning multiple roles or select the operation boxes in thePermissionssection.
- You can assign the user to an organization by selecting it from the
- Click on the
Submitbutton to create the new user.
Create a new collaboration
A collaboration is a collection of one or more organizations. Let’s create a new collaboration between two organizations. Here are the steps:
- Click on the
Collaborationstab in the administration page. - Click on the
Create collaborationbutton. - Fill in the details of the new collaboration.
- For
Encryptedbox, you can select whether the collaboration should be encrypted or not. - You can select the organizations that will participate in the
collaboration by selecting them from the
Organizationsdropdown. - By default, we select the
Register nodesbox. This will ensure the nodes of the organizations are registered in the collaboration. If you don’t select this box, you will have to register the nodes manually later.
- For
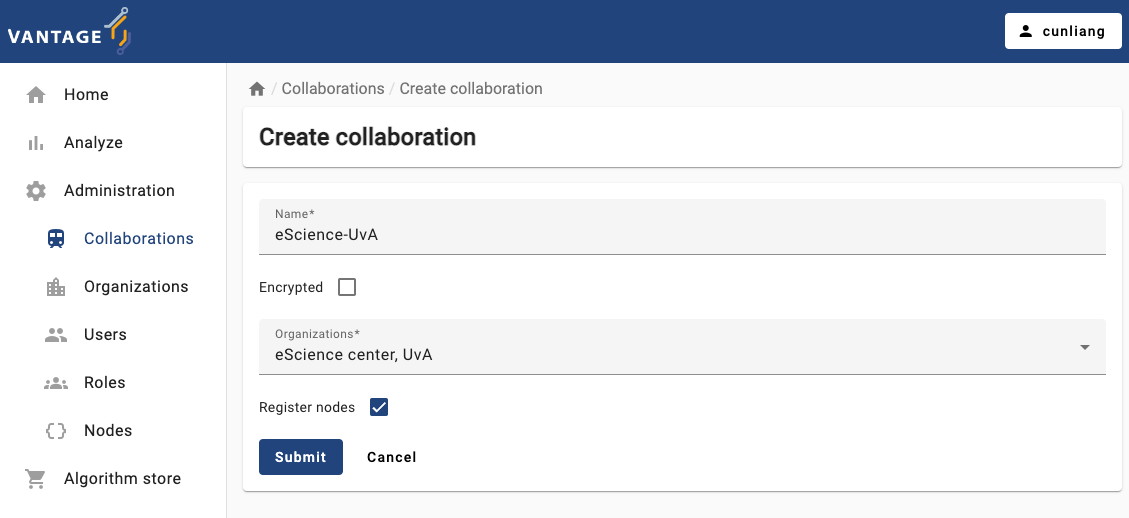
- Click on the
Submitbutton to create the new collaboration.- After submitting the form, you may see a dialog box to ask you to download the API key (on MacOS) or a dialog points out that the API key has been downloaded (on Windows). The API key is used to authenticate the nodes in the collaboration.
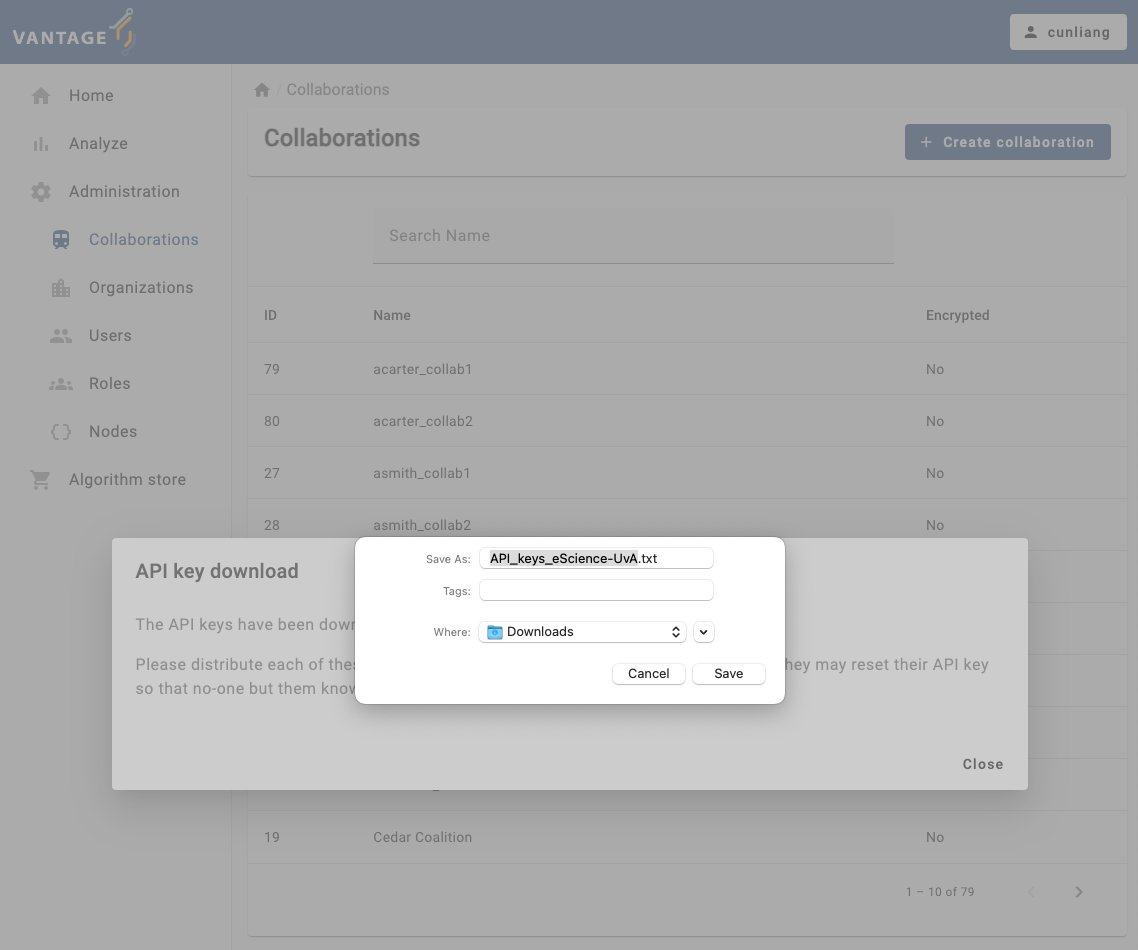
You will see a message:
API key download
The API keys have been downloaded.
Please distribute each of these keys privately to each of the organizations. Note that they may reset their API key so that no-one but them knows it.
You will need the API keys when you run the nodes to authenticate with the vantage6 server. Please save the API keys properly, we will need it in Chapter 6.
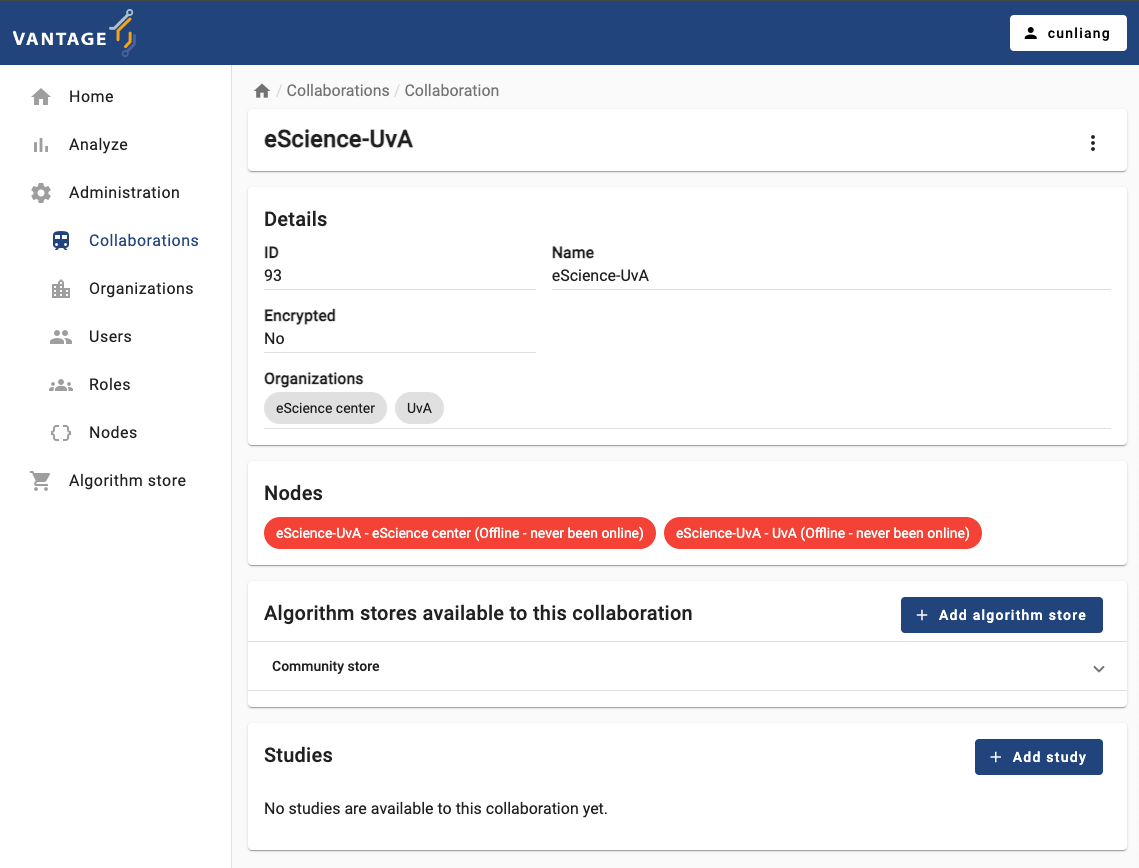
- After creating the collaboration, you can see the details of the
collaboration by clicking on the specific collaboration listed in the
Collaborationstab.- You will see what organizations are participating in the collaboration.
- You will see the nodes of the organizations that are registered in
the collaboration. In case one or more organizations did not register
their nodes when creating or updating the collaboration, you can
register them manually by clicking the
Register missing nodesbutton. Note that this button is not visible if all nodes are registered. - You can also see the algorithm store available for the
collaboration. You can add a algorithm store for the collaboration by
clicking the
Add algorithm storebutton. - You can also see the studies of the collaboration. You can add a
study by clicking the
Add studybutton.
Challenge 2: Manage vantage6 project using the UI
Go to the administration page in the vantage6 UI, and do the following:
- Create a new role
- Create a new user and grant them the new role you created
- Re-login to the vantage6 UI with the new user account and check if they have the permissions you granted them
- Vantage6 uses a permission system to control who can do what in the system.
- Vantage6 has default roles like
Root,Collaboration Admin,Organization Admin,Researcher, andViewer. - Vantage6 UI can be used to manage the entities of vantage6, like creating or deleting an organization, a user, or a collaboration.
Content from Running a PET analysis using the Python client
Last updated on 2024-10-03 | Edit this page
Overview
Questions
In the context of the Python client:
- How to connect to the vantage6 server?
- How to explore the
Clientobject? - How to check details of a collaborations?
- How to start a compute task?
- How to collect the results of a finished computation?
Objectives
After completing this episode, you will be able to:
- Understand the basic concepts of the vantage6 Python client.
use the Python client to …
- Connect to the vantage6 server.
- Use the Python client to get details of a collaboration.
- Create a task using the Python client.
- Collect the results of a finished computation using the Python client.
Prerequisite
Make sure you completed the Setup Episode before starting this episode. Some basic knowledge of Python is also required to complete the exercises in this episode.
The Python client
The vantage6 Python client is a library designed to facilitate interaction with the vantage6 server, to perform various tasks such as creating computation tasks, managing organizations, collaborations, users, and collecting results. It is a versatile alternative to the web-based user interface we have used in previous lessons.
Data scientists and administrators may use it to manage resources programatically. For example, to automate actions or integrating them on other applications. The Python client communicates with the REST API (wikipedia.org) of the vantage6 server, handling encryption and decryption where applicable.
Besides the Python client, there is also an R client (github.com) available. This client is more focused on starting federated analysis and does not provide tools to manage the server. Important to note that this client is poorly maintained and lags behind in terms of features. Therefore we do not recommend using it. You can find more information in the documentation (docs.vantage6.ai).
If your organization uses a different programming language, you can always create a client in that language by following the API documentation (docs.vantage6.ai).
In this workshop, we will only use on the Python client.
Connect & authenticate
Creating an instance of the vantage6 Python client is relatively straightforward. The user defines server connection details: server address, login credentials, and the organization’s private key in case encryption (docs.vantage6.ai) is used in the collaboration. In case the server has two-factor authentication (docs.vantage6.ai) (2FA) enabled, you should also enter the corresponding time-based 6-digit code accordingly.
To avoid leaking your username and/or password by accident, they can
be defined in a separate Python file (e.g., config.py),
which is then imported into the main script. This way, the main script
does not contain any sensitive information.
PYTHON
server_url = "https://<vantage6-server-address>"
server_port = 443
server_api = "/api"

username = "MY USERNAME"
password = "MY PASSWORD"

# Path to the private key, if encryption is enabled. Can be None if
# encryption is not used. Note that this key is the organization's
# private key. In case of this workshop we do not use encryption, so
# this can be None.
organization_key = None
Once you have created the Python module with the configuration settings, you can import it and create the client instance as follows:
PYTHON
from vantage6.client import Client

# It is assumed here that the `config.py` you just created is in the current
# directory. If it is not, then you need to make sure it can be found on
# your PYTHONPATH
import config

# Initialize the client object, and authenticate
client = Client(config.server_url, config.server_port, config.server_api,
                log_level='info')
client.authenticate(config.username, config.password)
# In the case of 2FA, you should also include the 6-digit code:
# client.authenticate(config.username, config.password, '123456')

# In case encryption is used, this line can be used to set the organizations private
# key.
# client.setup_encryption(config.organization_key)1. Connect 🌍!
Connect to the vantage6 server using the Python client!
- Create the
config.pywith the your credentials and connection details. - Create a cell with the
clientscript with the code above. - Run the
clientcell as defined above to create the client instance. - Make sure to use the correct user / password
- Check the output to see if there are any errors
Make sure you have created the
config.pyfile with your credentials and theclientcell with the code above.-
Run the
clientcell. If the connection is successful, you should see the message--> Succesfully authenticated:Welcome to _ __ | | / / __ ____ _ _ __ | |_ __ _ __ _ ___ / /_ \ \ / / _` | '_ \| __/ _` |/ _` |/ _ \ '_ \ \ V / (_| | | | | || (_| | (_| | __/ (_) | \_/ \__,_|_| |_|\__\__,_|\__, |\___|\___/ __/ | |___/ --> Join us on Discord! https://discord.gg/rwRvwyK --> Docs: https://docs.vantage6.ai --> Blog: https://vantage6.ai ------------------------------------------------------------ Cite us! If you publish your findings obtained using vantage6, please cite the proper sources as mentioned in: https://vantage6.ai/vantage6/references ------------------------------------------------------------ ... --> Succesfully authenticated
Using the client
The Client instance offers a set of attributes that
correspond to the vantage6
server resources (Episode 3) also described in the official
documentation (docs.vantage6.ai). The available attributes are:
| Resource | Description |
|---|---|
client.user |
Manage users including your own user details |
client.organization |
Manage organizations or the organization that you are part of |
client.rule |
View all available permission rules |
client.role |
Manage roles (are collections of rules) |
client.collaboration |
Manage collaborations |
client.task |
Create new tasks and view their run data |
client.result |
Obtain results from the tasks |
client.util |
Provides utility functions for the vantage6 Python client. For example to reset your password |
client.node |
Manage nodes |
client.store |
Manage algorithm stores |
client.algorithm |
Manage algorithms that can be used for the computations |
Method and parameter documentation
There are many methods available in each of the resources and each
method has its own set of parameters. To know which parameters are
available for a specific method, you can use the help()
function in Python. For example, to get the documentation of the
client.organization.list() method, you can use the
following command:
OUTPUT
list(self, name: 'str' = None, country: 'int' = None, collaboration: 'int' = None, study: 'int' = None, page: 'int' = None, per_page: 'int' = None) -> 'list[dict]'
    List organizations

    Parameters
    ----------
    name: str, optional
        Filter by name (with LIKE operator)
    country: str, optional
        Filter by country
    collaboration: int, optional
        Filter by collaboration id. If client.setup_collaboration() was called,
        the previously setup collaboration is used. Default value is None
This shows you that you can filter the list of organizations (among
others) by name, country, and collaboration. It is also possible to
request documentation of a higher level method, for example
help(client.organization) or even
help(client).:
To view all Client functions and their arguments without
using help() you can use the official
documentation (docs.vantage6.ai). Which is the same as the Python
client’s docstring.
Make sure you are viewing the documentation of the version of the client you are using. You can find the version of the client by one of the following commands:
or by running the following command in the terminal:
Permissions
Note that the authenticated user may not be allowed to perform all operations or view all resources. For example, a user may not be allowed to create a new organization, but may be allowed to list the organizations within all collaboration its organization participates in. The server will only allow the user to perform operations on the resources that the user has permission to perform.
The 5 basic operations
Almost all of the resources provide a get, list, create, update and delete operation.
When using the get and list methods a
dictionary is returned with the requested information. In the case of
the create and update methods typically the
created resource is returned. Finally in the case of delete
nothing is returned but a message is printed to confirm the
deletion.
2. Collect collaboration details
Before starting a task, you need to know the details of the collaboration you are working with. Use the Python client to get the details of the collaboration you have access to. Write down the name and ID of each collaboration.
Use help(client.collaboration.list) to see which
arugments you can use to filter the collaborations.
OUTPUT
[
    {'id': 168, 'name': 'Lychee Labs', ...},
    {'id': 158, 'name': 'Pineapple Paradigm', ...},
    {'id': 155, 'name': 'Huckleberry Hub', ...},
    {'id': 140, 'name': 'Mango Matrix', ...},
    {'id': 128, 'name': 'Apple Innovations', ...},
    {'id': 170, 'name': 'eScience center', ...},
    {'id': 165, 'name': 'Grapefruit Group', ...},
    {'id': 145, 'name': 'Raspberry Revolution', ...},
    {'id': 136, 'name': 'Ivy Berry Solutions', ...},
    {'id': 166, 'name': 'Huckleberry Holdings', ...}
]
Additional operations
Some resources do not provide all five operations and some resource provide additional operations. For example:
- it is not possible to create new rules. In other words:
client.rule.createdoes not exist. - the
client.taskhas aclient.task.killmethod which is able to stop a task that currently is running.
Top level methods
Up untill now we only discussed Client methods that are
bound to an resource. There are also some methods that are not bound to
a specific resource. Examples are:
-
client.authenticate()to authenticate the user. You have already used this method when you authenticated to the server. -
client.setup_encryption()to setup the encryption. -
client.wait_for_results()to wait for the results of a task.
3. Find documentation
Find the documentation on how to reset your password 🔑 in case you
forgot it. You can use the help() to explore the client
functions.
Have a look at the client table, and see if you can find a resource group that might contain the method you are looking for.
Use the help() function to find the documentation of the
client.util resource.
Identifiers are key
It is important to note that the Python client use identifiers rather than names to select resources. For example, to filter the organizations that belong to a a given collaboration, you need to know the collaboration’s identifier first.
In a previous challenge, you were asked to get the details of the collaborations you have access to. This is common practice when working with the vantage6 Python client.
It is also possible to obtain these identifiers through the UI. However, when working with the UI, identifiers are not as important as the names can be used to identify the resources. But also for the UI, it is important to know the identifiers of the resources as names are not always unique.
The reason for this is that the UI is designed to more be user-friendly, and it is expected that users will interact with the resources using their names. Typically they will select the resources from a list or dropdown. Since names do not always have to be unique (e.g. task names) it is impossible to identify a resource uniquely by its name.
Now that we understand the basic concepts of the vantage6 Python
client, let us get some more details about our collaborations. First, as
before, we collect the details of the collaborations we have access to.
We do so by specifying an additional parameter fields to
the list() method. This parameter allows us to specify
which fields we want to see in the output. This makes it more readable
and easier to find the information we are looking for.
OUTPUT
[
    {'id': 12, 'name': 'Birch Brotherhood'},
    {'id': 9, 'name': 'Pine Partners'},
    {'id': 11, 'name': 'Cedar Coalition'},
    {'id': 10, 'name': 'Maple Consortium'},
    {'id': 15, 'name': 'demo'},
    {'id': 8, 'name': 'Oak Alliance'},
    {'id': 14, 'name': 'Redwood Union'},
    {'id': 13, 'name': 'Willow Network'}
]
Then, we are interested in all the organizations that participate in
one of the collaborations. Lets assume that the collaboration ID is 1.
We then can get the organizations that are part of this collaboration by
using the client.organization.list() method with the
collaboration parameter set to 1.
OUTPUT
[
    {'id': 171, 'name': 'IKNL'},
    {'id': 172, 'name': 'new_organization'}
]
Write down the ID of each organization and collaboration. You will need them in the next challenges.
Creating a new task
Before starting an analysis we need several details about the collaboration and the analysis to be performed. This includes the organization and collaboration identifiers, we have just collected.
Before we start the analysis, let us check if everything is in place:
Network
- ✔ Connect to the vantage6 server using the Python client.
- ✔ Use the Python client to get the details of the collaboration and its organizations you have access to.
- ⚠ Check the status of the nodes
Average Algorithm
- ✔ published at:
harbor2.vantage6.ai/demo/average. - ✔ We are going to use the
partial_average()function. - ✔ The function requires a
column_nameparameter, we are setting this to ‘age’.
Node status
As the checklist above indicates, we have not checked the status of the nodes. You can start an analys when nodes are offline, they will start the analysis once they are online. In case a node is offline, you might need to inquire with the node owner to get it back online.
4. Check the status of the nodes
Use the Python client to check the status of the nodes that are part of the collaboration you are interested in.
To check the status of the nodes, you can use the
client.node resource.
See help(client.node.list) to see how to get the details
of the nodes of a given collaboration. You can also use the
fields parameter to get only the information you are
interested in.
You can obtain node details by using the
client.node.list() method. To filter the nodes you are
interested in, you can use the collaboration parameter in
the client.node.list() method:
You can also specify the fields parameter to get only
the information you are interested in:
You can also use the is_online parameter to filter the
nodes that are online. But for now it would be good to see both online
and offline nodes.
OUTPUT
[
    {
        'id': 155,
        'name': 'IKNL demo node',
        'status': None
    }
]
One of the nodes in our collaboration is offline. In the real world,
you would need to contact the node owner to get the node back online.
But for the purpose of this workshop we have defined a study
that contains only online nodes. Which has a name that ends with
Subset. You can find the study ID by using the
client.study.list() method. Write down the ID of the
study.
Task definition
A task in vantage6 is a request to execute an algorithm on a given organization. When creating a task, you need to specify the following:
- The collaboration[, study] and organization identifiers.
- The algorithm to be executed.
- The input parameters for the algorithm.
The average algorithm we are going to use is the same as in Episode 3.
This algorithm has two functions: partial_average() and
central_average(). If you do not know the difference
between partial and central function, you should read
How
algorithms run in vantage6 (Episode 2) again.
We can use the client.task.create() method to create a
new task to be executed by the nodes.
OUTPUT
create(organizations: 'list', name: 'str', image: 'str', description: 'str', input_: 'dict', collaboration: 'int' = None, study: 'int' = None, store: 'int' = None, databases: 'list[dict]' = None) -> 'dict' method of vantage6.client.Task instance
    Create a new task

    Parameters
    ----------
    organizations : list
        Organization ids (within the collaboration) which need
        to execute this task
    name : str
        Human readable name
    image : str
        Docker image name which contains the algorithm
    description : str
        Human readable description
    input_ : dict
        Algorithm input
    collaboration : int, optional
        ID of the collaboration to which this task belongs. Should be set if
        the study is not set
    study : int, optional
        ID of the study to which this task belongs. Should be set if the
        collaboration is not set
    store : int, optional
        ID of the algorithm store to retrieve the algorithm from
    databases: list[dict], optional
        Databases to be used at the node. Each dict should contain
        at least a 'label' key. Additional keys are 'query' (if using
        SQL/SPARQL databases), 'sheet_name' (if using Excel databases),
        and 'preprocessing' information.

    Returns
    -------
    dict
        A dictionairy containing data on the created task, or a message
        from the server if the task could not be created
Lets start by defining the input for the task. The
partial_average() function requires a
column_name parameter. We can define the input as
follows:
Basically we are defining the method to be executed, the arguments
and keyword arguments for the method. In other words, we just created a
function call in Python that would look like this:
partial_average(column_name=age). If you are not familiar
with Python’s args and kwargs, you can read more about them at W3C
Schools: args
(w3schools.com) and kwargs
(w3schools.com).
Now that you have defined the task input, you can create and start it by also specifying (using the IDs we collected earlier) which organizations and for which collaboration, it will be executed:
Database parameter
We have not yet explained the databases parameter. This
parameter is used to specify the database that the nodes will use to
execute the algorithm. Each node can have multiple databases, and you
can specify them in the databases parameter. We will go
into more detail about this in Seting
up a vantage6 node (Episode 6).
Obtaining results
A client’s task execution request is asynchronous. This means that
once the client.task.create() method is invoked, the task
will begin running in the background, returning the control to the
Python program immediately (i.e., without waiting for the task to
complete).
This means that in case you want to use the task result in the remainder of your code, your program needs to wait until the task is completed, so you can get access to the results (or to the error details, if something goes wrong).
You can use the client.wait_for_result() method to make
the program execution wait until the task is completed. For that, you
need the ID of the task you just created, which was included in the
dictionary returned by the client.task.create() method. For
the task execution request of the code snippet above, this will look
like:
Aggregate results
The results contain the output of the algorithm. In the case of the
partial_average() function, the output is not yet
aggregated. This means that the output of each node is returned
separately. In the case of the central_average() function,
the output is aggregated and only the aggregated result is returned.
For now we can aggregate the results ourselfs:
Create a central task
In the previous section you created a task to run the
partial_average() function. Now, create a task to run the
central_average() function.
5. Run central method
In section Creating a new task it
is explained how to create a task to run the
partial_average() function. Now, create a task to run the
central_average() function. ⚠ Make sure to
only send the task to a single organization.
PYTHON
input_ = {
    'method': 'central_average',
    'args': [],
    'kwargs': {'column_name': 'age'}
}

average_task = client.task.create(
   organizations=[1],
   study=1,
   name="name_for_the_task",
   image="harbor2.vantage6.ai/demo/average",
   description='',
   input_=input_,
   databases=[
      {'label': 'default'}
   ]
)
Then you can obtain the results by using the
client.wait_for_results() method:
Inspecting log files
Each task consists of several runs. Each node included in the task execution will at least have one run. But in case of multi-step algorithms or iterative algorithms, a node can have multiple runs. Each run has a log file that contains information about the execution of the algorithm on the node.
6. Inspect log files
- Retrieve the log files from the central method from previous challenge.
- Rerun the central method, but this time use a column name that does
not exist in the dataset (e.g.
abc123). Retrieve the log files from this task as well.
To retrieve the log files from any task, you can use the
client.run.from_task() method:
In the second case you should be able to find an exception in the log file. Is the error message clear enough to understand what went wrong?
Content from Setting up a vantage6 node
Last updated on 2024-10-22 | Edit this page
Overview
Questions
- What are the requirements to install a node?
- How to install the command line interface (CLI)?
- Which commands are available in the CLI?
- How to set up a new node?
- How to reset and update an API key?
Objectives
- Understand the requirements for setting up vantage6 node
- Understand the basic
v6commands - Be able to create a new vantage6 node using
v6commands - Be able to reset and update an API key for a node
- Be able to observe the logs of vantage6 node
Vantage6 node is the software that runs on a data station. It allows the data owner to share their data within the vantage6 network in a privacy enhancing way. Also, it is responsible for the execution of the federated learning tasks and the communication with the vantage6 server.
Each organization that is involved in a federated learning collaboration has its own node in that collaboration. They should therefore install the node software on a (virtual) machine hosted in their own infrastructure. The machine should have access to the data that is used in the federated learning collaboration.
This chapter will explain how to set up and run the vantage6 node software.
Requirements on hardware and software
Hardware requirements
The minimal hardware requirements are:
- x86 CPU architecture + virtualization enabled. This setting is usually the default in most of the systems.
- 1 GB memory
- Sufficient storage to install Python, docker and vantage6, and to store the required docker images (50GB+ recommended).
- Stable and fast internet connection (1 Mbps+).
The hardware requirements of vantage6 node also depend on the algorithms that the node will run. For example, you need much less compute power for a descriptive statistical algorithm than for a machine learning model.
Even though a vantage6 node can be installed and run on Linux, Windows and Mac, Linux is the recommended OS.
In this lesson, you will use your laptop, but in a production scenario, we recommend to use a server or virtual machine to run the node.
Software requirements
The following software must be installed before installing the vantage6 node:
- Recommended operating system: Ubuntu 20.04+ , MacOS Big Sur+, or Windows 10+
- Docker Desktop (Windows, MacOS) or the Docker Engine (Linux)
- Miniconda (latest version)
- Python v3.10
- Python packages:
You should already have installed the requirements before coming to this lesson. They are detailed in the Setup section.
⚠️ Docker installation
For Linux users, some post-installation steps may be required (as also mentioned in the setup section). Vantage6 needs to be able to run docker without sudo, and these steps ensure just that.
For Windows users, if you are using Docker Desktop, it may be preferable to limit the amount of memory Docker can use - in some cases it may otherwise consume much memory and slow down the system. This may be achieved as described here.
Installation
The Python package vantage6 provides a command-line
interface (CLI) to manage the vantage6 infrastructure.
To install this CLI package, run the following command in your Python environment, provided you had not done so already in the Setup section:
BASH
# First go to your python virtual environment
conda create -n v6-workshop python=3.10
conda activate v6-workshop

# Then install the package
pip install vantage6 jupyterlab
To verify the installed CLI, run the command,
If the installation is successful, it will print out a message explaining the CLI usage.
v6 node commands
The vantage6 CLI provides the v6 node command to manage
the vantage6 node instances.
To see how to use it, run the command v6 node --help in
your terminal, and it will print out the following messages:
BASH
Usage: v6 node [OPTIONS] COMMAND [ARGS]...

  Manage your vantage6 node instances.

Options:
  --help  Show this message and exit.

Commands:
  attach              Show the node logs in the current console.
  clean               Erase temporary Docker volumes.
  create-private-key  Create and upload a new private key
  files               Prints the location of important node files.
  list                Lists all node configurations.
  new                 Create a new node configuration.
  remove              Delete a node permanently.
  set-api-key         Put a new API key into the node configuration file
  start               Start the node.
  stop                Stop one or all running nodes.
  version             Returns current version of a vantage6 node.
For example, to view the list of available nodes, you can run the
command v6 node list.
View the list of nodes
You can use the v6 node list command to see the list of
nodes:
If it print out a long error message, it means the Docker engine is not running:
BASH
Cannot reach the Docker engine! Please make sure Docker is running.
Error while fetching server API version: 502 Server Error for http+docker://localhost/version: Bad Gateway
Traceback (most recent call last):
...
⚠️ Please make sure Docker is running when you’re using the
v6 node commands.
Start Docker engine
- For Windows and MacOS, open Docker Desktop to start the Docker engine.
- For Linux, Docker engine usually starts automatically when you
login. Otherwise, use the commmand
sudo systemctl start dockerto start the Docker engine.
If the Docker engine is running, you will see the following message:
BASH
Name                     Status          System/User
-----------------------------------------------------
-----------------------------------------------------
You don’t see any nodes in the list because you haven’t created any nodes yet. Next, we will create a new node configuration.
Configure a new node
We will now create a new node configuration using the
v6 node new command for the collaboration we created in Chapter 4. This process will
create a configuration yaml file that the vantage6 node
requires to run.
Prepare the API key and data
Make sure you have the API key downloaded from the vantage6 UI in Episode 4. If you haven’t done so or lost the API key, you can reset the API key for the node in the vantage6 UI, check the Reset API key for a node via the vantage6 UI section.
Go back to the terminal and go to a directory you want to work in:
Open the jupyter lab in the terminal:
In the Jupyter Lab, create a new csv data file
data_node1.csv with the following content:
age
1
1
1
Let’s run the command:
The command will show a wizard to guide you through the configuration process in a step-by-step manner:
BASH
? Please enter a configuration-name: node1
? Enter given api-key: ***
? The base-URL of the server: https://server.workshop.vantage6.ai
? Enter port to which the server listens: 443
? Path of the api: /api
? Task directory path: ***/vantage6/node/node1
? Do you want to add a database? Yes
? Enter unique label for the database: default
? Database URI: ***/data_node1.csv
? Database type: csv
? Do you want to add a database? No
? Do you want to connect to a VPN server? No
? Do you want to add limit the algorithms allowed to run on your node? This should always be done for production scenarios. No
? Which level of logging would you like? DEBUG
? Encryption is disabled for this collaboration. Accept? Yes
It is important to note the meaning of following configuration parameters:
- The
api-keyis the API key that you downloaded from vantage6 UI in Chapter 4. It is used to authenticate the node at the server. - The
base-URL of the serveris the URL of the vantage6 server. If you are running the server on your local machine using Docker, the URL has to be set tohttp://localhost - The
port to which the server listensis the port number of the server. Check with the server administrator to get the correct port number. - The
path of the apiis the path of the API of the server. By default it is/api. - The
database URIis the path of the database file containing the sensitive data. You can add multiple databases by repeating the process. The database type can be ‘csv’, ‘parquet’, ‘sql’, ‘sparql’, ‘excel’ or ‘omop’. - The
unique label for the databaseis the name of the database. It must be unique. It’s used when you want to refer to the database in the algorithms. - The
VPN serveris used to connect the node to a VPN server. A VPN connection allows nodes to communicate directly with one another, which is useful when some algorithms require direct or a lot of communication between nodes. For more information, see the vantage6 documentation.
To see all configuration options, please check https://docs.vantage6.ai/en/main/node/configure.html#all-configuration-options.
When you finish the configuration, you will see the following message:
BASH
[info ] - New configuration created: ***/vantage6/node/node1.yaml
[info ] - You can start the node by running v6 node start
It means that the node configuration file is created successfully, and it also gives the path of the configuration file.
Where is the node configuration file?
You can always use the v6 node files command to check
the location of the node configuration file:
It will ask you which node you want to see. You can choose the one you just created:
In the printed message, you will see not only the path of the configuration file is printed out, but also the locations of the log file, the data folders and the database files are shown.
Challenge 1: Create a new node configuration
- Create a new node configuration
node2using thev6 node newcommand for another organization in the collaboration you created in Episode 4:- add a new database in the format of
csvwith only one column namedage, you need to make up the data.
- add a new database in the format of
- Find the path to the configuration file using the
v6 node filescommand. Open the configuration file with a text editor and check the configuration options. Are they correct? - Open your configuration file, do the following:
- add another database in the format of
excelwith only one column namedage, you need to make up the data.
- add another database in the format of
Start a node
Before starting a vantage6 node, you need to make sure the vantage6 server and Docker are running.
To start a node, you can run the command
v6 node start:
It will ask you which node you want to start. You can choose the one you just created:
BASH
[info ] - Starting node...
[info ] - Finding Docker daemon
? Select the configuration you want to use: (Use arrow keys)
 » node1
node2then it will start the node and print out the following messages:
BASH
? Select the configuration you want to use: node1
[info ] - Starting node...
[info ] - Finding Docker daemon
[info ] - Checking that data and log dirs exist
[info ] - Connecting to server at 'https://server.workshop.vantage6.ai:443/api'
[info ] - Pulling latest node image 'harbor2.vantage6.ai/infrastructure/node:4.7'
[info ] - Creating file & folder mounts
[warn ] - private key file provided ***/vantage6/node/node1/private_key.pem, but does not exists
[info ] - Setting up databases
[info ] -   Processing csv database default:***/data_node1.csv
[debug] -   - file-based database added
[info ] - Running Docker container
[info ] - Node container was started!
[info ] - Please check the node logs to see if the node successfully connects to the server.
[info ] - To see the logs, run: v6 node attach --name node1
Now the node container is running, but it does not mean the node is connected to the server. You need to check the logs to see if the node successfully connects to the server.
Watch the logs
You can show the logs in the current console by running the command:
then it will print out the logs of the node in the console:
BASH
2024-09-23 09:09:59 - context        - INFO     - ---------------------------------------------
2024-09-23 09:09:59 - context        - INFO     -  Welcome to
2024-09-23 09:09:59 - context        - INFO     -                   _                     __
2024-09-23 09:09:59 - context        - INFO     -                  | |                   / /
2024-09-23 09:09:59 - context        - INFO     - __   ____ _ _ __ | |_ __ _  __ _  ___ / /_
2024-09-23 09:09:59 - context        - INFO     - \ \ / / _` | '_ \| __/ _` |/ _` |/ _ \ '_ \
2024-09-23 09:09:59 - context        - INFO     -  \ V / (_| | | | | || (_| | (_| |  __/ (_) |
2024-09-23 09:09:59 - context        - INFO     -   \_/ \__,_|_| |_|\__\__,_|\__, |\___|\___/
2024-09-23 09:09:59 - context        - INFO     -                             __/ |
2024-09-23 09:09:59 - context        - INFO     -                            |___/
2024-09-23 09:09:59 - context        - INFO     -
2024-09-23 09:09:59 - context        - INFO     -  --> Join us on Discord! https://discord.gg/rwRvwyK
2024-09-23 09:09:59 - context        - INFO     -  --> Docs: https://docs.vantage6.ai
2024-09-23 09:09:59 - context        - INFO     -  --> Blog: https://vantage6.ai
2024-09-23 09:09:59 - context        - INFO     - ------------------------------------------------------------
2024-09-23 09:09:59 - context        - INFO     - Cite us!
2024-09-23 09:09:59 - context        - INFO     - If you publish your findings obtained using vantage6,
2024-09-23 09:09:59 - context        - INFO     - please cite the proper sources as mentioned in:
2024-09-23 09:09:59 - context        - INFO     - https://vantage6.ai/vantage6/references
2024-09-23 09:09:59 - context        - INFO     - ------------------------------------------------------------
2024-09-23 09:09:59 - context        - INFO     - Started application vantage6
2024-09-23 09:09:59 - context        - INFO     - Current working directory is '/'
2024-09-23 09:09:59 - context        - INFO     - Successfully loaded configuration from '/mnt/config/node1.yaml'
2024-09-23 09:09:59 - context        - INFO     - Logging to '/mnt/log/node_user.log'
2024-09-23 09:09:59 - context        - INFO     - Common package version '4.7.1'
2024-09-23 09:09:59 - context        - INFO     - vantage6 version '4.7.1'
2024-09-23 09:09:59 - context        - INFO     - Node package version '4.7.1'
2024-09-23 09:09:59 - node           - INFO     - Connecting server: https://server.workshop.vantage6.ai:443/api
2024-09-23 09:09:59 - node           - DEBUG    - Authenticating
2024-09-23 09:09:59 - common         - DEBUG    - Authenticating node...
2024-09-23 09:10:03 - common         - INFO     - Successfully authenticated
2024-09-23 09:10:03 - common         - DEBUG    - Making request: GET | https://server.workshop.vantage6.ai:443/api/node/268 | None
2024-09-23 09:10:04 - common         - DEBUG    - Making request: GET | https://server.workshop.vantage6.ai:443/api/organization/170 | None
2024-09-23 09:10:05 - node           - INFO     - Node name: eScience-UvA - eScience
2024-09-23 09:10:05 - common         - DEBUG    - Making request: GET | https://server.workshop.vantage6.ai:443/api/collaboration/93 | None
2024-09-23 09:10:05 - node           - WARNING  - Disabling encryption!
2024-09-23 09:10:05 - node           - INFO     - Setting up proxy server
2024-09-23 09:10:05 - node           - INFO     - Starting proxyserver at 'proxyserver:80'
2024-09-23 09:10:05 - node           - INFO     - Setting up VPN client container
2024-09-23 09:10:05 - vpn_manager    - INFO     - Updating VPN images...
2024-09-23 09:10:05 - vpn_manager    - DEBUG    - Pulling Alpine image
2024-09-23 09:10:06 - addons         - DEBUG    - Succeeded to pull image harbor2.vantage6.ai/infrastructure/alpine:4.7
2024-09-23 09:10:06 - vpn_manager    - DEBUG    - Pulling VPN client image
2024-09-23 09:10:06 - addons         - DEBUG    - Succeeded to pull image harbor2.vantage6.ai/infrastructure/vpn-client:4.7
2024-09-23 09:10:06 - vpn_manager    - DEBUG    - Pulling network config image
2024-09-23 09:10:06 - addons         - DEBUG    - Succeeded to pull image harbor2.vantage6.ai/infrastructure/vpn-configurator:4.7
2024-09-23 09:10:06 - vpn_manager    - INFO     - Done updating VPN images
2024-09-23 09:10:06 - vpn_manager    - DEBUG    - Used VPN images:
2024-09-23 09:10:06 - vpn_manager    - DEBUG    -   Alpine: harbor2.vantage6.ai/infrastructure/alpine:4.7
2024-09-23 09:10:06 - vpn_manager    - DEBUG    -   Client: harbor2.vantage6.ai/infrastructure/vpn-client:4.7
2024-09-23 09:10:06 - vpn_manager    - DEBUG    -   Config: harbor2.vantage6.ai/infrastructure/vpn-configurator:4.7
2024-09-23 09:10:06 - node           - WARNING  - VPN subnet is not defined! VPN disabled.
2024-09-23 09:10:06 - node           - INFO     - No SSH tunnels configured
2024-09-23 09:10:06 - node           - INFO     - No squid proxy configured
2024-09-23 09:10:06 - node           - DEBUG    - Setting up the docker manager
2024-09-23 09:10:06 - docker_manager - DEBUG    - Initializing DockerManager
2024-09-23 09:10:06 - docker_manager - WARNING  - No policies on allowed algorithms have been set for this node!
2024-09-23 09:10:06 - docker_manager - WARNING  - This means that all algorithms are allowed to run on this node.
2024-09-23 09:10:06 - docker_manager - INFO     - Copying /mnt/default.csv to /mnt/data
2024-09-23 09:10:06 - docker_manager - INFO     - Copying /mnt/age.csv to /mnt/data
2024-09-23 09:10:06 - docker_manager - DEBUG    - Databases: {'default': {'uri': PosixPath('/mnt/data/default.csv'), 'is_file': True, 'type': 'csv', 'env': {}}, 'age': {'uri': PosixPath('/mnt/data/age.csv'), 'is_file': True, 'type': 'csv', 'env': {}}}
2024-09-23 09:10:06 - node           - DEBUG    - Creating websocket connection with the server
2024-09-23 09:10:06 - node           - INFO     - Connected to host=https://server.workshop.vantage6.ai on port=443
2024-09-23 09:10:06 - node           - DEBUG    - Starting thread to ping the server to notify this node is online.
2024-09-23 09:10:06 - network_man..  - DEBUG    - Connecting vantage6-node1-user to network 'vantage6-node1-user-net'
2024-09-23 09:10:06 - node           - DEBUG    - Start thread for sending messages (results)
2024-09-23 09:10:06 - node           - DEBUG    - Waiting for results to send to the server
2024-09-23 09:10:06 - node           - DEBUG    - Starting thread for incoming messages (tasks)
2024-09-23 09:10:06 - node           - DEBUG    - Listening for incoming messages
2024-09-23 09:10:06 - node           - INFO     - Init complete
2024-09-23 09:10:06 - node           - INFO     - Waiting for new tasks....
2024-09-23 09:10:07 - socket         - INFO     - Websocket connection established
2024-09-23 09:10:07 - socket         - INFO     - (Re)Connected to the /tasks namespace
2024-09-23 09:10:07 - common         - DEBUG    - Making request: GET | https://server.workshop.vantage6.ai:443/api/run | {'state': 'open', 'node_id': 268, 'include': 'task'}
2024-09-23 09:10:07 - socket         - INFO     - Node <eScience-UvA - eScience> joined room <collaboration_93>
2024-09-23 09:10:07 - socket         - INFO     - Node <eScience-UvA - eScience> joined room <collaboration_93_organization_170>
2024-09-23 09:10:08 - node           - DEBUG    - task_results: []
2024-09-23 09:10:08 - node           - INFO     - Received 0 tasks
2024-09-23 09:10:08 - socket         - DEBUG    - Tasks synced again with the server...
2024-09-23 09:10:08 - node           - DEBUG    - Sharing node configuration: {'encryption': False, 'allowed_algorithms': 'all', 'database_labels': ['default', 'age'], 'database_types': {'db_type_default': 'csv', 'db_type_age': 'csv'}, 'database_columns': {'columns_default': ['age'], 'columns_age': ['age']}}
From there, you can see the running status of the node, the connection to the server, the databases, the websocket connection, and the incoming tasks.
Challenge 2: Start a node and watch the logs
- Start the node
node2you created in last exercise using thev6 node startcommand. - Watch the logs of the node using the
v6 node attach --name node2command. Observe the logs and see if the node is connected to server successfully. - How do you know if the node is connected to the server without checking the logs?
- You can use vantage6 UI to check if a node is online or not. There
are two ways:
- Click on the
Nodestab in the administration page, then click on the tab of the node you want to check. You will see the node status isOnlineif the node is connected to the server successfully. - Or click on the
Collaborationstab in the administration page, then click on the tab of the collaboration you want to check. You will see the Nodes section, if nodes are in green color, it means they are online, otherwise they are in red color with a messageOffline.
- Click on the
Stop a node
To stop a running node, you can run the command:
then it will ask you which node you want to stop:
after you choose the node, it will print out the following messages:
Update the API key of your node
Reset API key for a node via the vantage6 UI
If you want to reset the API key for a node, you can do so by following these steps:
- Login to the vantage6 UI.
- Click on the
Nodestab in the administration page. - Click on the tab of the node you want to reset the API key for in the list of nodes.
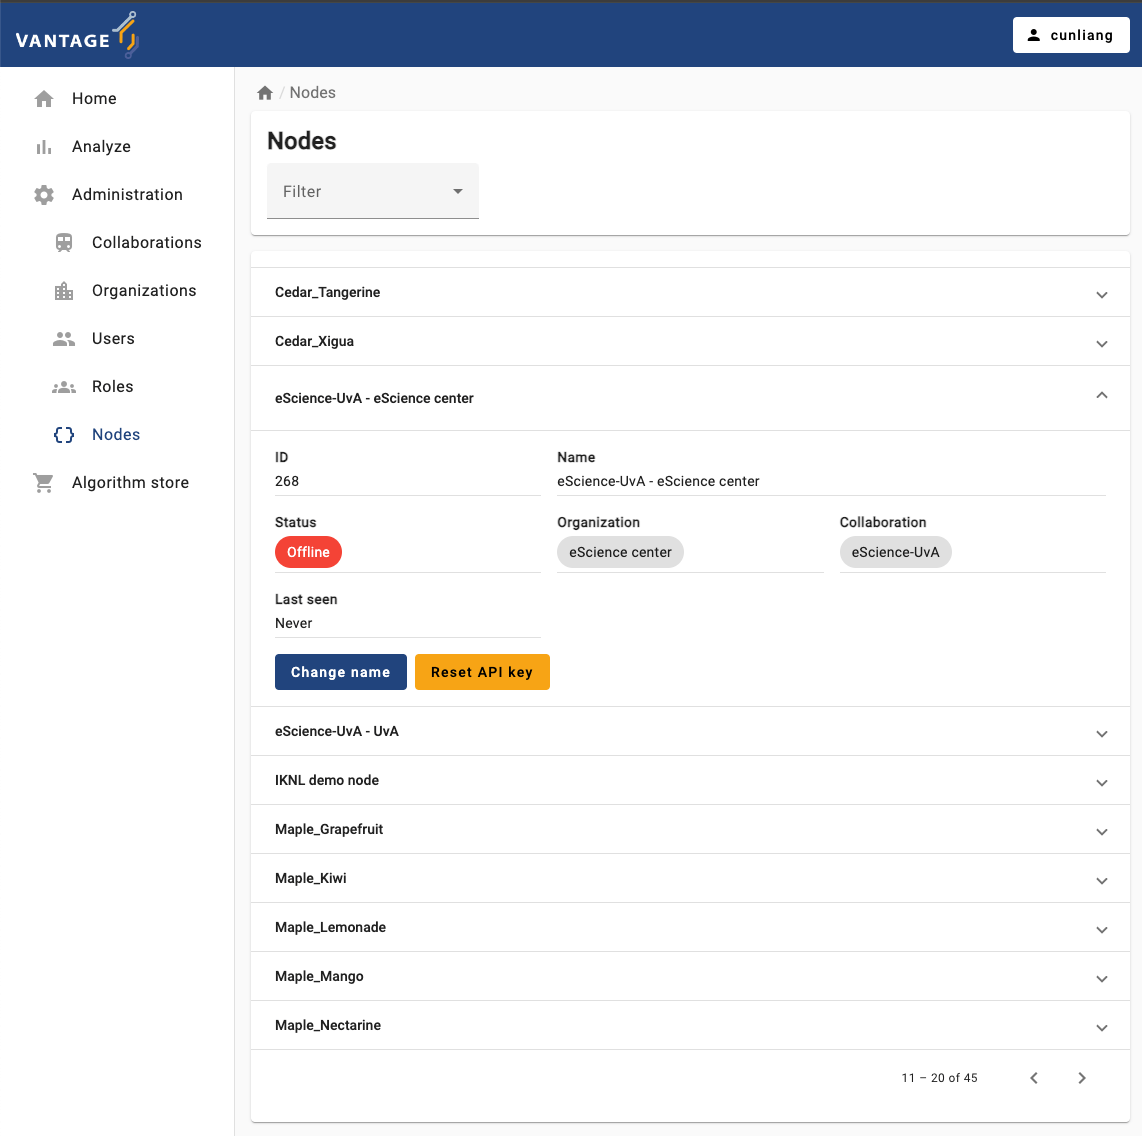
- Click on the
Reset API keybutton.- You may see a dialog box asking you to download the new API key.
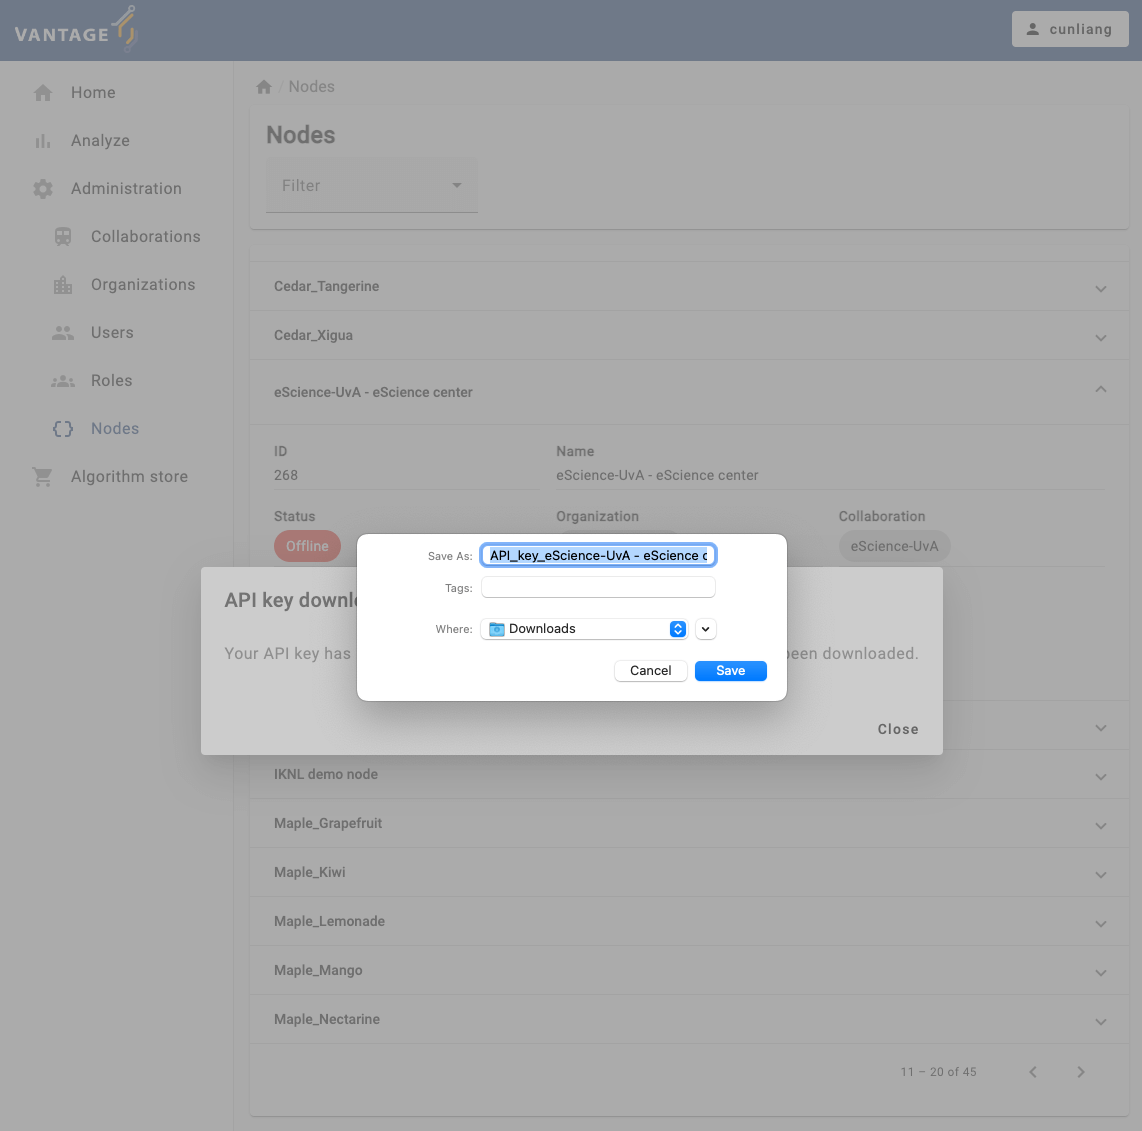
You will see a message:
API key download
Your API key has been reset. Please read your new key in the file that has been downloaded.
You can open the downloaded text file to copy the new API key. Next, you’ll use it to update your node configuration.
Update API key in the node configuration file
You can use v6 CLI to update the API key of a node. For that, you can run the command:
then it will ask you which node you want to update the API key of:
after you choose the node, it will ask you to enter the new API key, then you can paste the new API key you just copied from the downloaded file:
BASH
? Select the configuration you want to use: node1
? Please enter your new API key: the-new-api-key
2024-09-23 11:30:33 - context        - INFO     - ---------------------------------------------
2024-09-23 11:30:33 - context        - INFO     -  Welcome to
2024-09-23 11:30:33 - context        - INFO     -                   _                     __
2024-09-23 11:30:33 - context        - INFO     -                  | |                   / /
2024-09-23 11:30:33 - context        - INFO     - __   ____ _ _ __ | |_ __ _  __ _  ___ / /_
2024-09-23 11:30:33 - context        - INFO     - \ \ / / _` | '_ \| __/ _` |/ _` |/ _ \ '_ \
2024-09-23 11:30:33 - context        - INFO     -  \ V / (_| | | | | || (_| | (_| |  __/ (_) |
2024-09-23 11:30:33 - context        - INFO     -   \_/ \__,_|_| |_|\__\__,_|\__, |\___|\___/
2024-09-23 11:30:33 - context        - INFO     -                             __/ |
2024-09-23 11:30:33 - context        - INFO     -                            |___/
2024-09-23 11:30:33 - context        - INFO     -
2024-09-23 11:30:33 - context        - INFO     -  --> Join us on Discord! https://discord.gg/rwRvwyK
2024-09-23 11:30:33 - context        - INFO     -  --> Docs: https://docs.vantage6.ai
2024-09-23 11:30:33 - context        - INFO     -  --> Blog: https://vantage6.ai
2024-09-23 11:30:33 - context        - INFO     - ------------------------------------------------------------
2024-09-23 11:30:33 - context        - INFO     - Cite us!
2024-09-23 11:30:33 - context        - INFO     - If you publish your findings obtained using vantage6,
2024-09-23 11:30:33 - context        - INFO     - please cite the proper sources as mentioned in:
2024-09-23 11:30:33 - context        - INFO     - https://vantage6.ai/vantage6/references
2024-09-23 11:30:33 - context        - INFO     - ------------------------------------------------------------
2024-09-23 11:30:33 - context        - INFO     - Started application vantage6
2024-09-23 11:30:33 - context        - INFO     - Current working directory is '***'
2024-09-23 11:30:33 - context        - INFO     - Successfully loaded configuration from '***/vantage6/node/node1.yaml'
2024-09-23 11:30:33 - context        - INFO     - Logging to '***/vantage6/node/node1/node_user.log'
2024-09-23 11:30:33 - context        - INFO     - Common package version '4.7.1'
2024-09-23 11:30:33 - context        - INFO     - vantage6 version '4.7.1'
[info ] - Your new API key has been uploaded to the config file ***/vantage6/node/node1.yaml.
When you finish the process, the node configuration file will be updated with the new API key.
To make the new API key effective, you need to restart the node by
running the command v6 node stop and then
v6 node start.
Challenge 3: Update the API key of a node
- Update the API key of the node
node1, WITHOUT using thev6 node set-api-keycommand. - How do you verify that the new API key is effective?
- We can update the API key in the configuration file:
- Run the
v6 node filescommand to locate the configuration file. - Open the configuration file and write the new API key in the
api_keyfield. - Stop the node with the
v6 node stopcommand. - Restart the node with the
v6 node startcommand.
- In order to verify the effectiveness of the API key change, we can restart the node with active logging:
In the log, we have to look for the node authentication message:
Run a task on the nodes
Now start all your nodes and go to the vantage6 UI to create a new task for your nodes.
Challenge 4: Run a task on the nodes
Start all your nodes node1 and node2 and go
to the vantage6 UI to run a new task for your nodes using the
Average algorithm for the age data.
- Run a centralized task on the nodes.
- Run a federated task on the nodes.
v6 server and
v6 algorithm-store commands
In this lesson we have focussed on the CLI commands to manage the
vantage6 node. Note that the commands to manage the server
(v6 server) and the algorithm store
(v6 algorithm-store) are similar to the ones presented for
the node. However, they are less commonly used for production scenarios
where administrators often prefer to deploy via nginx or
docker compose. We will not cover those commands in this
course.
- Install the vantage6 CLI package by running
pip install vantage6. - Use the
v6 --helpcommand to see the available commands of the vantage6 CLI. - Use the
v6 nodecommand to manage the vantage6 node instances. - Use the
v6 node newcommand to create a new node configuration. - Use the
v6 node startcommand to start a node. - Use the
v6 node attach --name xxxcommand to show the logs of the nodexxx. - Use the
v6 node stopcommand to stop a node. - Use the
v6 node set-api-keycommand to set a new API key of a node. - Use the
v6 node filescommand to check the location of the node configuration file. - The commands similar to the ones presented for the node are also
available for
v6 serverandv6 algorithm-store.
Content from Algorithm development
Last updated on 2024-10-02 | Edit this page
Overview
Questions
- What do the algorithm tools in vantage6 provide?
- How do you create a personalized boilerplate using the v6 cli?
- What is the process for adapting the boilerplate into a simple algorithm?
- How can you test your algorithm using the mock client?
- How do you build your algorithm into a docker image?
- How do you set up a local test environment using the v6 cli
(
v6 dev)? - How can you publish your algorithm in the algorithm store?
- How can you run your algorithm?
Objectives
- Understand the available algorithm tools
- Create a personalized boilerplate using the v6 cli
- Adapt the boilerplate into a simple algorithm
- Test your algorithm using the mock client
- Build your algorithm into a docker image
- Set up a local test environment using the v6 cli
(
v6 dev) - Publish your algorithm in the algorithm store
- Run your algorithm in the UI
- Run your algorithm with the Python client
Introduction
The goal of this lesson is to develop a simple average algorithm, and walk through all the steps from creating the proper code up until running it in the User Interface and via the Python client. We will start by explaining how the algorithm interacts with the vantage6 infrastructure. Then, you will start to build, test and run your own algorithm.
Algorithm tools
The vantage6 infrastructure provides a set of tools to help you develop your algorithm. You have probably already done this in the setup of the workshop, but you can install the algorithm tools with:
The following sections handle the most important parts of the algorithm tools.
Algorithm client
The algorithm client provides functionality that is similar to the Python client, but can only do a subset of the operations, because the algorithm is not allowed to execute operations like creating a collaboration or deleting a user. This client can be used to interact with the server, e.g. to create a subtask, retrieve results, or get the organizations participating in the collaboration.
A typical example of how to use the algorithm client is as follows:
PYTHON
from vantage6.algorithm.client import AlgorithmClient
from vantage6.algorithm.tools.decorators import algorithm_client

# Load the algorithm client to interact with the server
@algorithm_client
def central_function(client: AlgorithmClient):
    organizations_in_collaboration = client.organization.list()

    task = client.task.create(
        input_=**my_input,
        organizations=organizations_in_collaboration,
        name="Subtask name",
    )

    results = client.wait_for_results(task.get('id'))

    return aggregate_results(results)
Data loading
The algorithm tools provide a way to load the data from the node and provide it to the algorithm as a Pandas dataframe.
Example:
Wrapping the algorithm functions
The algorithm client and data loading tools provide you with the vantage6 tools in the algorithm code itself. However, the algorithm tools also provide an interface between the algorithm and the node, which we call the algorithm wrapper. The wrapper ensures that all the necessary information is passed to the algorithm, and that the output is returned to the server. Mostly this is ‘magic’ that happens in the background. It is important to know about it though, as it can help you understand how the algorithm interacts with the vantage6 infrastructure, and you can use the wrapper to e.g. pass environment variables to the algorithm.
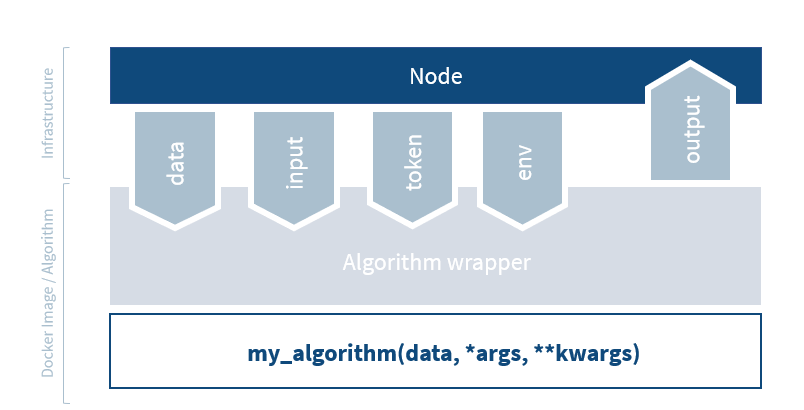
The following items are handled by the wrapper:
-
Input handling: the algorithm tools read the input
from the node and provide it to the arguments of the algorithm function.
In the example above, the
columnargument is provided by the node to the function via the algorithm tools. - Environment variables: the algorithm tools get the environment variables from the node and pass them on to the algorithm. You can also define environment variables in the node configuration file that are passed to the algorithm. This can e.g. be useful if you want to pass the database connection string to the algorithm.
- Token: the algorithm tools ensure that the algorithm uses the security token to be able to get the allowed resources from the server.
-
Data: while the actual data is handled by the
@datadecorator, the algorithm tools provide the decorator with environment variables so that it knows where to find the data. - Output handling: the output from the algorithm functions is written to a file that the node will send back to the server.
It is possible to write your algorithm without the algorithm tools. If you want to write your algorithm in a different language than Python, you cannot use the algorithm tools.
For more information about the algorithm tools, please check out the relevant documentation.
Challenge 1: Creating non-Python algorithms
You want to create a vantage6 algorithm, but Python is not your favorite programming language. What extra work do you need to do to create a vantage6 algorithm in a different language?
You would need to implement parts of the wrapper and algorithm client yourself:
- You should use the environment variables to load the token, input and data
- You should create your own HTTP requests to replace the algorithm client
- You should make sure the output is written to the correct place
Create a simple algorithm
As discussed above, vantage6 algorithms require a certain structure to interact properly with the vantage6 infrastructure. For example, vantage6 requires the functions in the algorithm to be at the base level of a Python package that is defined within the Docker image. Such requirements can be cumbersome to get right if you have to write all the code yourself. Fortunately, vantage6 provides tools to create a boilerplate for you, so that you can focus on the development of your algorithm functions rather than worry about the infrastructure.
To create a personalized boilerplate, use the vantage6 CLI. You should have installed the CLI in the workshop setup. Be sure to activate the conda environment you created for the workshop.
You can create a new algorithm boilerplate repository with:
The first step in creating your own algorithm is to enter the command
v6 algorithm create and type along to create your own
personalized boilerplate:
BASH
> v6 algorithm create
? Name of your new algorithm: my-vantage6-average
? Directory to put the algorithm in: \some\local\directory\for\algorithms\my-vantage6-average

Welcome to the vantage6 algorithm template creator!

You will be asked a series of questions to generate the basis of your new
vantage6 algorithm in Python.

🎤 Please enter a short description (one sentence) of your algorithm.
   My very first vantage6 algorithm, computing the average of a single data column
🎤 The open source license to use
   MIT
🎤 Do you want to use a central function in your algorithm?
   Yes
🎤 What is the name of your central function?
   central
🎤 Do you want to use a client in your central function?
   Yes
🎤 Do you want to use data in your central function?
   No
🎤 Add a list of arguments to the central function 'central'
    (Finish with 'Alt+Enter' or 'Esc then Enter')
> [
    "column"
  ]
🎤 Do you want to use a partial function in your algorithm?
   Yes
🎤 What is the name of your partial function?
   partial
🎤 Do you want to use a client in your partial function?
   No
🎤 Do you want to use data in your partial function?
   Yes
🎤 How many databases do you want to use in your partial function?
   1
🎤 Add a list of arguments to the partial function 'partial'
    (Finish with 'Alt+Enter' or 'Esc then Enter')
> [
    "column"
  ]
🎤 Do you want to add documentation to your algorithm?
   No
🎤 Do you want to see the advanced options?
   No
That should give you a nice head-start to develop your own algorithm!
Challenge 2: Learn about your personalized boilerplate
Inspect your personalized boilerplate code. What does it contain? Multiple answers are possible.
A. Templates of your algorithm functions B. Arguments of your algorithm functions C. Scripts to test your algorithm functions D. Checklist of what to do to complete your algorithm E. A JSON file that helps to include the algorithm in an algorithm store
The answers is that it contains all those things. The boilerplate was designed to be as complete as possible!
A. Templates of your algorithm functions: the boilerplate contains
the central and partial functions that you specified in the creation
process, in the files central.py and
partial.py, in the folder with the algorithm name you
specified in the first question. B. Arguments of your algorithm
functions: within the files specified in the previous point, you can see
that the parameters are already defined in the function signature. C.
Scripts to test your algorithm functions: the boilerplate contains a
test.py file in the test/ directory. Some
details still need to be adjusted to test your algorithm - we’ll come to
that later in this lesson. D. Checklist of what to do to complete your
algorithm: the README.md file in the root directory of your
algorithm contains a checklist of what you need to do to complete your
algorithm. E. A JSON file that helps to include the algorithm in an
algorithm store: the boilerplate contains an
algorithm_store.json file that contains a JSON description
of your algorithm. This file is used to upload your algorithm to the
algorithm store.
Missing anything? Let us know!
Modifying the boilerplate
If you want to modify the answers you gave in
v6 algorithm create, you can do so by running:
This is recommended to do whenever you want to change something like the name of the function, as it will ensure that it will be updated in all places it was mentioned.
The update command can also be used without
--change-answers to update your algorithm to a new version,
even after you have implemented your functions. This is helpful when
there is new functionality or changes in vantage6 that require
algorithms to update.
Implement the algorithm functions
Your personalized boilerplate is now ready to be adapted into a simple algorithm. We are now going to implement the average algorithm in several steps. First, we will explain how this can be done, and then you can try it yourself in a challenge.
First step is to implement the central and partial functions. The easiest is to start with the partial function. Using the Pandas dataframe that is provided by the algorithm tools, the following should be extracted for the requested column:
- The number of rows that contains a number
- The sum of all these numbers
The boilerplate code for the central function already a large part of the code that will be required to gather the results from the partial functions. To compute the final average, we will need to:
- Modify how the subtasks are created - we need to provide the column to the partial functions
- Combine the results from the partial functions to compute the average
Remember that both functions should return the results as valid JSON serializable objects - we recommend returning a Python dictionary.
Test your algorithm using the mock client
As discussed before, the algorithm tools contain an algorithm client that helps the algorithm container to communicate with the server. When testing your algorithm, it would be cumbersome to test your algorithm in the real infrastructure on every code change, as this requires you to build your algorithm Docker image, ensure all nodes in your collaboration are online, etc.
To facilitate the testing phase, the algorithm tools also provide an algorithm mock client. This client can be used to test your algorithm locally without having to start up the server and nodes. The mock client provides the same functions as the algorithm client, but instead of communicating with the server, it simply returns a smart mock response. The mock client does not mock the output of the algorithm functions, but actually calls them with locally defined test data. This way, you can easily test locally if your algorithm functions give the answer you expect without worrying about the infrastructure.
Your personalized template already contains a
test/test.py file that contains boilerplate code to test
your algorithm. You just need to make small adjustments to test your
average algorithm.
Challenge 3: Implement the functions and test them
Implement your partial and central functions as described above.
Adapt and run test.py to test your function
implementation:
- In your Python environment, run
pip install -e .. This installs the local Python package and also the algorithm tools (which contain the mock client). - Adjust
test.pyto compute the average over the Age column. Do this both for the test of the central and of the partial function - Run
test.pyto test your functions.
We provide a pandas dataframe. Pandas is a well-known Python library for data manipulation and analysis. It also provides a sum method that can be used to calculate the sum of a column.
You can find the solution in the workshop-average-boilerplate repository. This branch contains the implementation of the average algorithm. Below is a description of what you need to change compared to the boilerplate you generated in Challenge 1.
In your central function:
- When creating the subtask, fill in the
columnargument from the input parameters. - Aggregate the results from the partial functions to compute the average, which may look something like this:
PYTHON
def central_function(client: AlgorithmClient, column: str):

    ...

    results = client.wait_for_results(task_id=task.get("id"))

    info("Computing global average")
    global_sum = 0
    global_count = 0
    for output in results:
        global_sum += output["sum"]
        global_count += output["count"]

    # return the final results of the algorithm
    return {"average": global_sum / global_count}
In your partial function:
- Extract the column from the dataframe and calculate the sum and
count of the column values. The output should be a dictionary with the
keys
sumandcount:
PYTHON
@data(1)
def partial_function(df: pd.DataFrame, column: str) -> Any:
    col_data = df[column]
    local_sum = float(col_data.sum())
    local_count = len(col_data)
    return {"sum": local_sum, "count": local_count}
In test.py:
- In the
client.task.create()calls, replace thecolumnargument with the column you want to calculate the average over:"Age".
Then, you can run python test/test.py and the output
should look something like:
[{'id': 0, 'name': 'mock-0', 'domain': 'mock-0.org', 'address1': 'mock', 'address2': 'mock', 'zipcode': 'mock', 'country': 'mock', 'public_key': 'mock', 'collaborations': '/api/collaboration?organization_id=0', 'users': '/api/user?organization_id=0', 'tasks': '/api/task?init_org_id=0', 'nodes': '/api/node?organization_id=0', 'runs': '/api/run?organization_id=0'}, {'id': 1, 'name': 'mock-1', 'domain': 'mock-1.org', 'address1': 'mock', 'address2': 'mock', 'zipcode': 'mock', 'country': 'mock', 'public_key': 'mock', 'collaborations': '/api/collaboration?organization_id=1', 'users': '/api/user?organization_id=1', 'tasks': '/api/task?init_org_id=1', 'nodes': '/api/node?organization_id=1', 'runs': '/api/run?organization_id=1'}]
info > Defining input parameters
info > Creating subtask for all organizations in the collaboration
info > Waiting for results
info > Mocking waiting for results
info > Results obtained!
info > Mocking waiting for results
[{'average': 34.666666666666664}]
{'id': 2, 'runs': '/api/run?task_id=2', 'results': '/api/results?task_id=2', 'status': 'completed', 'name': 'mock', 'databases': ['mock'], 'description': 'mock', 'image': 'mock_image', 'init_user': {'id': 1, 'link': '/api/user/1', 'methods': ['GET', 'DELETE', 'PATCH']}, 'init_org': {'id': 0, 'link': '/api/organization/0', 'methods': ['GET', 'PATCH']}, 'parent': None, 'collaboration': {'id': 1, 'link': '/api/collaboration/1', 'methods': ['DELETE', 'PATCH', 'GET']}, 'job_id': 1, 'children': None}
info > Mocking waiting for results
[{'sum': 624.0, 'count': 18}, {'sum': 624.0, 'count': 18}]
Hence, the average age is 34.67!
Build your algorithm into a docker image
To be able to run your algorithm in the vantage6 infrastructure, you need to make your algorithm available online. To do so, you need access to a Docker registry. The easiest way to do this is to use Dockerhub. To create an account there, go here.
Your algorithm boilerplate contains a Dockerfile in the
root folder. Enter the following commands to build your algorithm into a
docker image. Be sure to replace $myusername with your
Dockerhub username.
BASH
cd /go/to/directory/with/my/algorithm/and/the/dockerfile
docker login
docker build -t $myusername/average .
docker push $myusername/average
This uses the command docker build to build your
algorithm into a Docker image, and then the image is uploaded with
docker push.
Set up a local test environment
When the algorithm image is available, it is recommended to test locally if it also works with an actual server and nodes - not just using the mock client. In this section, we will test your algorithm via vantage6 on your own machine. The easiest way to set up a server and a few nodes locally is with:
This command creates a vantage6 server configuration, and then registers a collaboration with 3 organizations in it. It registers a node for each organization and finally, it creates the vantage6 node configuration for each node with the correct API key.
Each node in the v6 dev network has part of a dataset on
olympic medal winners in the 2016 Olympics. The dataset contains the
columns Age, Sex, Height,
Weight, Country, Sport and
Medal. We are mainly interested in the Age
column for our average computation, but of course you can also compute
the average over other columns, as long as they are numeric.
The other available commands are:
BASH
# Start the server and nodes
v6 dev start-demo-network

# Stop the server and nodes
v6 dev stop-demo-network

# Remove the server and nodes
v6 dev remove-demo-network
In Chapter 5, you have learned how to run an algorithm using the Python client. Now, you can run your own algorithm using the Python client!
Challenge 4: Test your algorithm on a local vantage6 network
Create and start a local vantage6 network with the
v6 dev commands. Then, run your algorithm using the Python
client. Note that the data in the v6 dev network is
different from the mock data you used before - however it contains the
same column “Age”.
If you are on Linux and are not using Docker Desktop, you
will need to run
v6 dev create-demo-network --server-url http://172.17.0.1 -
this to let vantage6 know where they can reach localhost from within the
Docker container.
You can use the following data to login:
Use help(client.task.create) to see the available
arguments for the create method. Your command should be
similar to the command in the test script, but with the correct
collaboration/organization ID
After doing v6 dev create-demo-network and
v6 dev start-demo-network, you can run the following Python
script to run your algorithm on the local network. Take care to provide
the correct username, password, and image name.
PYTHON
from vantage6.client import Client
client.authenticate(username, password)

image = "myusername/average"

task = client.task.create(
    input_={
        "method": "central_function",
        "kwargs": {
            "column": "Age",
        },
    },
    organizations=[1],
    databases = [{"label": "default"}],
    name="test task",
    description="My description",
    collaboration=1,
    image=image
)
results = client.wait_for_results(central_task.get("id"))
print(results)
which should print:
{'data': [{'result': '{"average": 27.613448844884488}',
   'task': {'id': 2, 'link': '/api/task/2', 'methods': ['DELETE', 'GET']},
   'run': {'id': 4, 'link': '/api/run/4', 'methods': ['GET', 'PATCH']},
   'id': 4}],
 'links': {'first': '/api/result?task_id=2&page=1',
  'self': '/api/result?task_id=2&page=1',
  'last': '/api/result?task_id=2&page=1'}}
So the average age is 27.61!
Publish your algorithm in the algorithm store
Previously, we have discussed how to run algorithms from the algorithm store. Now, it is time to publish your own algorithm in the algorithm store. This is required if you want to run your algorithm in the user interface: the user interface gathers information about how to run the algorithm from the algorithm store. For example, this helps the UI to construct a dropdown of available functions, and to know what arguments the function expects.
The boilerplate you create should already contain an
algorithm_store.json file that contains a JSON description
of your algorithm - how many databases each function uses, for
example.
You can put the algorithm in the store by selecting the local
algorithm store in the UI. You should upload this algorithm into your
local test store, which is part of the v6 dev network. You
can do this by selecting that store in the UI, and then by clicking on
the “Add algorithm” button on the page with approved algorithms. You can
upload the algorithm_store.json file in the top. After
uploading it, you can change the details of the algorithm before
submitting it.
Challenge 5: Add your algorithm to the algorithm store
Your local v6 dev network is running an algorithm store
locally on http://localhost:7602, and a user interface on
http://localhost:7600. Log in to the UI and upload your
algorithm to the algorithm store. Note: the UI requests a link to your
code - you can fill in a dummy link for now.
Then, can you download the revised JSON file so you can update it in your algorithm repository?
Use the algorithm_store.json which is present in your
algorithm code repository to fill in most of the details. Note, however,
that not everything is prefilled and you also need to adjust some
existing fields. Which fields do you need to adjust?
Go to the UI and log in. Then, go to the ‘Algorithm store’ section
and select the local algorithm store. Go to ‘Approved algorithms’, click
on ‘Add algorithm’ and upload the algorithm_store.json
file. Fill in the correct image name and set the type of the argument
‘column’ to ‘Column’ (this will ensure that the UI displays a dropdown
of all available columns).
You can find the revised JSON file on the page with the algorithm details.
Challenge 6: Run your algorithm in the UI
Run your algorithm in the UI. The v6 dev network should
already provide you with a collaboration where all nodes are online.
Verify that the average age is still the same. Can you also get the average height and weight?
- Make sure that your
v6 devnetwork is running. If not, start it again withv6 dev start-demo-network. - Login to the UI, go to ‘Analyze’ section, select ‘Task’ and ‘Create task’.
- Select your algorithm from the dropdown.
- Fill in the required fields. You should select the central function and provide the column you want to calculate the average over.
- Your algorithm should run successfully in the UI. The result should - obviously - be the same as when you ran it with the Python client, so we are expecting:
Average ~= 27.61.
Similarly, you can get the average height at 178.5 and the average weight at 74.3.
Challenge 7 (Advanced): Calculate the average per group
Extend your algorithm to answer the following question: in the
v6 dev dataset, are gold medal winners older or younger
than silver medal winners?
Add a group_by argument to both the central and the
partial function. Pass this argument to the partial function when
creating the subtask, and use it in the partial function to group the
data.
A working solution is provided in the workshop-average-boilerplate repository. Of course, multiple solutions are possible. Below is a description of what you need to change compared to the algorithm implementation you created in Challenge 2.
Your partial function may now look like this:
PYTHON
@data(1)
def partial_function(df: pd.DataFrame, column, group_by) -> Any:
    """Decentral part of the algorithm"""

    grouped = df.groupby(group_by)
    return {
        "sum": grouped[column].sum().to_dict(),
        "count": grouped[column].size().to_dict(),
    }
Your central function should be adapted to pass the
group_by argument to the partial function, and it should
aggregate the results per group, as something like this:
PYTHON
def central_function(client: AlgorithmClient, column: str, group_by: str):

    ...

    results = client.wait_for_results(task_id=task.get("id"))

    global_sums = {}
    global_counts = {}
    for output in results:
        for key, value in output["sum"].items():
            if key not in global_sums:
                global_sums[key] = 0
            global_sums[key] += value
        for key, value in output["count"].items():
            if key not in global_counts:
                global_counts[key] = 0
            global_counts[key] += value

    results = {}
    for key, value in global_sums.items():
        results[key] = value / global_counts[key]

    return results
And when running this, the final results are:
{"Bronze":27.39364035087719,"Gold":27.86445366528354,"Silver":27.637515842839036}Gold medal winners are older than silver medal winners. Practice makes perfect!
In case you also aspire to be perfect, feel free to practice some more. Be creative and think of other questions you can answer with this dataset!
Next steps
Congratulations! You have successfully developed your first vantage6 algorithm. You have learned how to create a personalized boilerplate, implement the algorithm functions, and run the algorithm using the Python client and the UI. The resulting algorithm, however, is not suitable yet for real-world use. For instance, if a node contains only a single data point for a given column, there are no guards implemented that prevent that such sensitive data is shared with the server. The following steps are usually important to address before your algorithm is ready for real-world use:
- Privacy guards: implement privacy guards to ensure that sensitive data is not shared with the server.
- Error handling: implement error handling to ensure that the algorithm does not crash when unexpected input is provided. Note that there are custom vantage6 errors that you can raise to provide more information about what went wrong.
- Documentation: document your algorithm so that others can understand how to use it, what their data should look like, how to interpret the results, etc.
Other next steps could be to extend the algorithm with more
functionality, such as allowing to calculate the average over multiple
columns, or to add a group_by argument to compute the
average per group.
In the final lesson of this course, you will have the opportunity to work on your own projects. You can also use that to further develop your algorithm!
Future changes
Sessions
We are currently using vantage6 version 4.7.1. The vantage6 team is working on vantage6 version 5.0, which will bring changes to the algorithm development process. Version 5.0 will introduce sessions, which are a way to split up the algorithm into smaller parts: data preparation, data preprocessing, data analysis, and post-processing. A major advantage of this is that extensive data preparation only needs to be done once per node instead of once per task, which can save a lot of time. Also, it will be possible for a more experienced user to prepare the data, while a less experienced user can simply run the algorithm on the prepared data.
For algorithm developers, the sessions mean that you should then split your algorithm functions into data preparation, analysis, postprocessing, etc. The vantage6 team will make sure that proper documentation will be available to help you with this transition.
Algorithm build service
As was already mentioned previously, the vantage6 team is working on a build service that will automatically build your algorithm into a Docker image. This will alleviate the algorithm developer from having to worry about the Docker image, and will allow them to focus on the algorithm itself. Also, it will ensure that the image is built in a consistent and secure way, which may enhance the trust in an algorithm image.
- Use
v6 algorithm createto create a personalized boilerplate - Implement the partial functions to run on each node and the central function to aggregate the results
- Build your algorithm into a docker image
- Test it with the mock client and with a local
v6 devtest environment - Publish your algorithm in the algorithm store to run it in the UI
Content from Work on your own project
Last updated on 2024-10-02 | Edit this page
Overview
Questions
- How can you use vantage6 in your own project?
Objectives
- Start working on your own research project
OR
- Complete some advanced challenges
Working on your own project
In this chapter, we will give you the opportunity to work on your own project. Feel free to ask questions and discuss your project with the instructors. We are here to help you!
If you prefer, you can also complete some advanced challenges that we have prepared for you. Note that these challenges don’t have one solution - discuss your solutions with the workshop instructors!
Advanced challenges
Challenge 1: Add privacy filters to your algorithm
In the previous lesson, you have created a simple algorithm. Now, you can add privacy filters to your algorithm.
- Create an algorithm that does not return the results unless there are more than 10 data points.
- Make this value configurable by the node administrator. Hint: look up the node configuration options in the documentation to provide environment variables to your algorithm.
- When the privacy filters are triggered, use one of the vantage6 exceptions to return an error message.
- What else could you do to protect the privacy of the data?
The contingency table algorithm already has a few privacy filters implemented. You can use this algorithm as an example.
Challenge 2: Use your own data the v6 dev network
The algorithm that you created in the previous lesson uses dummy data. In
this challenge, you will use your own data in the v6 dev
network. If you don’t have any data, you can use the Iris
dataset.
Locate and modify the node configuration files. Before starting the algorithm, how can you make sure that the data is available to the nodes?
Challenge 3: Document your algorithm
In the previous lesson, you have created a simple algorithm. For this challenge, learn how to document your algorithm.
- Make sure a documentation template is available in the algorithm
repository. If it is not, you can generate it using the
v6 algorithm update --change-answerscommand. - Install the dependencies required to run the documentation locally.
You can find the dependencies in the
requirements.txtfile indocsfolder. - Run the documentation locally in your browser. Use
docs/README.mdto find out how to do this.
For more details, learn about restructured text (rst) files online!
Challenge 4: Visualize the results of your algorithm in the UI
In the previous lesson, you have created a simple algorithm. In this challenge, modify the algorithm in the algorithm store to include a table visualization. You can do this in the UI by modifying your algorithm in the algorithm store.
Then, check that your algorithm’s results are displayed in a table!
Check the documentation
Challenge 5: Expand your average algorithm
In the previous lesson, you have created a simple average algorithm. In this challenge, expand your algorithm to calculate the one or more of the following:
- Standard deviation
- Minimum
- Maximum
Consider which data you share in the partial results and how you can minimize this to protect the privacy of the data.
Challenge 6: Make your dev environment more secure
In the previous lesson, you have
created a simple algorithm with the v6 dev command. In this
challenge, make your development environment more secure.
Use the documentation to find configuration options that can help you to:
- Enable two-factor authentication in the vantage6 server.
- Change your node configuration to only allow running algorithms from the local algorithm store. Verify that it then no longer allows running the algorithms from the community store. Note that you can both whitelist single algorithms or entire algorithm stores.
- The
v6 devalgorithm store has a specific setting that turns off the need for review of algorithms - they are automatically accepted. Change this setting to require review of algorithms. Feel free to explore the review process in the Algorithm Store section of the UI!
Are there any other security measures you can take to make your development environment more secure?
To complete this challenge, locate the configuration files of the
v6 dev network and modify them. You may need to use the
--user flag to locate the server and algorithm store
configuration files.
Try restarting the v6 dev network after changing the
configuration files.