Setting up a vantage6 node
Last updated on 2024-10-22 | Edit this page
Overview
Questions
- What are the requirements to install a node?
- How to install the command line interface (CLI)?
- Which commands are available in the CLI?
- How to set up a new node?
- How to reset and update an API key?
Objectives
- Understand the requirements for setting up vantage6 node
- Understand the basic
v6commands - Be able to create a new vantage6 node using
v6commands - Be able to reset and update an API key for a node
- Be able to observe the logs of vantage6 node
Vantage6 node is the software that runs on a data station. It allows the data owner to share their data within the vantage6 network in a privacy enhancing way. Also, it is responsible for the execution of the federated learning tasks and the communication with the vantage6 server.
Each organization that is involved in a federated learning collaboration has its own node in that collaboration. They should therefore install the node software on a (virtual) machine hosted in their own infrastructure. The machine should have access to the data that is used in the federated learning collaboration.
This chapter will explain how to set up and run the vantage6 node software.
Requirements on hardware and software
Hardware requirements
The minimal hardware requirements are:
- x86 CPU architecture + virtualization enabled. This setting is usually the default in most of the systems.
- 1 GB memory
- Sufficient storage to install Python, docker and vantage6, and to store the required docker images (50GB+ recommended).
- Stable and fast internet connection (1 Mbps+).
The hardware requirements of vantage6 node also depend on the algorithms that the node will run. For example, you need much less compute power for a descriptive statistical algorithm than for a machine learning model.
Even though a vantage6 node can be installed and run on Linux, Windows and Mac, Linux is the recommended OS.
In this lesson, you will use your laptop, but in a production scenario, we recommend to use a server or virtual machine to run the node.
Software requirements
The following software must be installed before installing the vantage6 node:
- Recommended operating system: Ubuntu 20.04+ , MacOS Big Sur+, or Windows 10+
- Docker Desktop (Windows, MacOS) or the Docker Engine (Linux)
- Miniconda (latest version)
- Python v3.10
- Python packages:
You should already have installed the requirements before coming to this lesson. They are detailed in the Setup section.
⚠️ Docker installation
For Linux users, some post-installation steps may be required (as also mentioned in the setup section). Vantage6 needs to be able to run docker without sudo, and these steps ensure just that.
For Windows users, if you are using Docker Desktop, it may be preferable to limit the amount of memory Docker can use - in some cases it may otherwise consume much memory and slow down the system. This may be achieved as described here.
Installation
The Python package vantage6 provides a command-line
interface (CLI) to manage the vantage6 infrastructure.
To install this CLI package, run the following command in your Python environment, provided you had not done so already in the Setup section:
BASH
# First go to your python virtual environment
conda create -n v6-workshop python=3.10
conda activate v6-workshop

# Then install the package
pip install vantage6 jupyterlab
To verify the installed CLI, run the command,
If the installation is successful, it will print out a message explaining the CLI usage.
v6 node commands
The vantage6 CLI provides the v6 node command to manage
the vantage6 node instances.
To see how to use it, run the command v6 node --help in
your terminal, and it will print out the following messages:
BASH
Usage: v6 node [OPTIONS] COMMAND [ARGS]...

  Manage your vantage6 node instances.

Options:
  --help  Show this message and exit.

Commands:
  attach              Show the node logs in the current console.
  clean               Erase temporary Docker volumes.
  create-private-key  Create and upload a new private key
  files               Prints the location of important node files.
  list                Lists all node configurations.
  new                 Create a new node configuration.
  remove              Delete a node permanently.
  set-api-key         Put a new API key into the node configuration file
  start               Start the node.
  stop                Stop one or all running nodes.
  version             Returns current version of a vantage6 node.
For example, to view the list of available nodes, you can run the
command v6 node list.
View the list of nodes
You can use the v6 node list command to see the list of
nodes:
If it print out a long error message, it means the Docker engine is not running:
BASH
Cannot reach the Docker engine! Please make sure Docker is running.
Error while fetching server API version: 502 Server Error for http+docker://localhost/version: Bad Gateway
Traceback (most recent call last):
...
⚠️ Please make sure Docker is running when you’re using the
v6 node commands.
Start Docker engine
- For Windows and MacOS, open Docker Desktop to start the Docker engine.
- For Linux, Docker engine usually starts automatically when you
login. Otherwise, use the commmand
sudo systemctl start dockerto start the Docker engine.
If the Docker engine is running, you will see the following message:
BASH
Name                     Status          System/User
-----------------------------------------------------
-----------------------------------------------------
You don’t see any nodes in the list because you haven’t created any nodes yet. Next, we will create a new node configuration.
Configure a new node
We will now create a new node configuration using the
v6 node new command for the collaboration we created in Chapter 4. This process will
create a configuration yaml file that the vantage6 node
requires to run.
Prepare the API key and data
Make sure you have the API key downloaded from the vantage6 UI in Episode 4. If you haven’t done so or lost the API key, you can reset the API key for the node in the vantage6 UI, check the Reset API key for a node via the vantage6 UI section.
Go back to the terminal and go to a directory you want to work in:
Open the jupyter lab in the terminal:
In the Jupyter Lab, create a new csv data file
data_node1.csv with the following content:
age
1
1
1
Let’s run the command:
The command will show a wizard to guide you through the configuration process in a step-by-step manner:
BASH
? Please enter a configuration-name: node1
? Enter given api-key: ***
? The base-URL of the server: https://server.workshop.vantage6.ai
? Enter port to which the server listens: 443
? Path of the api: /api
? Task directory path: ***/vantage6/node/node1
? Do you want to add a database? Yes
? Enter unique label for the database: default
? Database URI: ***/data_node1.csv
? Database type: csv
? Do you want to add a database? No
? Do you want to connect to a VPN server? No
? Do you want to add limit the algorithms allowed to run on your node? This should always be done for production scenarios. No
? Which level of logging would you like? DEBUG
? Encryption is disabled for this collaboration. Accept? Yes
It is important to note the meaning of following configuration parameters:
- The
api-keyis the API key that you downloaded from vantage6 UI in Chapter 4. It is used to authenticate the node at the server. - The
base-URL of the serveris the URL of the vantage6 server. If you are running the server on your local machine using Docker, the URL has to be set tohttp://localhost - The
port to which the server listensis the port number of the server. Check with the server administrator to get the correct port number. - The
path of the apiis the path of the API of the server. By default it is/api. - The
database URIis the path of the database file containing the sensitive data. You can add multiple databases by repeating the process. The database type can be ‘csv’, ‘parquet’, ‘sql’, ‘sparql’, ‘excel’ or ‘omop’. - The
unique label for the databaseis the name of the database. It must be unique. It’s used when you want to refer to the database in the algorithms. - The
VPN serveris used to connect the node to a VPN server. A VPN connection allows nodes to communicate directly with one another, which is useful when some algorithms require direct or a lot of communication between nodes. For more information, see the vantage6 documentation.
To see all configuration options, please check https://docs.vantage6.ai/en/main/node/configure.html#all-configuration-options.
When you finish the configuration, you will see the following message:
BASH
[info ] - New configuration created: ***/vantage6/node/node1.yaml
[info ] - You can start the node by running v6 node start
It means that the node configuration file is created successfully, and it also gives the path of the configuration file.
Where is the node configuration file?
You can always use the v6 node files command to check
the location of the node configuration file:
It will ask you which node you want to see. You can choose the one you just created:
In the printed message, you will see not only the path of the configuration file is printed out, but also the locations of the log file, the data folders and the database files are shown.
Challenge 1: Create a new node configuration
- Create a new node configuration
node2using thev6 node newcommand for another organization in the collaboration you created in Episode 4:- add a new database in the format of
csvwith only one column namedage, you need to make up the data.
- add a new database in the format of
- Find the path to the configuration file using the
v6 node filescommand. Open the configuration file with a text editor and check the configuration options. Are they correct? - Open your configuration file, do the following:
- add another database in the format of
excelwith only one column namedage, you need to make up the data.
- add another database in the format of
Start a node
Before starting a vantage6 node, you need to make sure the vantage6 server and Docker are running.
To start a node, you can run the command
v6 node start:
It will ask you which node you want to start. You can choose the one you just created:
BASH
[info ] - Starting node...
[info ] - Finding Docker daemon
? Select the configuration you want to use: (Use arrow keys)
 » node1
node2then it will start the node and print out the following messages:
BASH
? Select the configuration you want to use: node1
[info ] - Starting node...
[info ] - Finding Docker daemon
[info ] - Checking that data and log dirs exist
[info ] - Connecting to server at 'https://server.workshop.vantage6.ai:443/api'
[info ] - Pulling latest node image 'harbor2.vantage6.ai/infrastructure/node:4.7'
[info ] - Creating file & folder mounts
[warn ] - private key file provided ***/vantage6/node/node1/private_key.pem, but does not exists
[info ] - Setting up databases
[info ] -   Processing csv database default:***/data_node1.csv
[debug] -   - file-based database added
[info ] - Running Docker container
[info ] - Node container was started!
[info ] - Please check the node logs to see if the node successfully connects to the server.
[info ] - To see the logs, run: v6 node attach --name node1
Now the node container is running, but it does not mean the node is connected to the server. You need to check the logs to see if the node successfully connects to the server.
Watch the logs
You can show the logs in the current console by running the command:
then it will print out the logs of the node in the console:
BASH
2024-09-23 09:09:59 - context        - INFO     - ---------------------------------------------
2024-09-23 09:09:59 - context        - INFO     -  Welcome to
2024-09-23 09:09:59 - context        - INFO     -                   _                     __
2024-09-23 09:09:59 - context        - INFO     -                  | |                   / /
2024-09-23 09:09:59 - context        - INFO     - __   ____ _ _ __ | |_ __ _  __ _  ___ / /_
2024-09-23 09:09:59 - context        - INFO     - \ \ / / _` | '_ \| __/ _` |/ _` |/ _ \ '_ \
2024-09-23 09:09:59 - context        - INFO     -  \ V / (_| | | | | || (_| | (_| |  __/ (_) |
2024-09-23 09:09:59 - context        - INFO     -   \_/ \__,_|_| |_|\__\__,_|\__, |\___|\___/
2024-09-23 09:09:59 - context        - INFO     -                             __/ |
2024-09-23 09:09:59 - context        - INFO     -                            |___/
2024-09-23 09:09:59 - context        - INFO     -
2024-09-23 09:09:59 - context        - INFO     -  --> Join us on Discord! https://discord.gg/rwRvwyK
2024-09-23 09:09:59 - context        - INFO     -  --> Docs: https://docs.vantage6.ai
2024-09-23 09:09:59 - context        - INFO     -  --> Blog: https://vantage6.ai
2024-09-23 09:09:59 - context        - INFO     - ------------------------------------------------------------
2024-09-23 09:09:59 - context        - INFO     - Cite us!
2024-09-23 09:09:59 - context        - INFO     - If you publish your findings obtained using vantage6,
2024-09-23 09:09:59 - context        - INFO     - please cite the proper sources as mentioned in:
2024-09-23 09:09:59 - context        - INFO     - https://vantage6.ai/vantage6/references
2024-09-23 09:09:59 - context        - INFO     - ------------------------------------------------------------
2024-09-23 09:09:59 - context        - INFO     - Started application vantage6
2024-09-23 09:09:59 - context        - INFO     - Current working directory is '/'
2024-09-23 09:09:59 - context        - INFO     - Successfully loaded configuration from '/mnt/config/node1.yaml'
2024-09-23 09:09:59 - context        - INFO     - Logging to '/mnt/log/node_user.log'
2024-09-23 09:09:59 - context        - INFO     - Common package version '4.7.1'
2024-09-23 09:09:59 - context        - INFO     - vantage6 version '4.7.1'
2024-09-23 09:09:59 - context        - INFO     - Node package version '4.7.1'
2024-09-23 09:09:59 - node           - INFO     - Connecting server: https://server.workshop.vantage6.ai:443/api
2024-09-23 09:09:59 - node           - DEBUG    - Authenticating
2024-09-23 09:09:59 - common         - DEBUG    - Authenticating node...
2024-09-23 09:10:03 - common         - INFO     - Successfully authenticated
2024-09-23 09:10:03 - common         - DEBUG    - Making request: GET | https://server.workshop.vantage6.ai:443/api/node/268 | None
2024-09-23 09:10:04 - common         - DEBUG    - Making request: GET | https://server.workshop.vantage6.ai:443/api/organization/170 | None
2024-09-23 09:10:05 - node           - INFO     - Node name: eScience-UvA - eScience
2024-09-23 09:10:05 - common         - DEBUG    - Making request: GET | https://server.workshop.vantage6.ai:443/api/collaboration/93 | None
2024-09-23 09:10:05 - node           - WARNING  - Disabling encryption!
2024-09-23 09:10:05 - node           - INFO     - Setting up proxy server
2024-09-23 09:10:05 - node           - INFO     - Starting proxyserver at 'proxyserver:80'
2024-09-23 09:10:05 - node           - INFO     - Setting up VPN client container
2024-09-23 09:10:05 - vpn_manager    - INFO     - Updating VPN images...
2024-09-23 09:10:05 - vpn_manager    - DEBUG    - Pulling Alpine image
2024-09-23 09:10:06 - addons         - DEBUG    - Succeeded to pull image harbor2.vantage6.ai/infrastructure/alpine:4.7
2024-09-23 09:10:06 - vpn_manager    - DEBUG    - Pulling VPN client image
2024-09-23 09:10:06 - addons         - DEBUG    - Succeeded to pull image harbor2.vantage6.ai/infrastructure/vpn-client:4.7
2024-09-23 09:10:06 - vpn_manager    - DEBUG    - Pulling network config image
2024-09-23 09:10:06 - addons         - DEBUG    - Succeeded to pull image harbor2.vantage6.ai/infrastructure/vpn-configurator:4.7
2024-09-23 09:10:06 - vpn_manager    - INFO     - Done updating VPN images
2024-09-23 09:10:06 - vpn_manager    - DEBUG    - Used VPN images:
2024-09-23 09:10:06 - vpn_manager    - DEBUG    -   Alpine: harbor2.vantage6.ai/infrastructure/alpine:4.7
2024-09-23 09:10:06 - vpn_manager    - DEBUG    -   Client: harbor2.vantage6.ai/infrastructure/vpn-client:4.7
2024-09-23 09:10:06 - vpn_manager    - DEBUG    -   Config: harbor2.vantage6.ai/infrastructure/vpn-configurator:4.7
2024-09-23 09:10:06 - node           - WARNING  - VPN subnet is not defined! VPN disabled.
2024-09-23 09:10:06 - node           - INFO     - No SSH tunnels configured
2024-09-23 09:10:06 - node           - INFO     - No squid proxy configured
2024-09-23 09:10:06 - node           - DEBUG    - Setting up the docker manager
2024-09-23 09:10:06 - docker_manager - DEBUG    - Initializing DockerManager
2024-09-23 09:10:06 - docker_manager - WARNING  - No policies on allowed algorithms have been set for this node!
2024-09-23 09:10:06 - docker_manager - WARNING  - This means that all algorithms are allowed to run on this node.
2024-09-23 09:10:06 - docker_manager - INFO     - Copying /mnt/default.csv to /mnt/data
2024-09-23 09:10:06 - docker_manager - INFO     - Copying /mnt/age.csv to /mnt/data
2024-09-23 09:10:06 - docker_manager - DEBUG    - Databases: {'default': {'uri': PosixPath('/mnt/data/default.csv'), 'is_file': True, 'type': 'csv', 'env': {}}, 'age': {'uri': PosixPath('/mnt/data/age.csv'), 'is_file': True, 'type': 'csv', 'env': {}}}
2024-09-23 09:10:06 - node           - DEBUG    - Creating websocket connection with the server
2024-09-23 09:10:06 - node           - INFO     - Connected to host=https://server.workshop.vantage6.ai on port=443
2024-09-23 09:10:06 - node           - DEBUG    - Starting thread to ping the server to notify this node is online.
2024-09-23 09:10:06 - network_man..  - DEBUG    - Connecting vantage6-node1-user to network 'vantage6-node1-user-net'
2024-09-23 09:10:06 - node           - DEBUG    - Start thread for sending messages (results)
2024-09-23 09:10:06 - node           - DEBUG    - Waiting for results to send to the server
2024-09-23 09:10:06 - node           - DEBUG    - Starting thread for incoming messages (tasks)
2024-09-23 09:10:06 - node           - DEBUG    - Listening for incoming messages
2024-09-23 09:10:06 - node           - INFO     - Init complete
2024-09-23 09:10:06 - node           - INFO     - Waiting for new tasks....
2024-09-23 09:10:07 - socket         - INFO     - Websocket connection established
2024-09-23 09:10:07 - socket         - INFO     - (Re)Connected to the /tasks namespace
2024-09-23 09:10:07 - common         - DEBUG    - Making request: GET | https://server.workshop.vantage6.ai:443/api/run | {'state': 'open', 'node_id': 268, 'include': 'task'}
2024-09-23 09:10:07 - socket         - INFO     - Node <eScience-UvA - eScience> joined room <collaboration_93>
2024-09-23 09:10:07 - socket         - INFO     - Node <eScience-UvA - eScience> joined room <collaboration_93_organization_170>
2024-09-23 09:10:08 - node           - DEBUG    - task_results: []
2024-09-23 09:10:08 - node           - INFO     - Received 0 tasks
2024-09-23 09:10:08 - socket         - DEBUG    - Tasks synced again with the server...
2024-09-23 09:10:08 - node           - DEBUG    - Sharing node configuration: {'encryption': False, 'allowed_algorithms': 'all', 'database_labels': ['default', 'age'], 'database_types': {'db_type_default': 'csv', 'db_type_age': 'csv'}, 'database_columns': {'columns_default': ['age'], 'columns_age': ['age']}}
From there, you can see the running status of the node, the connection to the server, the databases, the websocket connection, and the incoming tasks.
Challenge 2: Start a node and watch the logs
- Start the node
node2you created in last exercise using thev6 node startcommand. - Watch the logs of the node using the
v6 node attach --name node2command. Observe the logs and see if the node is connected to server successfully. - How do you know if the node is connected to the server without checking the logs?
- You can use vantage6 UI to check if a node is online or not. There
are two ways:
- Click on the
Nodestab in the administration page, then click on the tab of the node you want to check. You will see the node status isOnlineif the node is connected to the server successfully. - Or click on the
Collaborationstab in the administration page, then click on the tab of the collaboration you want to check. You will see the Nodes section, if nodes are in green color, it means they are online, otherwise they are in red color with a messageOffline.
- Click on the
Stop a node
To stop a running node, you can run the command:
then it will ask you which node you want to stop:
after you choose the node, it will print out the following messages:
Update the API key of your node
Reset API key for a node via the vantage6 UI
If you want to reset the API key for a node, you can do so by following these steps:
- Login to the vantage6 UI.
- Click on the
Nodestab in the administration page. - Click on the tab of the node you want to reset the API key for in the list of nodes.
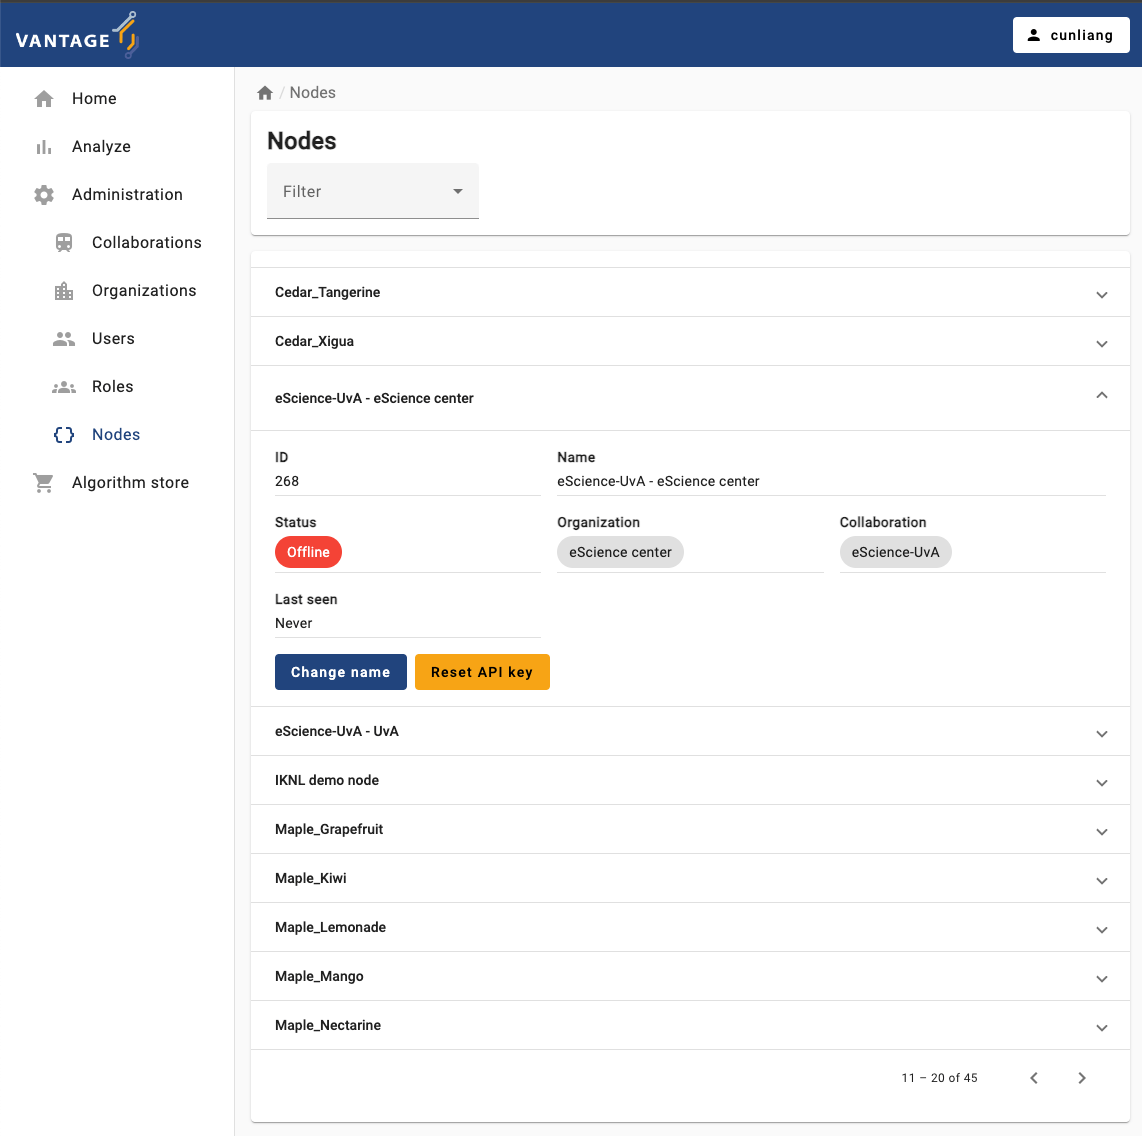
- Click on the
Reset API keybutton.- You may see a dialog box asking you to download the new API key.
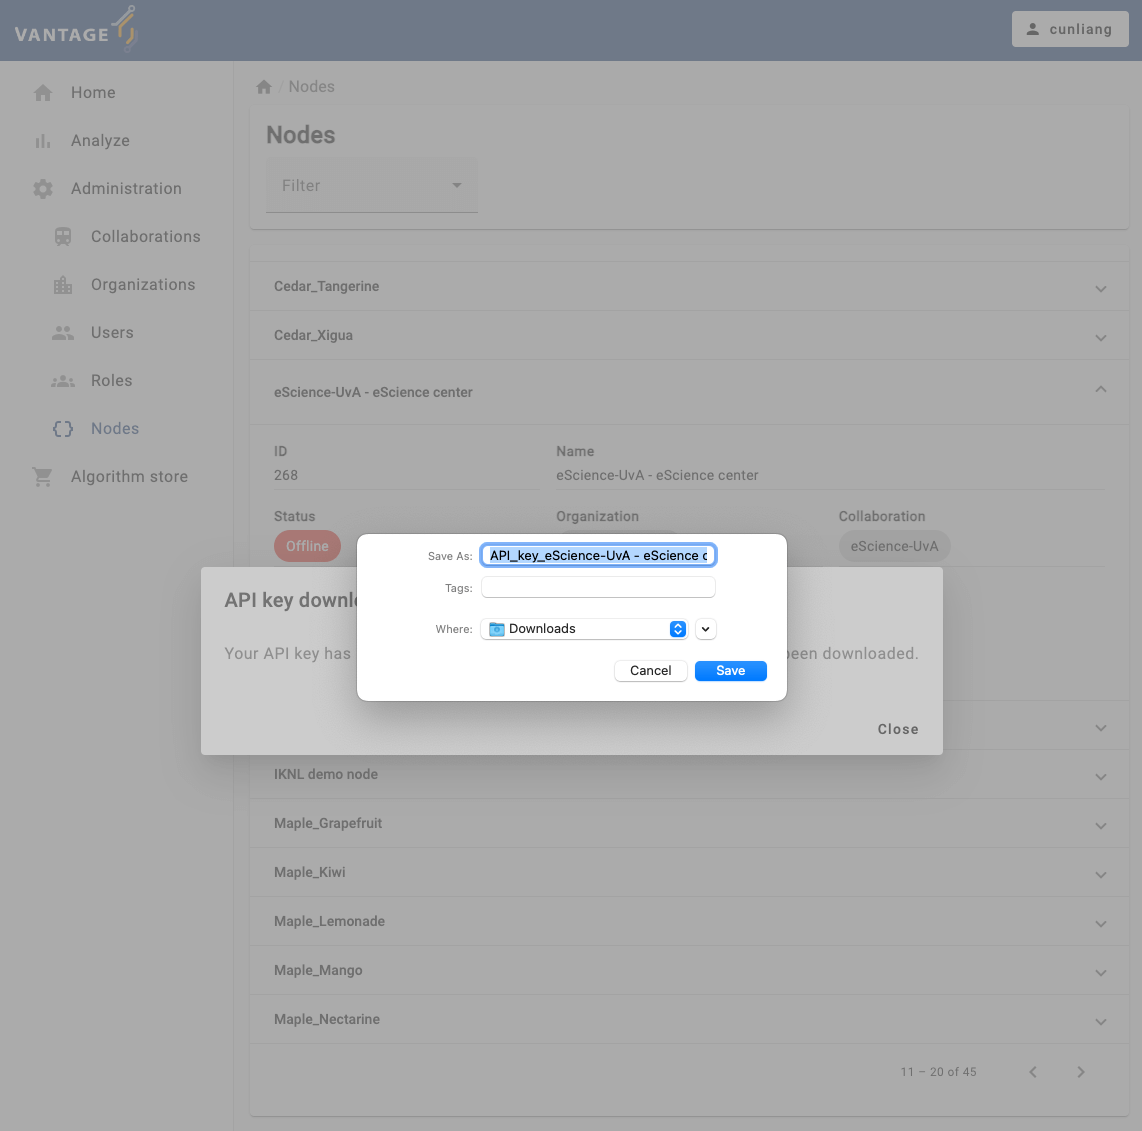
You will see a message:
API key download
Your API key has been reset. Please read your new key in the file that has been downloaded.
You can open the downloaded text file to copy the new API key. Next, you’ll use it to update your node configuration.
Update API key in the node configuration file
You can use v6 CLI to update the API key of a node. For that, you can run the command:
then it will ask you which node you want to update the API key of:
after you choose the node, it will ask you to enter the new API key, then you can paste the new API key you just copied from the downloaded file:
BASH
? Select the configuration you want to use: node1
? Please enter your new API key: the-new-api-key
2024-09-23 11:30:33 - context        - INFO     - ---------------------------------------------
2024-09-23 11:30:33 - context        - INFO     -  Welcome to
2024-09-23 11:30:33 - context        - INFO     -                   _                     __
2024-09-23 11:30:33 - context        - INFO     -                  | |                   / /
2024-09-23 11:30:33 - context        - INFO     - __   ____ _ _ __ | |_ __ _  __ _  ___ / /_
2024-09-23 11:30:33 - context        - INFO     - \ \ / / _` | '_ \| __/ _` |/ _` |/ _ \ '_ \
2024-09-23 11:30:33 - context        - INFO     -  \ V / (_| | | | | || (_| | (_| |  __/ (_) |
2024-09-23 11:30:33 - context        - INFO     -   \_/ \__,_|_| |_|\__\__,_|\__, |\___|\___/
2024-09-23 11:30:33 - context        - INFO     -                             __/ |
2024-09-23 11:30:33 - context        - INFO     -                            |___/
2024-09-23 11:30:33 - context        - INFO     -
2024-09-23 11:30:33 - context        - INFO     -  --> Join us on Discord! https://discord.gg/rwRvwyK
2024-09-23 11:30:33 - context        - INFO     -  --> Docs: https://docs.vantage6.ai
2024-09-23 11:30:33 - context        - INFO     -  --> Blog: https://vantage6.ai
2024-09-23 11:30:33 - context        - INFO     - ------------------------------------------------------------
2024-09-23 11:30:33 - context        - INFO     - Cite us!
2024-09-23 11:30:33 - context        - INFO     - If you publish your findings obtained using vantage6,
2024-09-23 11:30:33 - context        - INFO     - please cite the proper sources as mentioned in:
2024-09-23 11:30:33 - context        - INFO     - https://vantage6.ai/vantage6/references
2024-09-23 11:30:33 - context        - INFO     - ------------------------------------------------------------
2024-09-23 11:30:33 - context        - INFO     - Started application vantage6
2024-09-23 11:30:33 - context        - INFO     - Current working directory is '***'
2024-09-23 11:30:33 - context        - INFO     - Successfully loaded configuration from '***/vantage6/node/node1.yaml'
2024-09-23 11:30:33 - context        - INFO     - Logging to '***/vantage6/node/node1/node_user.log'
2024-09-23 11:30:33 - context        - INFO     - Common package version '4.7.1'
2024-09-23 11:30:33 - context        - INFO     - vantage6 version '4.7.1'
[info ] - Your new API key has been uploaded to the config file ***/vantage6/node/node1.yaml.
When you finish the process, the node configuration file will be updated with the new API key.
To make the new API key effective, you need to restart the node by
running the command v6 node stop and then
v6 node start.
Challenge 3: Update the API key of a node
- Update the API key of the node
node1, WITHOUT using thev6 node set-api-keycommand. - How do you verify that the new API key is effective?
- We can update the API key in the configuration file:
- Run the
v6 node filescommand to locate the configuration file. - Open the configuration file and write the new API key in the
api_keyfield. - Stop the node with the
v6 node stopcommand. - Restart the node with the
v6 node startcommand.
- In order to verify the effectiveness of the API key change, we can restart the node with active logging:
In the log, we have to look for the node authentication message:
Run a task on the nodes
Now start all your nodes and go to the vantage6 UI to create a new task for your nodes.
Challenge 4: Run a task on the nodes
Start all your nodes node1 and node2 and go
to the vantage6 UI to run a new task for your nodes using the
Average algorithm for the age data.
- Run a centralized task on the nodes.
- Run a federated task on the nodes.
v6 server and
v6 algorithm-store commands
In this lesson we have focussed on the CLI commands to manage the
vantage6 node. Note that the commands to manage the server
(v6 server) and the algorithm store
(v6 algorithm-store) are similar to the ones presented for
the node. However, they are less commonly used for production scenarios
where administrators often prefer to deploy via nginx or
docker compose. We will not cover those commands in this
course.
- Install the vantage6 CLI package by running
pip install vantage6. - Use the
v6 --helpcommand to see the available commands of the vantage6 CLI. - Use the
v6 nodecommand to manage the vantage6 node instances. - Use the
v6 node newcommand to create a new node configuration. - Use the
v6 node startcommand to start a node. - Use the
v6 node attach --name xxxcommand to show the logs of the nodexxx. - Use the
v6 node stopcommand to stop a node. - Use the
v6 node set-api-keycommand to set a new API key of a node. - Use the
v6 node filescommand to check the location of the node configuration file. - The commands similar to the ones presented for the node are also
available for
v6 serverandv6 algorithm-store.